Winter Camp 09

March 5th, 2009 . 0 comments

I’m currently here with several other Blender developers at Winter Camp 09, organised by the Institute of Network Cultures in Amsterdam.

We’re here to discuss and hopefully make some decisions and consensus on the work we’re doing for Blender 2.5, particularly regarding the user interface and new tool/event system. It’s been really promising so far, and we’re agreeing on a great number of things.

A few links:

lighthouse / tornado

January 24th, 2009 . 2 comments

Last week I went to see a few sessions of the 2009 Sydney festival called films afloat, a free outdoor film screening on a massive screen floating out in the middle of Darling Harbour. Before the main feature (each night a different movie, with a soundtrack played by an improvising live band!) they showed the finalists of the animation competition, which our short ‘Lighthouse’ was included in. We ended up coming second in the competition, which was nice, but even better just to have it shown outdoors in front of a few thousand people in such a great atmosphere.

At work we also published a project we finished late last year, which was our first production use of the volume rendering tools I’ve been working on. It’s just a couple of shots, produced for an internal corporate video involving a hallucination sequence where a worker gets ripped out of his cubicle by a tornado. It’s a bit silly, and may not be the greatest vfx shot known to man, but it was fun to do, and good to give the rendering tools a good hammering in a practical context. There’s a bit more info about the process in this blenderartists thread.

Radiohead / point density

January 11th, 2009 . 9 comments

I’d heard before about Radiohead’s House of Cards video, made entirely from 3D laser scan data. Yesterday I found out that some of the point cloud data files were made available to download from Google under a creative commons license.

So I did a little test reading it into Blender with a quickie Python script, and rendered it as a volume, using the ‘point density’ texture, in the sim_physics branch. You can

download the .blend file including the script.


news

November 30th, 2008 . 5 comments

It’s getting to the end of the year and things are getting busy. There’s been plenty on at work – quite a few projects have been running concurrent for a while, including a new Bridgestone gecko spot that’s out now, and the still in-progress project I’ve been working on the volume rendering for.

We’ve been getting around a bit too, four of us headed down to Melbourne in October to attend the first ‘Melbourne Blender Society‘ meeting. We gave an informal presentation about some of our work, much of it involving character setups, and then headed out for some ‘beer r&d’, meeting some fun and interesting people (Hi Glenn, this only took a month ;).

Jez, James and I also gave a presentation at the Digital Media Festival in Sydney , on the topic of ‘an open source pipeline’, talking about our use of Blender in production. Some of the parts that interested the audience of mostly 3d/vfx/design people most were existing features like the library linking system, but also the ability for us to do custom development, such as contracting the ocean sim tools for the Lighthouse project. I also showed off some work on the volume rendering too 😉

The volume rendering tools are at the point now where it’s going to give acceptable results given the timeframe. Although it’s still lacking a bit in some areas right now that aren’t a priority for this job, for my purpose it’s going pretty well. Raul has now picked up this code to work with too, and I’m looking forward to seeing his implementation of voxel data sets. A couple of the improvements I’ve made since last time posting include:

  • Particle rendering

    There’s now a new 3d texture called ‘point density’ that retrieves density and colour information from point clouds (either particle systems or object vertices). It uses a BVH tree to store the points, and looks up what points are within a given radius of the shaded point, with various falloffs. It also has a few methods for simple turbulence, adding directed noise to give the impression of more detail. It’s also possible to use this texture on solid surfaces too.

  • Light Cache

    In order to speed up rendering of self-shaded volumes, there’s a new option to precalculate the shading at the start of the render into a voxel grid, which gets interpolated later to generate lighting information, rather than shading the lamps directly. You could make the analogy to raytraced occlusion vs approximate occlusion in Blender – it often gives around a 3x speed up with similar quality.

  • A few other small things such as internal and external shadows, anisotropic scattering with various phase functions, integration with the sun/sky system, and various fixes.

Kajimba‘s also rolling along nicely. We’ve released several more animation tests with audio (and plenty more sill in the pipe), the voices for the first episode have been recorded, and the animator dudes have started working on lipsync tests to begin some animation on ep 1 soon.

And on it goes…

Blender Conference 2008

October 25th, 2008 . 8 comments

As much as I’d love to be at the 2008 Blender Conference in Amsterdam, as I have in some years past, it’s quite prohibitive and difficult, especially with work. Luckily, there is a live feed to watch the presentations online. One presentation that I’ve watched in its entirety so far is by William Reynish: The evolution of Blenders User Interface. I’ve met William a few times, and we’ve chatted about these issues a long time ago, and his presentation brilliantly elucidates so many things that I’ve been thinking about, ranting about and very patiently waiting to start working on, for several years. Do yourself a favour and watch it now!

These issues are not theoretical niceties, they’re serious problems that I (and the other people I work with) run up against day by day in our production work. They’re hurdles in Blender’s workflow that not only make Blender slower and clumsier to work in than it could potentially be, but also harder for professional users of other software to come up to speed in Blender quickly, which is important for us too. I’m sure William has come to the same conclusions after his experience working on Big Buck Bunny. Anyway, I want to offer my full support behind William’s presentation, and during the work on Blender 2.5 I’d like to do whatever I can to help make that happen. I hope you all can give these ideas the same support too.


volume rendering updates

September 24th, 2008 . 15 comments

Luckily, I’ve been able to work full time for a while on the volume rendering code, as part of budgeted R&D time at work. Since Monday I’ve made a lot of progress, and have been committing code to the ‘sim_physics‘ SVN branch, maintained by Daniel Genrich.

I’m actually quite surprised at how quickly I’ve managed to come this far, I guess I can attribute it partially to the clear design of pbrt, which I’ve used as reference for the fundamental structure. So far, I’m getting close to having it at a reasonably well integrated state with the rest of the renderer. Perhaps tomorrow it’ll be at a state where particles could be rendered by just instancing spheres at each point.


Some of the changes so far include:

  • Fixed the shading bug I mentioned earlier, due to a limitation in the raytrace engine (before, after). Now shading works quite nicely.
  • Added colour emission – as well as the overall ‘Emit:’ slider to control

    overall emission strength, there’s also a colour swatch for the volume to emit

    that colour. This can also be textured, using ‘Emit Col’ in the map to panel.

  • Cleaned up and clarified volume texture mapping, fixing the offsets and scaling, and adding ‘Local’ (similar to Orco) mapping, alongside Object and Global coordinates
  • Added colour absorption – rather than a single absorption value to control how much light is absorbed as it travels through a volume, there’s now an additional absorption colour. This is used to absorb different R/G/B components of light at different amounts. For example, if a white light shines on a volume which absorbs green and blue

    components, the volume will appear red. This colour can also be textured.

  • Refactored the previous volume texturing code to be more efficient
  • Worked on integrating volume materials into the rest of the renderer. Now other objects (and sky) correctly render if they’re partially inside or behind a volume. Previously all other objects were ignored, and volumes just rendered on black. The colour of surfaces inside or behind the volume gets correctly attenuated by the density of the volume in between – i.e. thicker volumes will block the light coming from behind.
  • Enabled rendering with the camera inside the volume.

Correct shading and absorption

Shading with two lamps

Shading within clouds density texture

Textured (with colour ramp) emission colour

Example of various absorption colours

Textured absorption colour

Objects and sky inside and behind volume

Shaded concave volume

Camera passing through a volume

Kajimba

September 18th, 2008 . 7 comments

This week, it’s been very exciting to publicly show a project that’s in the works for some time: Kajimba. It’s a CG animated comedy series for mature audiences (though not pornographic!) about a ragtag bunch of animals in the distant Australian outback, hanging out at the only pub for thousands of km. Kajimba has been in progress in-house at ProMotion since before I started working there, but in the last year has finally gathered momentum, going from what was originally a concept, some sketches and a few early character models, to now, where we’ve done a good few minutes of rendered character animation tests, and production on the first (out of 26 slated) 5 minute episode has begun.

At the present, it’s self-funded by the studio, so it’s taking time to develop alongside other paid work. The benefit of this is that we can do what we want, which working out great so far. It’s not certain how the episodes will be delivered, whether it gets picked up by a TV network or if we’ll try something different. At this stage, we’ll concentrate on getting a first episode done and see how we go from there. It’s a great concept, very aussie, and very exciting. We should hopefully have some first voice recordings happening soon along with more and more images and animation tests coming down the wire so keep an eye on the blog and check on our progress!


Volume Rendering

September 10th, 2008 . 18 comments

Some of you may be aware of the great work done so far by Raul Fernandez Hernandez (“farsthary“) concerning volume rendering in Blender. For those not in the know, rendering volumes of participating media as opposed to solid surfaces, has many uses such as realistically rendering smoke, fire, clouds or fog, or even with more complicated techniques, rendering volume density data such as MRI scans for medical visfualisation.

Raul completed a fair bit already, implementing this in Blender. Living in Cuba, where he doesn’t enjoy the same kind of connectivity as in many other parts of the world, it’s been difficult for him to participate in development and share his work. A few weeks ago, he emailed me asking for help with his code, and with maintaining it publicly. I promised I’d at least have a look at the first patch he was able to release and see what I thought.

In some spare time, I had a go at taking apart his patch. Unfortunately, it became clear that it wasn’t suitable for immediate inclusion. It was Raul’s first time coding in Blender (or perhaps in 3D) and due to this, wasn’t aware of some of the techniques available to make his life easier, or of how to integrate the code as cleanly as it could or should be. On top of this, working alone without being able to easily communicate with other developers, he’d been working hard on adding more and more features and options on top of a structure which I think could be done differently and a lot cleaner at a fundamental level. This led to some quite complicated code, and a tricky UI for artists to interact with.

I proposed to Raul that I start again from scratch, simpler and more cleanly integrated and then merge in what I could later down the track, step by step, to which he was very enthusiastic. He excitedly agreed with my invitation to work closely on integrating things like the simulation work he’s been doing, once a new structure is well defined. Recently in a few days off from work I sat down and started fresh, based on the approach in Physically Based Rendering.

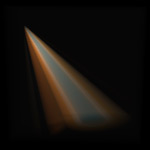
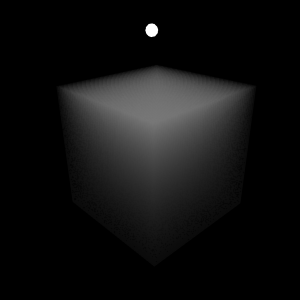
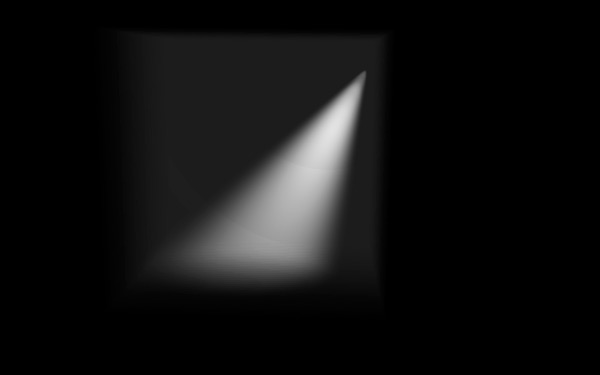
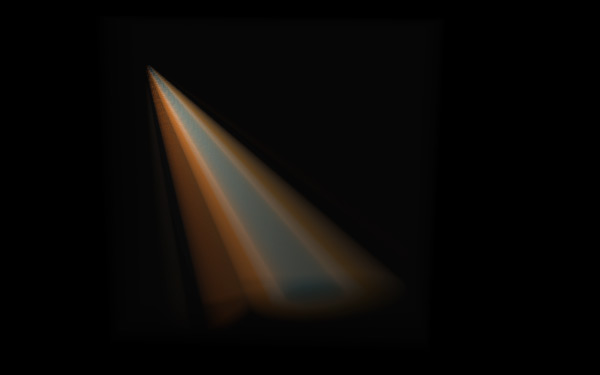
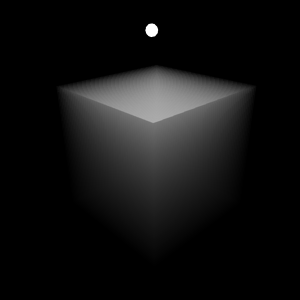
Spot light in constant density volume

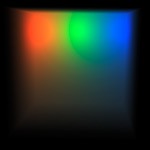
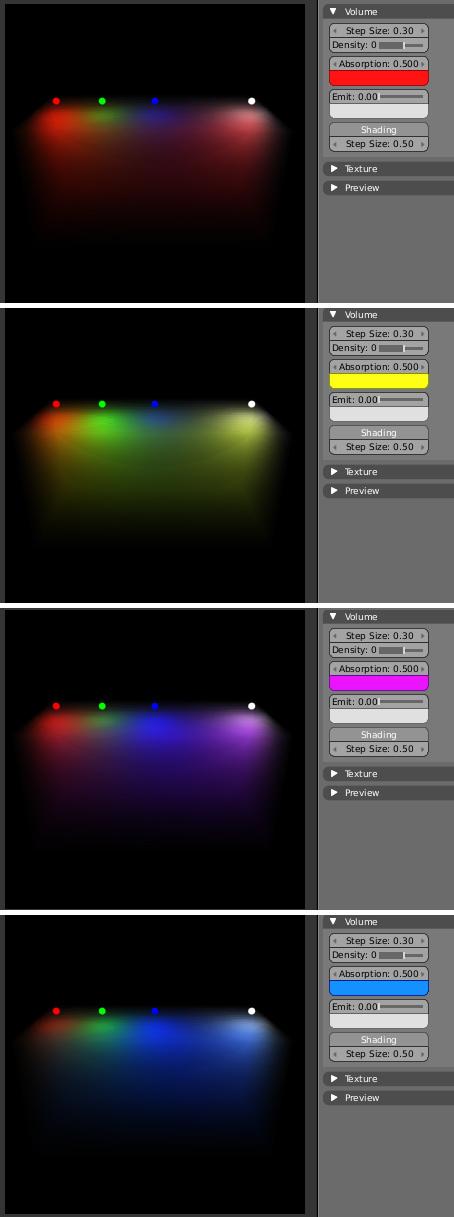
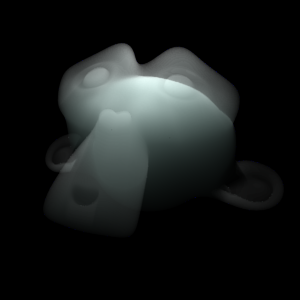
3 point lights in constant density volume

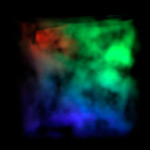
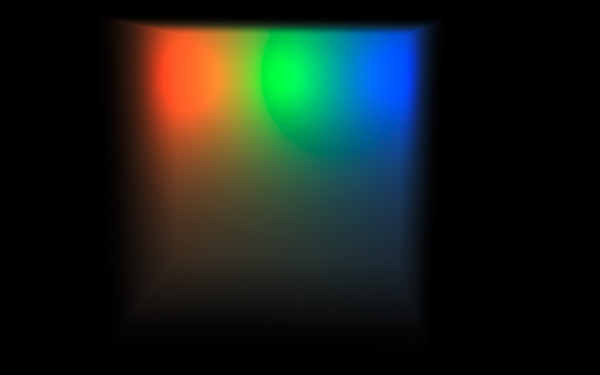
Textured spot light in constant density volume


So far I’ve got it working reasonably well with about 90% new code. Unlike before, it’s following a physically based approach, with a region of constant or variable density, calculating light emission, absorption, and single scattering from lamps. My aim is to get a simple, easier to use version ready, optimised for practical rendering tasks like smoke, fire or clouds. Once this is working perfectly, integrated cleanly and completely, and working in Blender SVN, further down the track we can think about adding some of the less common capabilities like isosurfaces or volume data sets.

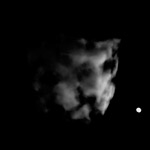
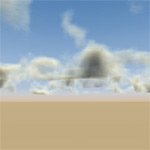
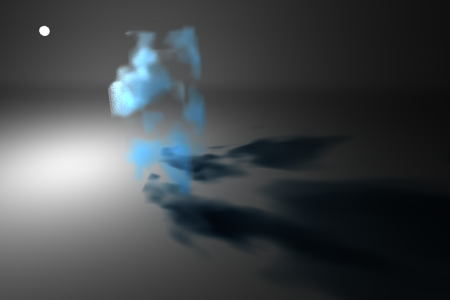
Cloud texture controlling density, lighting from volume emission only

Cloud texture controlling density, 3 lights with single scattering

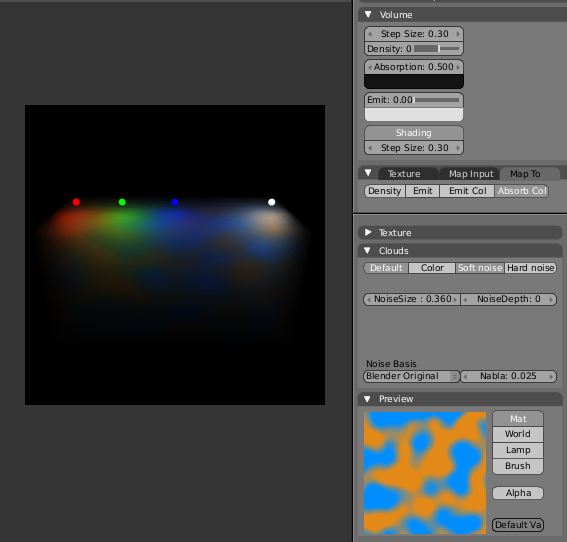
Spherical blend textures controlling density, directional light with single scattering


There’s still a lot to do – there’s one remaining bug with single scattering I must try and track down, and then there’s a lot of integration work to do, calculating alpha, rendering volumes in front of solid surfaces etc. Before too long I’ll commit this to the newly created ‘sim/physics’ SVN branch and work on it in there. I don’t know how long it will be before Raul is able to start working on this again too, since he’s under some horrible circumstances after hurricane Gustav ravaged Cuba. At least in the near term, I’ll be able to continue poking away at this in SVN.

Some things on my want-to-do list include:

  • Plenty of optimisations
  • Adaptive sampling – step size and/or early termination
  • Alternative anisotropic phase (scattering) functions such as Mie or Henyey-Greenstein
  • Wavelength (R/G/B) dependent absorption, so light gets tinted as it travels through a medium
  • An optimised bounding box or sphere ‘volume region’ primitive, which could be much faster than raytracing meshes as is done now
  • Multiple layers deep ray intersections, to enable concave meshes or volume meshes in front of volume meshes
  • Rendering Blender’s particle systems, either by creating spherical ‘puffs’ at each particle as Afterburner or PyroCluster do, or perhaps by estimating particle density with a kd-tree or such

I hope to be able to provide some more updates on this before too long!

Linear Workflow

September 5th, 2008 . 2 comments

I recently posted on blenderartists.org in response to some questions and misunderstanding about gamma correction and ‘linear workflow’ in 3D rendering.

I thought I’d re-post it here, since there are a lot of misconceptions about this topic around.


Much of the value of a linear workflow comes with rendering colour textures. But as the name suggests, it’s a workflow, that has to be kept in mind throughout the entire process.

The issue is that when you make a texture, either painting it in Photoshop to look good on your screen, or as a JPEG from a camera, that image is made to look good under gamma corrected conditions, usually gamma 2.2. So as you paint that texture, you’re looking at it on a monitor that’s already gamma 2.2, which is not linear. This is all well and good, displays are already gamma corrected to better fit the range of human vision.

The problem starts though, when you use those colour maps as textures in a renderer. When you’re doing lighting calculations in a renderer, those take place in a linear colour space. i.e – add 2x as much light, and it gets 2x brighter. The problem is that your colour textures aren’t like that if they’re at gamma 2.2. What’s double in numerical pixel values in gamma 2.2 is not necessarily twice brighter perceptually. So this breaks the idea of taking brightness information from a colour texture and using it in lighting/shading calculations, especially if you’re doing multiple light bounces off textured surfaces.

So what a linear workflow means, is that you take those colour textures, and convert them back to linear space before rendering, then you gamma correct/tonemap the final result back to gamma space (for viewing on a monitor). Now the lighting calculations work accurately, however it does change things – because the textures get darkened in the midtones the image can look darker, so you need to change the lighting setup, etc. etc. Hence, workflow – it’s something you need to have on all throughout the process, not just applying gamma at the end.

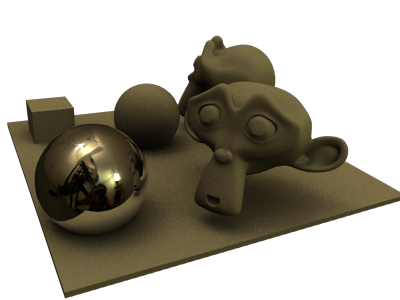
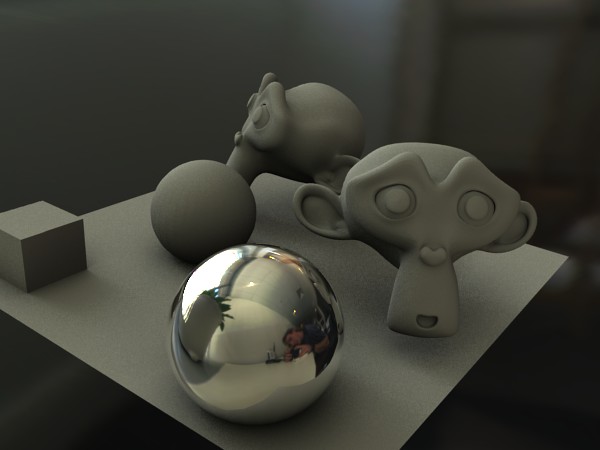
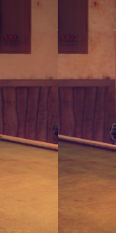
I wrote some code a little while ago that did it all automatically in the shading process, applying inverse gamma correction for colour textures before rendering, then corrected back to gamma 2.2 afterwards. After adjusting lights from old scenes to have the same appearance, it gave some nice results. It seemed to bring out a lot more detail in the textures, which got washed out before (left is normal, right is with linear workflow). It’s not finished though, it also needs to adjust the lights in the preview render, and inverse gamma correct colour swatches too so the flat colours you pick in the UI are also linear.

Further references:

Striderite Slimers

September 4th, 2008 . 0 comments

We recently finished a 15 second commercial for Striderite Slimers a new childrens’ shoe made in conjunction with Nickelodeon in the US. It involved heavy use of fluid sim, with all the sim, animation and rendering done in Blender.

You can see some images and video at our website below, and also a zoomed out openGL view of the big splash. The project has also been featured on It’s Art Magazine, and BlenderNation.


Olympic Appearance

August 17th, 2008 . 10 comments

While watching the Beijing olympic opening ceremony last week, I got a bit of a surprise. A couple of months ago at work, we had a quick project come in to model, texture and render turnarounds of a few Chinese artifacts from a reference photo each. Mine wasn’t a big job and was pretty fast to do, using some texture projections with the UV Project modifier and cloning and cleanup in Photoshop.

We’d had a hunch it may be for something related to graphics in the olympics, but I was taken aback to see it blown up on the enormous LED screen during the opening ceremony. I wonder how many million people saw it – too bad this tiny part wasn’t something a bit more impressive! 🙂 Still, not bad for the novelty at least! Below is the original render, and a grab of how it appeared on screen.


blatant self-promotion

July 22nd, 2008 . 8 comments

A couple of nice things have come up lately that I’m quite proud to be able to mention. I was at the Museum of Contemporary Art on the weekend checking out part of the 2008 Biennale of Sydney. Browsing in the museum shop afterwards, I came across a book with a familiar sounding title – Design and the Elastic Mind, published by MoMA (that’s right, the Museum of Modern Art in New York). I knew Elephants Dream had been featured in the web component of this exhibition a little while back, but had no idea there was a book. So, I took a look inside and there it was, published art, with our names in the index too!

Another nice piece of news came in from Exopolis yesterday, mentioning that Lighthouse had appeared in Shoot magazine’s Summer 2008 top 10 visual effects and animation chart, coming in at 2nd place! Because of this, there’s also an article on the project too. Not only is this very flattering to see in itself, but especially looking at some of the other names below us, such as The Mill, Framestore, Digital Domain and Psyop, all huge studios with great reputations, it’s very satisfying to see that our little team is in such esteemed company.


Lighthouse

July 1st, 2008 . 4 comments

Last week, Lighthouse was released online, a short film project that our studio had been working on for the last couple of months. The full details about the project, with the movie itself viewable online, high res stills, and production breakdown video are available in the post we made at CGTalk, so please do go and check it out there. The response so far has been great, we got featured on the front page of said website, and have had several thousand views with very encouraging comments.

Although it was a bit tricky for me, being the bottleneck responsible for the texturing, shading, lighting, comping, with a couple of weeks of late nights towards the end of the project, it was quite enjoyable overall. Exopolis, our clients in LA, were fun guys to work with and gave us a lot of room to work without being micromanaged. It’s interesting that Liberty Mutual (the insurance firm who commissioned the work, in the form of the ‘responsibility project‘) are now spending their marketing dollars on producing themed art, rather than usual commercials. It’s certainly the kind of work I’d love to be doing more of.


Noise constraint

June 3rd, 2008 . 5 comments

Since there’s no analogue built in to Blender at the present, during our last animation project, I knocked together a very simple PyConstraint: Noise. It’s made to fulfill similar tasks as the Noise controller in 3DS Max, giving random (yet deterministic) animation to an object. We used it for things like like applying it to a lamp for randomised shadow flicker from a candle flame, or on a large scale, subtle swaying movements of a ship on the ocean.

There’s a thread with instructions on blenderartists.org, and the goodies themselves here:

some new rendering things

November 21st, 2007 . 24 comments

Had some r&d time lately, at work and at home. Here’s what I’m up to:

I’d like to get the node system hooked up to raytracing, allowing one to do advanced shading techniques but without being forced to do it with the dodgy ‘mixing materials’ method. As a starting point, I’ve made a reflection node – the bonus is that the node system makes it a lot easier to texturise inputs. Thanks to some hints from Alfredo de Greef, I’ve added an additional input to rotate the anisotropic direction (with black being 0° and white being 360°). This can give some nice effects:

I’d also like to include a refract node, an AO node, and/or also a general purpose raytrace node that takes a *vector and *solid angle as input, and gives as output: *whether it intersected something (average of samples in solid angle) *distance to intersection, *shaded colour of intersected face, etc.

At the studio we might possibly be doing a project that would involve vfx/image based lighting. It’s Christmas soon and there are plenty of shiny balls around, so I got a nice one and we’ve started making some HDRI light probes. Blender’s brute force method of doing image based lighting by evenly sampling the hemisphere in AO gives reasonable results, but it’s too slow for animation.

I’ve been looking into a technique originally devised for realtime graphics, based on the paper An Efficient Representation for Irradiance Environment Maps. It works by storing the irradiance in the map in spherical harmonics coefficients and only supports lambert diffuse shading, but it’s extremely fast, and can give quite nice results especially combined with it in an AO source, or even just humble buffer shadows. I’ve done some tests so far with Paul Debevec’s free light probes


gathering dust

September 27th, 2007 . 1 comment

Three months since the last post here, I think that deserves either an award or a slap on the wrist. Things have been busy, and I’m sorry to say I’ve been much more inclined to spend my free time in other ways than writing here.

Work has been through alternating bursts of slow r&d time and busy projects, the latter being where I find myself at the moment. We’re using Blender more and more, currently we’re doing an immensely complex animation of around 12,000 frames, without much time to do it in. It’s the first project of this scale that we’ve done in Blender as a team, and although it’s a lot to manage and keep track of, it’s been pretty good.

Blender’s linked library / group / scene / action system has been great, and much easier than they were doing previously for similar projects in Max. I’m keeping a master scene file that contains everything, however most of the models/rigs in there are coming in from linked groups in external files, that any of the others can add to and update. Not only does this keep things easy to modify and ripple through, but it allows us to distribute the workload well between all of us by segmenting the files finely. I’m afraid I can’t give much more detailed info at this moment, perhaps some time in the future.


The work I was doing on glossy reflections/refractions was finished a while ago, the end product being much more robust and advanced than in that last post, and also including all sorts of extra nice things like using QMC sampling for ray shadows and ambient occlusion. These changes are now officially in Blender’s SVN repository and will be in the next major release, however I’ve already been making use of it extensively. This not overly interesting illustration I did for a magazine cover made it into the Australian Creative magazine gallery and uses a lot of anisotropic blurry reflection.

I made some nice docs online here: Glossy Reflection/Refraction / Raytraced Soft Shadows / QMC Sampling. Thanks again to Brecht van Lommel and Alfredo de Greef who both gave me some great guidance and help along the way, and I look forward to doing more work in this area in the future. A few other changes I’ve made recently have been extra lamp falloff options, including custom curve, enabling different curve tilt interpolation types, and I’ve also committed a bunch of ex-tuhopuu UI related work to the ‘imagebrowser’ branch, to work on separately in there until I can find the time to finish it up and bring to the main Blender SVN trunk.

But life goes on…