A couple of days ago, I was experimenting with unsharp masks in Blender’s compositor when I came across an interesting paper by Thomas Luft, Carsten Colditz, and Oliver Deussen, Image Enhancement by Unsharp Masking the Depth Buffer. The paper describes a number of image manipulations that can be done by finding areas where there are sharp discontinuities in depth, one of which is quite useful as a way to fake an ambient occlusion effect in post.
Unsharp mask is a popular way of sharpening images, which generally gives much better results and flexibility than simple convolution filters. It may not be widely known, but it’s actually a wet darkroom technique, and is very easy to recreate with some simple blurring and blending. Unsharp mask finds areas of high local contrast by comparing the original image to a blurred version of itself, checks where it differs the most, then uses this mask to enhance constrast in those areas, usually in the luminance channel. The blur radius determines the size, or frequency of features that will be found.
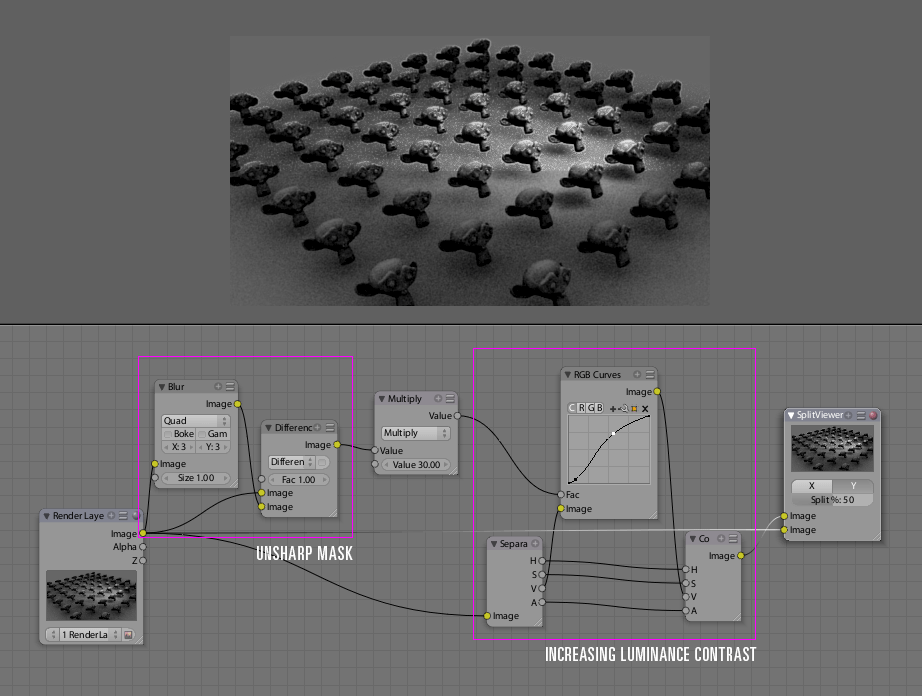
This is quite simple to rig up in the compositor, below is an example with a deliberately grainy and blurry render to clearly show the effect of the unsharp mask.
Now that I’ve got an unsharp mask, it’s easy enough to follow through and look at implementing some of the techniques mentioned in the paper. One that interests me the most is where they use the depth buffer to give a kind of ‘drop shadow’ behind foreground objects, using the unsharp mask to find discontinuities and and mask foreground/background. This can be used like a fake, post-process ambient occlusion. With a low radius, it can be used to act like a dirt shader, darkening cracks and wrinkles, and with a higher radius it can act more subtly on larger features.
Below is an example of using this fake AO technique. I didn’t actually use this on the Waiting in the Basement image, but the model is a nice test case. I start by finding the creases and corners from the depth channel using the unsharp mask, then I do some tweaks to the intensity since what comes out of the unsharp mask isn’t immediately useful by itself, and doesn’t cover all the areas I want to darken. Because it’s using a non-antialiased Z buffer, I do some small blurring to the mask at the end to make it a bit smoother, and then use that mask to darken the image slightly, giving the detail shadows.
Note that I’m using the Min and Max options on the Map Value nodes to clamp the channel to between 0.0 and 1.0 before blurring. Since the channels are all float values, giving a range greater than 0-1 can make the blur nodes work in strange ways. The effect is much clearer on the full size image, especially around the collar and folds in the face, so click to check it out. Here’s the .blend file (2.43 RC+ required)

Very interesting read. The link explaining the USM filter was particularly enlightening.
Thanks for these links you’ve been posting, I really find them useful.
And having a Blender Specific post is even better.
— Rui —
cheers, folks!
Very interesting and useful. Thanks for sharing!
sorry, but i dont see any diffrence in that example picture, can u put some red circles around the spot where we have to look?
Hey Matt!
This is simply Amazing!(like all your works)!
Thanks for sharing!
notice:
i cannot Download the Blend file or better i cannot open the blend file from this “Sharp mask and AO example blend file!
Whats wrong?
error message:”this zip commpressed folder is demaged”
can you post me a Link that works or post me the Blend file as Email Attachment?
Thanks
seeYa
all the best
Billy
ysvry: Look around the creases in the skin on the left side of the face, and around the collar. It’s a subtle ‘dirt shading’ effect, adding shadows in cracks and creases.
Billy: Woops, I think there was a problem with my internet when I uploaded it the first time, I’ve just re-uploaded it to the same location and I hope it works now!
THANK YOU VERY MUCH!!!
I may be wrong, but it seems to me that the unsharp mask for instance in Ps works a little bit different than in your nodesetup. The main difference seems to be, that one take the blured version of the INVERTED picture and subtract it form the orginal one, not the difference of the origional blured and the original one.
Example file
http://uploader.polorix.net//files/30/unsharp_mask.blend
Have been reading your weblog retrospectively. It amazes me how useful your documented experiments are. This is yet another handy hint. It also makes me see what an asset you are to the Blender community by going back and seeing what you’ve coded, knowing that there are features in more recent versions of the program that are all thanks to you.
This is an incredible, quick and easy AO implementation. The simplicity and speed of the operation lends itself very well to real-time applications and games. As a post-process effect applied to the depth buffer you could get some really nice results.
Since this is an old page, some of the images are broken. Would it be possible for you to fix the broken links so I could study this method of yours?
Best regards,
NP