I’ve pre-ordered an Oculus Rift DK2 for some experimentation, and in the meantime have been looking into OpenFrameworks as a convenient way of creating things for use in VR. There’s a huge range of addons, including ofxOculusRift which looks like it will make things pretty easy.
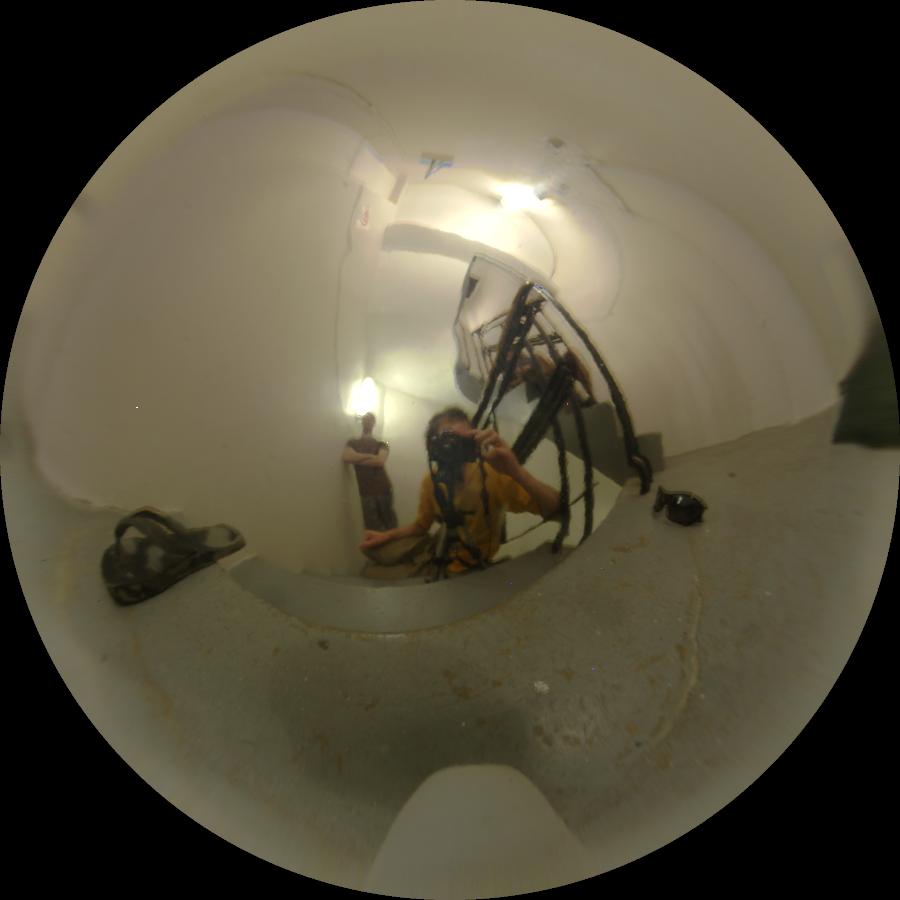
While waiting for the headset to be shipped, I’ve been thinking about what input devices that I could use with it. A wacom tablet is an interesting candidate for VR because of its 1:1 mapping of movement in physical space to virtual space, which increases presence compared to something less direct like a game pad. I did some searching to see if any OF addons for tablet data already existed, with only a few traces and broken links to show for it. I’d added support for tablets before in Blender’s game engine many years ago, so I ended up having a go at putting something together myself.
It currently only supports OS X since that’s what I’m using. I only have an old Wacom Intuos 2 which doesn’t have any of the fancy newer touch strips to connect up, but basic stuff like pressure and tilt works pretty well, and it’s good enough to get a bare minimum of sensor data out to reconstruct a position and orientation in 3D space. While I have a bit of experience with tablets before, I’ve barely done much in OF or obj-c, so any contributions or fixes are very welcome.
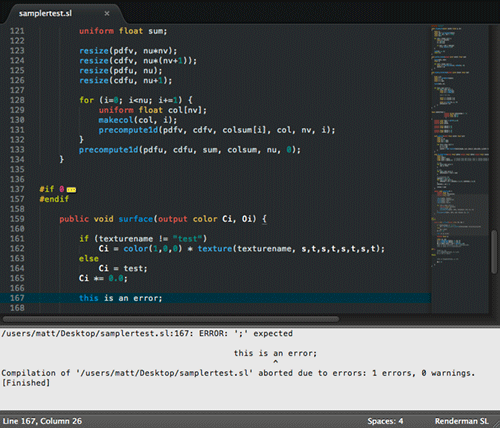
Today I tried out the super nice Sublime Text editor for writing Renderman shaders, and liked it enough to buy a license immediately. Looks like it’s made here in Sydney too!
To improve the workflow a bit, I made a little language pack for Renderman SL. It includes a syntax package for highlighting, which mostly inherits the C syntax, but adds a few extras for SL data types (eg. color, vector) and some global shader variables. It also contains a ‘build system’ for shaderdl, 3Delight’s shader compiler, which lets you compile a shader quickly with a hotkey. It should be very easy to copy that for other renderers/compilers too. It’s all pretty basic, but does enough for my needs.
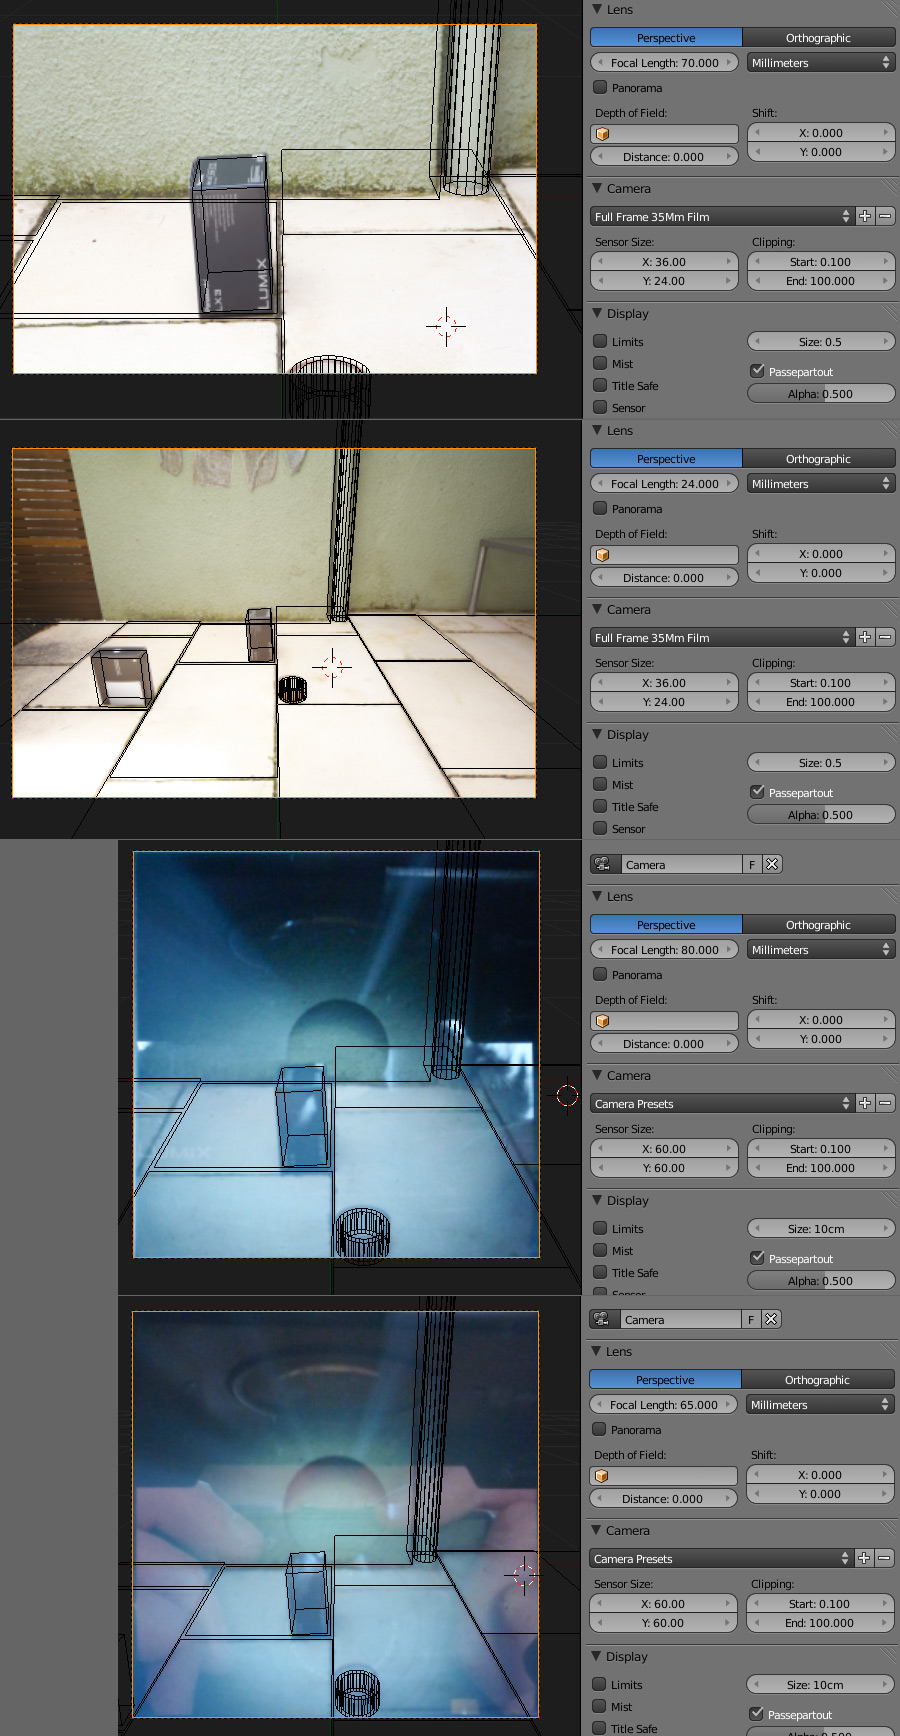
Today I finally got around to fixing Blender’s weird camera to more closely resemble real-world counterparts. Previously Blender’s camera was hardcoded to use a sensor aperture width of 32mm, which doesn’t reflect any commonly available real-world camera sensor/film size. In turn, this meant the focal length (mm) for the lens didn’t resemble any real-world lenses whatsoever. It was pretty misleading when trying to intuitively choose lenses based on photographic experience, and also makes it a lot harder to match live-action footage.
I’ve made a patch to allow specifying a sensor size, along with a handful of common presets – easy to add some more. This first version isn’t 100% correct in that it doesn’t modify the FOV due to focus (in reality, the extension of the lens elements due to focusing slightly alters the FOV), but this can be added pretty easily as an option later. It’s also deriving the apparent FOV purely based on the horizontal aperture width, options for vertical/diagonal may be possible to add later, but would need to check how the renderer works with varying frame resolution aspect ratios.
I thought it would be fun to do some real-world tests, so I quickly set up a very rough set in my backyard to see if a virtual set in Blender would match up. The setup and measurements were very very dodgy and I didn’t expect it to match perfectly. I shot with two cameras – first a 5D Mk II with a 12-24mm on 24mm and a 24-70mm on 70mm. To compound the un-scientific sketchiness of the test even further I tried again with my 6×6 Mamiya C330f TLR with 65mm and 80mm lenses, using a compact digital camera shooting the ground glass focusing screen (yes, too cheap to spend film on this). Given all this, I was pretty surprised to see that with a bit of tweaking it looks like it’s doing the right thing.
Anyway, the patch is up on the blender patch tracker, would be good to get some testing first before trying to commit, especially since I’m not sure how it should interact with the game engine either.
As of last week, I’ve decided it’s time to finish up with my full time Blender development contract and move on to new things. It’s been 8 months now since I started with this, pretty close to the first 9 month target/budget, so it’s not too unexpected. I’m happy to have done my part in bringing Blender 2.5 closer up to production ready status over the last several months, and this decision doesn’t necessarily mean I’ll cease contributing, but it will be the end of it for now in this professional capacity. It’s been an interesting time, I’ve had some new experiences, but it’s not what I really want to be doing with myself in the long term – I’m itching to get back into more regular creative production work!
I think what I’ve learned from this is that while some people are happy programming for programming’s sake, It’s really most interesting for me when it’s directly in service of some artistic goal or creative problem to solve. While I’ve done the work to the best of my professional ability, the last several months of report management and bug fixing (I estimate about ~350 fixed since the start) has been a bit motivationally draining, so it’s a good time for change.
So, what next? I’m looking forward to getting stuck into more freelance work again
(hire me! 😉 as well as developing some new skills in other areas and working on some personal projects. Hopefully more interesting times ahead!
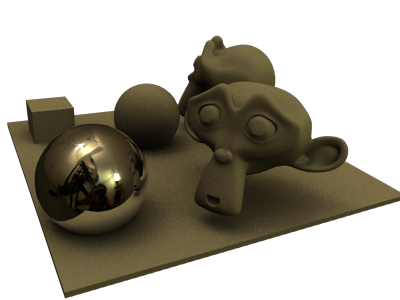
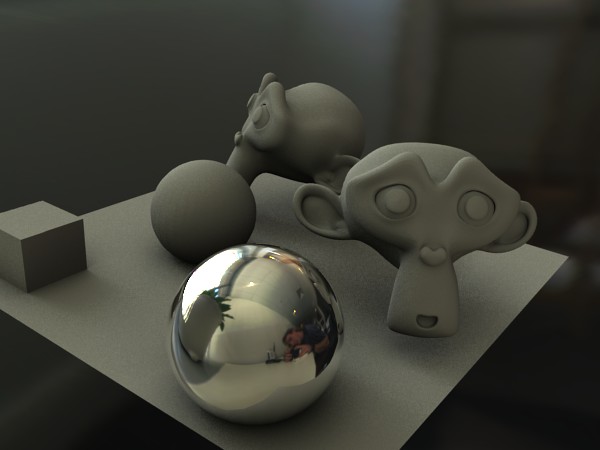
For a little while now I’ve been working in my own time on a renderman connection for Blender 2.5. The new render API, while not fully complete and stable, makes it much easier to connect Blender’s scene data to external renderers, via python.
I’m aware that other people are interested in this topic too, but so far I’ve been doing this for my own use – to get more familiar and experienced with renderman in practice (by diving deeper in head first), and to develop something I’d like to use myself as a lighting/shading artist. I’m also concentrating on the 3Delight renderer at the moment, since it interests me most and provides a free single license.
It’s still quite a work-in-progress, and by no means provides exhaustive support at this point. I’m tackling this from a pragmatic angle, with the priority of implementing things I want to use myself first and making that easy to use rather than trying to supporting the entire rispec from the start. I’ll probably release the code very soon, but I would like to clean it up a little bit first.
Here’s a test I rendered out last night, with a model by my mate Tristan Lock:
Anyway, currently it supports: polygon mesh, subdivision surfaces, uv coordinates, depth of field blur, motion blur, surface/displacement/lightsource shaders with parameters available in blender material properties, simple conversion from blender’s lamps to renderman lightsources, shadow maps, raytraced shadows, built-in indirect lighting and environment lighting using 3Delight’s ‘indirectlight’ and ‘envlight2’ shaders, and shader editing and compilation from the blender text editor.
As some of you may have seen, yesterday during the 2009 Blender conference keynote, Ton Roosendaal announced the addition of another full time blender developer: me! Thanks to the support of a very generous anonymous sponsor, I should be able to survive working from home on Blender development for the next few months.
This came about over the last week or two, so it’s still new for me as well. As far as I’m currently aware, the brief for this project is ‘Get Blender 2.5 ready’. So rather than some of the other things I’ve been working on in my own time such as volume rendering, at least in the near term, this project will involve a fair bit of ui work, fixes, tweaks, cleaning up, attacking the 2.5 todo list, documentation – attacking the main things needed to get the 2.5/2.6 work polished to a professional level.
I also hope to be able to provide support to other developers who are working on other tools, to help polish things for 2.5 where they may not have time to do so themselves. This also includes Brecht and Campbell at the Blender Institute who are busy with Durian – I suspect I’ll be taking on some of their grunt work, so they can concentrate on what’s needed for their production. Hopefully this can alleviate some of the ‘blender open project syndrome’, where features are added quickly to fill a specific need for the team, but aren’t entirely well integrated or fleshed out enough to be fully useful for blender users in general.
So that’s the plan as it stands for now. Depending on how soon these tasks can be done, perhaps there will be time for some other things such as working on python integration related work, render api, or also something I think is desperately needed – design and coding work for a re-written shading/material system. But time will tell!
It’s been a little while since I merged the volume rendering work into Blender 2.5 but I’ve been steadily poking away at it since. Today I committed some lighting features, support for volumes receiving external shadows (raytraced, and quick but more limited shadow mapped) and a new shadow only mode that’s a bit faster than self-shading, good for less dense volumes like fog or wispy smoke:
I’ve also had some behind-the-scenes help in the form of code review and some new features from Alfredo de Greef, which has been great, and last week I bit the bullet and redid part of the shading code. It was previously using a custom method left over from initial experiments that wasn’t entirely physically correct – the shader didn’t conserve energy. In the real world, if more light is scattered out of the volume, towards your eye, there will be less left to keep penetrating through the remainder of the volume, but the previous method didn’t account for this.
In reality this also applies on a wavelength-dependent basis too, if the media is such that the red light is scattered out of the volume (from an initial white light shining on it), all that’s left to continue through the rest of the volume is the inverse of that (roughly cyan). I got to work changing this in the code, but after a long time testing realised it was getting very difficult to control. Most of the time, if you’re making a coloured volume (like the excellent coloured smoke in the Cloudy trailer), you want to be able to just set a colour and be done with it. Doing it by tweaking wavelength dependent absorption and scattering was getting to be a real pain, so I ended up chopping and changing things around.
Now there’s a single physically based ‘scattering’ parameter, controlling the amount of light that’s scattered out of the volume (leaving less to continue through), as well as a ‘transmission colour’ that defines the result colour in the rest of the volume, after out-scattering and absorption. With these settings, by default, the shader works physically correctly. For ease of control though, I also added a ‘reflection’ colour and strength which basically acts as an RGB gain, tinting the out-scattered light. It’s more of a non-physical tweak, but it does make life a fair bit easier. I’ve documented these settings with example renders on the blender wiki.
I’m pretty happy with how it’s working now: physically correct by default, but with the option of changing it for artistic control, and philosophically I think that’s how it should be. One of the many things I dislike about Blender’s current shading system is that it generally starts out incorrect, and you have to really understand what’s going on, and work quite hard in order to make it do the right thing (energy conservation, obeying physical laws, etc.). Not only is this a real pain since you have to go through the same chores every time just to get a decent looking material, but for many people who don’t have a good understanding of how rendering/shading works (or should work!) they’re left with sub-par results since they don’t know what magic buttons to press. You should have to work to break it, not to get just a base level of correctness. In further work I do on shading/rendering, that’s going to be a large motivation, to get things working physically plausible by default, but with the ability to break the rules if the situation requires it.
Here’s a quick screencast showing how to use the voxel data texture to load and render image slices as 3D volumes. It may be a little unclear in this small window, but you can click through to Vimeo to see the HD/fullscreen version. This is using the sim_physics branch in blender SVN, you may be able to find builds for your system on graphicall.org.
Today I committed some new additions to the blender sim_physics branch, making it easier to load up different types of voxel data sets for volume rendering within Blender. The most significant addition is a new ‘Image Sequence’ file format choice in the voxel data texture, which makes it easy to load up image slice sequences as the Z axis of a 3d voxel grid.
There are some other new features and optimisations mentioned in the commit log too. I really hope this helps people involved in medical visualisation/research, if only by providing them a free method for making animations with case data. If you are in the field, I’d love to hear from you.
Made a simple little script last night for testing voxel data loading – it creates vertices of a mesh based on voxel data, if the voxel’s value is above a threshold. The file’s here if you’re interested. The datasets this works with are available here.
I’m working on adding support for these, and also image sequences ( 3D voxel resolution = image X * image Y * number of frames), in Blender’s voxeldata texture, which should be interesting for people wanting to load up medical data. A preview animation is on vimeo.
I’d heard before about Radiohead’s House of Cards video, made entirely from 3D laser scan data. Yesterday I found out that some of the point cloud data files were made available to download from Google under a creative commons license.
So I did a little test reading it into Blender with a quickie Python script, and rendered it as a volume, using the ‘point density’ texture, in the sim_physics branch. You can
Luckily, I’ve been able to work full time for a while on the volume rendering code, as part of budgeted R&D time at work. Since Monday I’ve made a lot of progress, and have been committing code to the ‘sim_physics‘ SVN branch, maintained by Daniel Genrich.
I’m actually quite surprised at how quickly I’ve managed to come this far, I guess I can attribute it partially to the clear design of pbrt, which I’ve used as reference for the fundamental structure. So far, I’m getting close to having it at a reasonably well integrated state with the rest of the renderer. Perhaps tomorrow it’ll be at a state where particles could be rendered by just instancing spheres at each point.
Some of the changes so far include:
Fixed the shading bug I mentioned earlier, due to a limitation in the raytrace engine (before, after). Now shading works quite nicely.
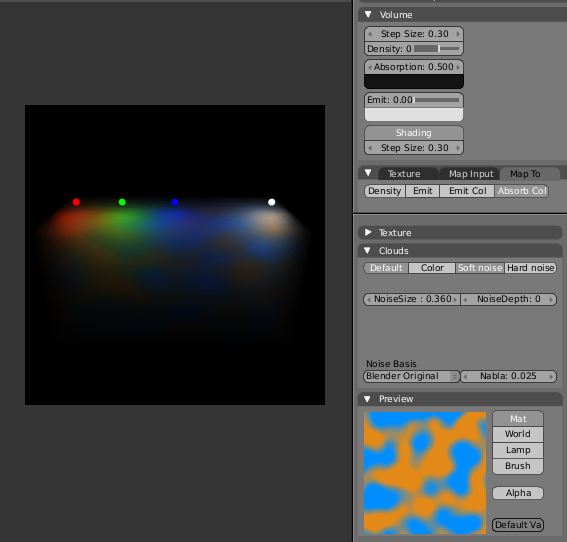
Added colour emission – as well as the overall ‘Emit:’ slider to control
overall emission strength, there’s also a colour swatch for the volume to emit
that colour. This can also be textured, using ‘Emit Col’ in the map to panel.
Cleaned up and clarified volume texture mapping, fixing the offsets and scaling, and adding ‘Local’ (similar to Orco) mapping, alongside Object and Global coordinates
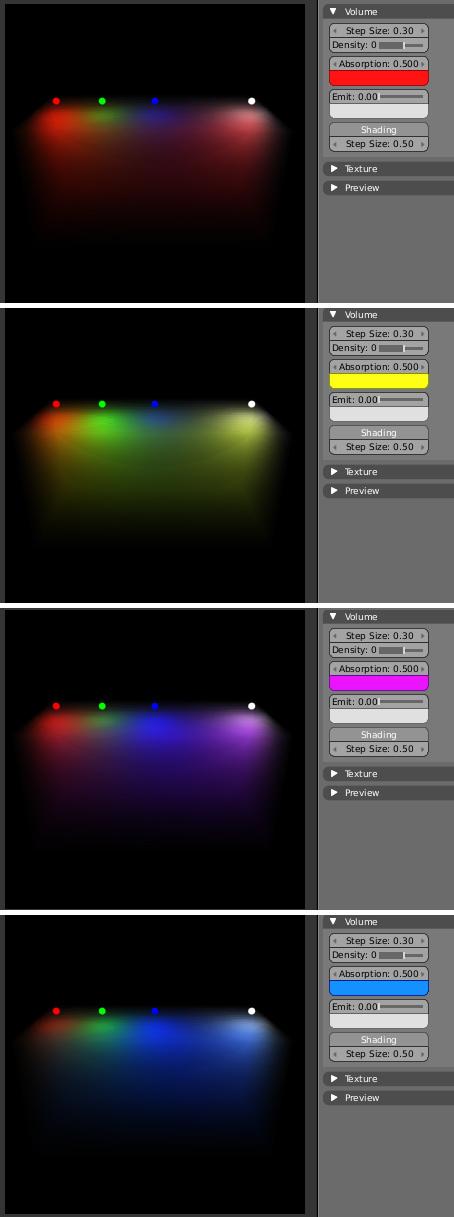
Added colour absorption – rather than a single absorption value to control how much light is absorbed as it travels through a volume, there’s now an additional absorption colour. This is used to absorb different R/G/B components of light at different amounts. For example, if a white light shines on a volume which absorbs green and blue
components, the volume will appear red. This colour can also be textured.
Refactored the previous volume texturing code to be more efficient
Worked on integrating volume materials into the rest of the renderer. Now other objects (and sky) correctly render if they’re partially inside or behind a volume. Previously all other objects were ignored, and volumes just rendered on black. The colour of surfaces inside or behind the volume gets correctly attenuated by the density of the volume in between – i.e. thicker volumes will block the light coming from behind.
Enabled rendering with the camera inside the volume.
Some of you may be aware of the great work done so far by Raul Fernandez Hernandez (“farsthary“) concerning volume rendering in Blender. For those not in the know, rendering volumes of participating media as opposed to solid surfaces, has many uses such as realistically rendering smoke, fire, clouds or fog, or even with more complicated techniques, rendering volume density data such as MRI scans for medical visfualisation.
Raul completed a fair bit already, implementing this in Blender. Living in Cuba, where he doesn’t enjoy the same kind of connectivity as in many other parts of the world, it’s been difficult for him to participate in development and share his work. A few weeks ago, he emailed me asking for help with his code, and with maintaining it publicly. I promised I’d at least have a look at the first patch he was able to release and see what I thought.
In some spare time, I had a go at taking apart his patch. Unfortunately, it became clear that it wasn’t suitable for immediate inclusion. It was Raul’s first time coding in Blender (or perhaps in 3D) and due to this, wasn’t aware of some of the techniques available to make his life easier, or of how to integrate the code as cleanly as it could or should be. On top of this, working alone without being able to easily communicate with other developers, he’d been working hard on adding more and more features and options on top of a structure which I think could be done differently and a lot cleaner at a fundamental level. This led to some quite complicated code, and a tricky UI for artists to interact with.
I proposed to Raul that I start again from scratch, simpler and more cleanly integrated and then merge in what I could later down the track, step by step, to which he was very enthusiastic. He excitedly agreed with my invitation to work closely on integrating things like the simulation work he’s been doing, once a new structure is well defined. Recently in a few days off from work I sat down and started fresh, based on the approach in Physically Based Rendering.
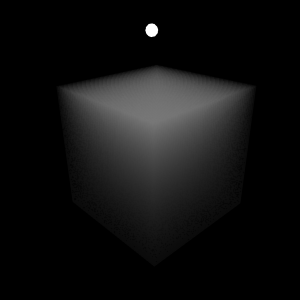
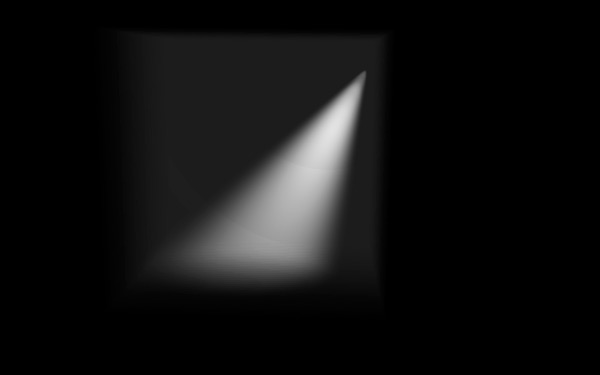
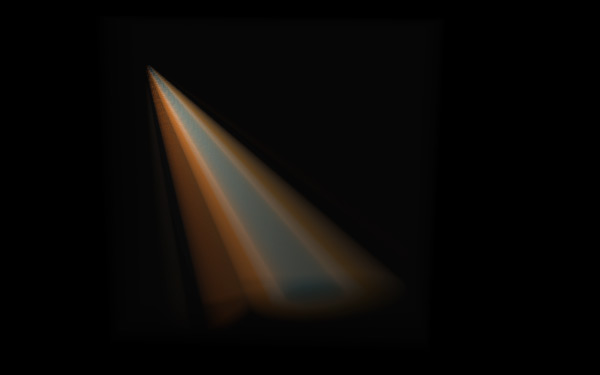
Spot light in constant density volume
3 point lights in constant density volume
Textured spot light in constant density volume
So far I’ve got it working reasonably well with about 90% new code. Unlike before, it’s following a physically based approach, with a region of constant or variable density, calculating light emission, absorption, and single scattering from lamps. My aim is to get a simple, easier to use version ready, optimised for practical rendering tasks like smoke, fire or clouds. Once this is working perfectly, integrated cleanly and completely, and working in Blender SVN, further down the track we can think about adding some of the less common capabilities like isosurfaces or volume data sets.
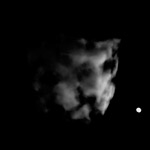
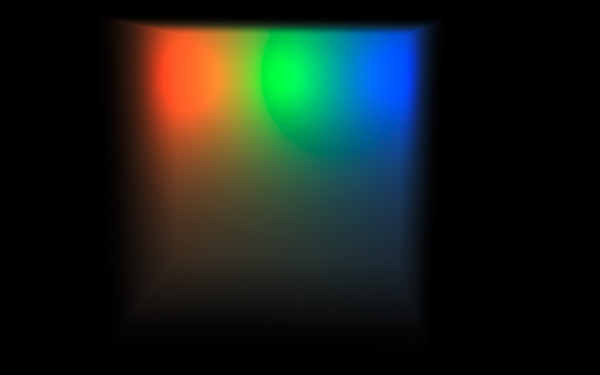
Cloud texture controlling density, lighting from volume emission only
Cloud texture controlling density, 3 lights with single scattering
Spherical blend textures controlling density, directional light with single scattering
There’s still a lot to do – there’s one remaining bug with single scattering I must try and track down, and then there’s a lot of integration work to do, calculating alpha, rendering volumes in front of solid surfaces etc. Before too long I’ll commit this to the newly created ‘sim/physics’ SVN branch and work on it in there. I don’t know how long it will be before Raul is able to start working on this again too, since he’s under some horrible circumstances after hurricane Gustav ravaged Cuba. At least in the near term, I’ll be able to continue poking away at this in SVN.
Some things on my want-to-do list include:
Plenty of optimisations
Adaptive sampling – step size and/or early termination
Alternative anisotropic phase (scattering) functions such as Mie or Henyey-Greenstein
Wavelength (R/G/B) dependent absorption, so light gets tinted as it travels through a medium
An optimised bounding box or sphere ‘volume region’ primitive, which could be much faster than raytracing meshes as is done now
Multiple layers deep ray intersections, to enable concave meshes or volume meshes in front of volume meshes
Rendering Blender’s particle systems, either by creating spherical ‘puffs’ at each particle as Afterburner or PyroCluster do, or perhaps by estimating particle density with a kd-tree or such
I hope to be able to provide some more updates on this before too long!
I recently posted on blenderartists.org in response to some questions and misunderstanding about gamma correction and ‘linear workflow’ in 3D rendering.
I thought I’d re-post it here, since there are a lot of misconceptions about this topic around.
Much of the value of a linear workflow comes with rendering colour textures. But as the name suggests, it’s a workflow, that has to be kept in mind throughout the entire process.
The issue is that when you make a texture, either painting it in Photoshop to look good on your screen, or as a JPEG from a camera, that image is made to look good under gamma corrected conditions, usually gamma 2.2. So as you paint that texture, you’re looking at it on a monitor that’s already gamma 2.2, which is not linear. This is all well and good, displays are already gamma corrected to better fit the range of human vision.
The problem starts though, when you use those colour maps as textures in a renderer. When you’re doing lighting calculations in a renderer, those take place in a linear colour space. i.e – add 2x as much light, and it gets 2x brighter. The problem is that your colour textures aren’t like that if they’re at gamma 2.2. What’s double in numerical pixel values in gamma 2.2 is not necessarily twice brighter perceptually. So this breaks the idea of taking brightness information from a colour texture and using it in lighting/shading calculations, especially if you’re doing multiple light bounces off textured surfaces.
So what a linear workflow means, is that you take those colour textures, and convert them back to linear space before rendering, then you gamma correct/tonemap the final result back to gamma space (for viewing on a monitor). Now the lighting calculations work accurately, however it does change things – because the textures get darkened in the midtones the image can look darker, so you need to change the lighting setup, etc. etc. Hence, workflow – it’s something you need to have on all throughout the process, not just applying gamma at the end.
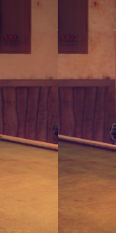
I wrote some code a little while ago that did it all automatically in the shading process, applying inverse gamma correction for colour textures before rendering, then corrected back to gamma 2.2 afterwards. After adjusting lights from old scenes to have the same appearance, it gave some nice results. It seemed to bring out a lot more detail in the textures, which got washed out before (left is normal, right is with linear workflow). It’s not finished though, it also needs to adjust the lights in the preview render, and inverse gamma correct colour swatches too so the flat colours you pick in the UI are also linear.
Since there’s no analogue built in to Blender at the present, during our last animation project, I knocked together a very simple PyConstraint: Noise. It’s made to fulfill similar tasks as the Noise controller in 3DS Max, giving random (yet deterministic) animation to an object. We used it for things like like applying it to a lamp for randomised shadow flicker from a candle flame, or on a large scale, subtle swaying movements of a ship on the ocean.
There’s a thread with instructions on blenderartists.org, and the goodies themselves here:
Had some r&d time lately, at work and at home. Here’s what I’m up to:
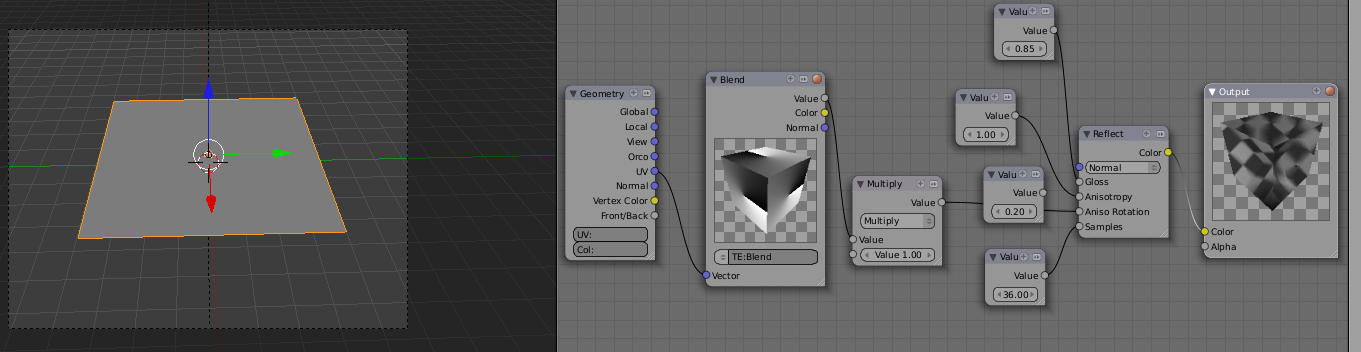
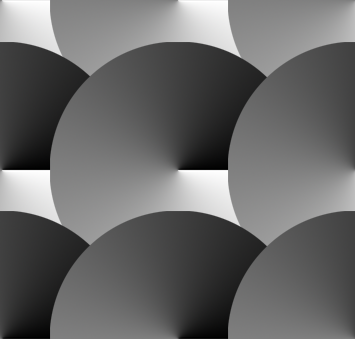
I’d like to get the node system hooked up to raytracing, allowing one to do advanced shading techniques but without being forced to do it with the dodgy ‘mixing materials’ method. As a starting point, I’ve made a reflection node – the bonus is that the node system makes it a lot easier to texturise inputs. Thanks to some hints from Alfredo de Greef, I’ve added an additional input to rotate the anisotropic direction (with black being 0° and white being 360°). This can give some nice effects:
Weird sphere (using a clouds texture for aniso rotation)
I’d also like to include a refract node, an AO node, and/or also a general purpose raytrace node that takes a *vector and *solid angle as input, and gives as output: *whether it intersected something (average of samples in solid angle) *distance to intersection, *shaded colour of intersected face, etc.
At the studio we might possibly be doing a project that would involve vfx/image based lighting. It’s Christmas soon and there are plenty of shiny balls around, so I got a nice one and we’ve started making some HDRIlight probes. Blender’s brute force method of doing image based lighting by evenly sampling the hemisphere in AO givesreasonableresults, but it’s too slow for animation.
I’ve been looking into a technique originally devised for realtime graphics, based on the paper An Efficient Representation for Irradiance Environment Maps. It works by storing the irradiance in the map in spherical harmonics coefficients and only supports lambert diffuse shading, but it’s extremely fast, and can give quite nice results especially combined with it in an AO source, or even just humble buffer shadows. I’ve done some tests so far with Paul Debevec’s free light probes
Rather than shoehorning it into AO, I’ve so far got a separate Image Based Lighting panel with this in it, and perhaps some other kinds of importance sampling methods later on.


 I wrote some code a little while ago that did it all automatically in the shading process, applying inverse gamma correction for colour textures before rendering, then corrected back to gamma 2.2 afterwards. After adjusting lights from old scenes to have the same appearance, it gave some nice results. It seemed to bring out a lot more detail in the textures, which got washed out before (left is normal, right is with linear workflow). It’s not finished though, it also needs to adjust the lights in the preview render, and inverse gamma correct colour swatches too so the flat colours you pick in the UI are also linear.