September 27th, 2007 .
Three months since the last post here, I think that deserves either an award or a slap on the wrist. Things have been busy, and I’m sorry to say I’ve been much more inclined to spend my free time in other ways than writing here.
Work has been through alternating bursts of slow r&d time and busy projects, the latter being where I find myself at the moment. We’re using Blender more and more, currently we’re doing an immensely complex animation of around 12,000 frames, without much time to do it in. It’s the first project of this scale that we’ve done in Blender as a team, and although it’s a lot to manage and keep track of, it’s been pretty good.
Blender’s linked library / group / scene / action system has been great, and much easier than they were doing previously for similar projects in Max. I’m keeping a master scene file that contains everything, however most of the models/rigs in there are coming in from linked groups in external files, that any of the others can add to and update. Not only does this keep things easy to modify and ripple through, but it allows us to distribute the workload well between all of us by segmenting the files finely. I’m afraid I can’t give much more detailed info at this moment, perhaps some time in the future.
The work I was doing on glossy reflections/refractions was finished a while ago, the end product being much more robust and advanced than in that last post, and also including all sorts of extra nice things like using QMC sampling for ray shadows and ambient occlusion. These changes are now officially in Blender’s SVN repository and will be in the next major release, however I’ve already been making use of it extensively. This not overly interesting illustration I did for a magazine cover made it into the Australian Creative magazine gallery and uses a lot of anisotropic blurry reflection.
I made some nice docs online here: Glossy Reflection/Refraction / Raytraced Soft Shadows / QMC Sampling. Thanks again to Brecht van Lommel and Alfredo de Greef who both gave me some great guidance and help along the way, and I look forward to doing more work in this area in the future. A few other changes I’ve made recently have been extra lamp falloff options, including custom curve, enabling different curve tilt interpolation types, and I’ve also committed a bunch of ex-tuhopuu UI related work to the ‘imagebrowser’ branch, to work on separately in there until I can find the time to finish it up and bring to the main Blender SVN trunk.
But life goes on…
June 12th, 2007 .
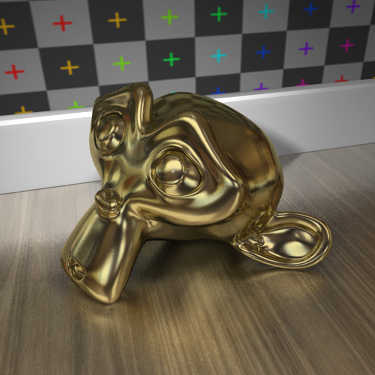
Previously, I’ve grumpily complained that there aren’t enough people interested in working on Blender’s internal renderer, and so it was only fair that I put my money where my mouth is. I mentioned I’d been doing some coding recently, and this is one of the products of that time: blurry/glossy reflections and refractions in Blender’s internal raytracer. It works similarly in concept to yafray’s ‘conetrace’, sampling a cone of rays around the current pixel to get an averaged, blurry result. The sampling is using a quasi-monte carlo Halton sequence, which Brecht van Lommel previously converted into C code in an old experiment of his, and which he gave me a lot of valuable help with – thanks a bunch, Brecht!
This has been quite an interesting (though sometimes frustrating) learning experience for me, diving into a new area of Blender’s source code for me, and learning about many concepts I was previously unfamiliar with. What I’ve got so far probably isn’t perfect, but I’m very happy with the progress made so far. I’ll post again soon about some of the process and things I’ve learned so far, hopefully in a way that people not used to reading technical SIGGRAPH papers will get some value from. But for now, here are some pretty pictures, and a patch! There’s also a bit of discussion in this thread on blenderartists.org, too.
April 22nd, 2007 .
Over the last few weeks at the studio I’ve been working in Blender alongside 3DS Max and I’ve needed to export 3D bezier curve (spline) data between the two apps. There were a few occasions, such as exporting a logo that I’d cleaned up in Blender from a 2D SVG, and also some 3D animation paths that I’d been working on. While there are a lot of options for exporting other data such as meshes, there’s very little around to facilitate transferring 3D curves between packages.
Wavefront OBJ is supposed to support curves as part of the spec, but functionality is extremely limited, and it’s so rarely used that I can’t find any apps or plugins that actually bother to support this area of the spec. I read somewhere that Autodesk’s flagship format FBX is supposed to include curve data, but in my tests, neither Max or Maya would export curves to FBX anyway, so it looked like they just didn’t bother support it. This makes it a no-go regardless of whether the up-and-coming FBX exporter for Blender supports it or not.
So with no ready made options, I tried an idea – I read up on MaxScript and made a Python script for Blender that takes the curve data and and uses it to generate a MaxScript, that when run inside 3DS Max will generate the same curve using the MaxScript API. There are a few advantages to this, there’s a very fine level of control and you can easily export every feature that’s supported by both Blender and Max, without worrying if an intermediary format supports those specific features too. However there are drawbacks – it’s a pain to use since you have to open up and run a MaxScript each time, rather than just importing a file. I’d rather support an existing standard format, so it’s more widely useful for other people than just me.
I’d been using the ColladaMax plugin (based on the open source FCollada library) previously to transfer meshes and cameras between Max and Blender, and after doing some more research it turns out that the COLLADA format supports 3D beziers, as does ColladaMax. Neither of Blender’s two COLLADA exporters do though, and they seemed too complex for me to add curve support to them, so I grabbed the spec and threw together my own simple exporter for curves only. One very annoying issue is that the ColladaMax plugin (and I presume the FCollada library) expects the data formatted in a way that’s incompatible with the spec. Since my goal here is practicality rather than technical purity, this means that rather than it being a generalised COLLADA format exporter, I have to tailor it to FCollada’s non-standard idiosyncracies. I hope the library is updated to conform to the standard in the future, but going by the devs’ response on their forum it doesn’t look like that will happen any time soon. On the positive side, there’s a good chance that my exported COLLADA curves will work with the ColladaMaya plugin as well, opening up another application to work with. If anyone can test this and confirm or deny, that would be very interesting information.
Anyway, the script is available here: export_curves_fcollada-1.1.py. It’s my first exporter and I didn’t use any fancy XML libraries, so it may be rough (although it gets the job done fine). If any Python gurus have ideas on how to improve it, I’d appreciate some hints! I hope this post might help anyone in the same situation as me, in the ever-perilous business of interoperability.
April 12th, 2007 .
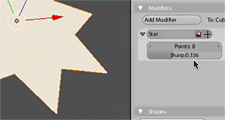
Unfortunately, ever since their inception, modifiers in Blender haven’t let you animate their settings. This is a real pain, and a motivational hurdle against people making lots of nice new modifiers like ‘bend’, ‘twist’, ‘taper’, etc. I really hope this gets addressed soon, but until then, here’s an ugly workaround which will let you animate modifiers using the bPython API.
Basically, you need to create a dummy object that you will animate in a simple manner just so you have an editable Ipo animation curve. From there, use a scriptlink set to onFrameChange to read that Ipo and manually set the modifier paramater you’re interested in to the curve’s value at that point in time. You can download my demo .blend file to see how this works (remember to enable script links in the scripts button tab), or check the demo video below to see an animated Decimate modifier.

March 29th, 2007 .
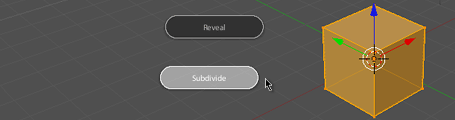
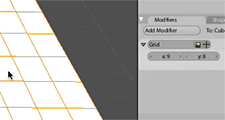
A while ago, I did some experiments that I didn’t really show anyone, a proof of concept for generating non-destructive primitive objects through the modifier stack. One of the things I liked in recent dabblings with 3DS Max is having flexibility and realtime feedback when editing primitive objects, and I thought I’d see if I could make it work in some way in Blender.
The issue of being able to see and tweak the effects of what you’re doing is one of the things that frustrates me most in Blender and I had a bit of a rant about it at last year’s Blender Conference. The topic came up on the bf-funboard list today, so I might as well share it here too:
It’s basically using a modifier at the bottom of the stack to create geometry, which you could then just apply to edit the mesh directly, though that’s not always necessary. This is a bit similar to how Max and Cinema 4D work. When you add an object, you can still manipulate dimensions, resolution, other parameters as a whole. Then if you want to edit it manually, you convert it to an editable mesh with a click.
Above are some screencasts of what I did in Blender. Obviously it’s simple and rough, and if developed further, one could do things to clean it up like disable those generator modifiers from appearing in the menu, change the add object code to apply the generator modifiers automatically, prevent them from being moved up and down the stack, and perhaps add some code that upon pressing Tab, would give you the option to apply that modifier and just convert it to a mesh so you can edit it. In any case, this could serve as some kind of inspiration for something nice in the future…
February 26th, 2007 .
I’m only about a week late, but I might as well do the customary ‘New version released!’ post, so here we go: Blender 2.43 is released! There, that’s better.
A challenge leading up to this release was getting the new website together. I’d pretty much finished the design last year, but it took a while for the admins to get the new server hardware ready, and for Bart to do the work integrating the templates with the CMS, Typo3.
The release provided as good an incentive as any to get the site ready, and thankfully this time with the new hardware, the website was pretty solid, despite it being thoroughly barraged by visitors via various news outlets around the web. There’s still a fair bit to do though, there are plenty of stale old pages in need of a refresh, and the forums and wiki design still needs to be integrated.

As far as the release itself goes, here’s another little list of my favourite contributions this time around.
There’s one bit of disappointing news though. The next release was planned for a while to be a UI-centred Blender 2.5 release, for which Ton would do the huge and time consuming necessary internal upgrades that would allow features that I’ve been working on such as drag and drop in the outliner, a customisable toolbar, and radial menus to be implemented.
It seems now that once again, it has been decided for this work to be postponed in favour of a version 2.44 with smaller projects, meaning that it’s going to be at least May or June before any of these UI projects can be integrated. It’s a lot of difficult work for Ton to do, and it’s up to him to decide what he wants to work on, but it’s also frustrating and demotivating for me, because I’ve been waiting so long, being prevented from working on these sorts of improvements release after release. I offer my apologies to any of you who are waiting too.
February 8th, 2007 .
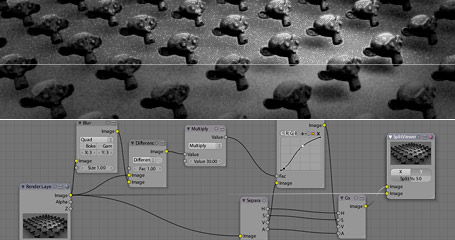
A couple of days ago, I was experimenting with unsharp masks in Blender’s compositor when I came across an interesting paper by Thomas Luft, Carsten Colditz, and Oliver Deussen, Image Enhancement by Unsharp Masking the Depth Buffer. The paper describes a number of image manipulations that can be done by finding areas where there are sharp discontinuities in depth, one of which is quite useful as a way to fake an ambient occlusion effect in post.
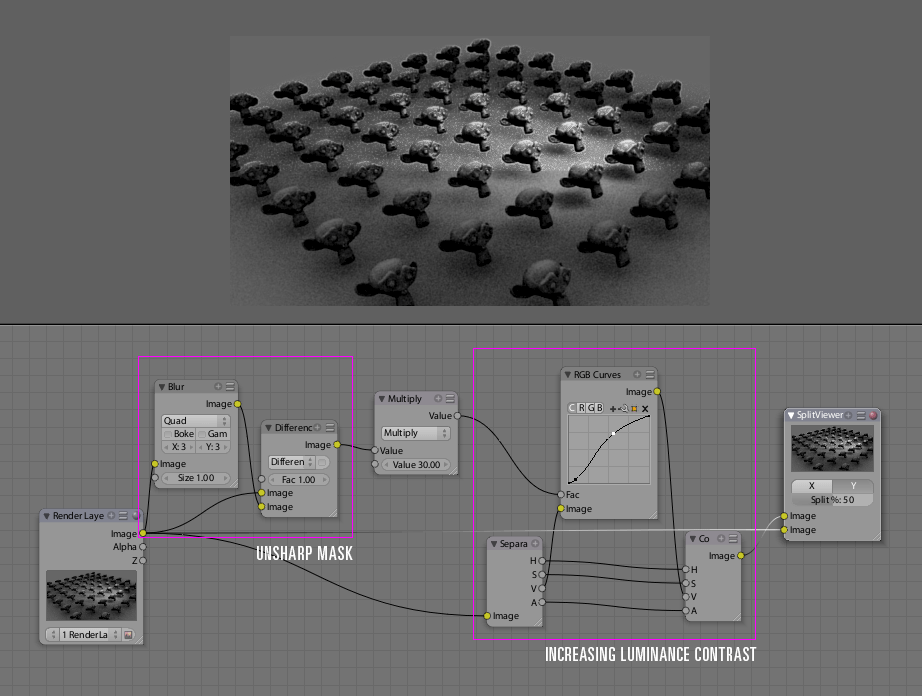
Unsharp mask is a popular way of sharpening images, which generally gives much better results and flexibility than simple convolution filters. It may not be widely known, but it’s actually a wet darkroom technique, and is very easy to recreate with some simple blurring and blending. Unsharp mask finds areas of high local contrast by comparing the original image to a blurred version of itself, checks where it differs the most, then uses this mask to enhance constrast in those areas, usually in the luminance channel. The blur radius determines the size, or frequency of features that will be found.
This is quite simple to rig up in the compositor, below is an example with a deliberately grainy and blurry render to clearly show the effect of the unsharp mask.
Now that I’ve got an unsharp mask, it’s easy enough to follow through and look at implementing some of the techniques mentioned in the paper. One that interests me the most is where they use the depth buffer to give a kind of ‘drop shadow’ behind foreground objects, using the unsharp mask to find discontinuities and and mask foreground/background. This can be used like a fake, post-process ambient occlusion. With a low radius, it can be used to act like a dirt shader, darkening cracks and wrinkles, and with a higher radius it can act more subtly on larger features.
Below is an example of using this fake AO technique. I didn’t actually use this on the Waiting in the Basement image, but the model is a nice test case. I start by finding the creases and corners from the depth channel using the unsharp mask, then I do some tweaks to the intensity since what comes out of the unsharp mask isn’t immediately useful by itself, and doesn’t cover all the areas I want to darken. Because it’s using a non-antialiased Z buffer, I do some small blurring to the mask at the end to make it a bit smoother, and then use that mask to darken the image slightly, giving the detail shadows.
Note that I’m using the Min and Max options on the Map Value nodes to clamp the channel to between 0.0 and 1.0 before blurring. Since the channels are all float values, giving a range greater than 0-1 can make the blur nodes work in strange ways. The effect is much clearer on the full size image, especially around the collar and folds in the face, so click to check it out. Here’s the .blend file (2.43 RC+ required)

January 6th, 2007 .
Here’s another experiment with my game engine tablet support patch, now trying to do something a bit more practical with the virtual pen. I’m using the new rigid body constraints in the game engine to construct a brush tip out of ball joints – I have very little experience with them so it’s a bit rough. I wish I knew how to make the motion more damped and swing less loosely, but it works to an extent, and the main thing, it’s all good fun!
I actually find it interesting, since the swinging back and forth of the tip adds another dimension to it, you have to get the angle and timing just right, to get the mark where you want it on the canvas. Although it’s not anything that’s of immediate practical value, it does at least provide an additional level of depth of ‘analogue’ input that could potentially be exploited in fun ways.
Of course this isn’t anything too amazing, being just a poor remediation of ink painting, but it’s a small step along the way to something that I’m interested in investigating, developing more simple, yet flexible tools.

As an example, a paintbrush is a tool that’s simple in construction, but can be used in a multitude of ways, to create a multitude of results. However these techniques and resultant effects are not necessarily designed from the outset. They are not necessarily results of conscious choices made during the creation of the tool, they are results of the brusha[euro](TM)s innate being, that are intuitively discovered or learnt by the artist by experience or experimentation, not by remembering formulas or keystrokes, or reading technical references.
I’d be confident in presuming brushes weren’t originally designed with the explicit thoughts a[euro]oewe will give it a feature to be able to be impressed, or used with too little ink, or to be thrown or flicked, or used with the opposite enda[euro]�. These are uses that come from outside the tool itself, from people using it and taking advantage of (abusing?) the form that it has.
How can this simplicity yet potential for complex creation be realised in software? Software is programmed, and often ita[euro](TM)s a case of if one wants a certain function, that functionality is programmed directly, and access to it given through some kind of direct command, button, gesture, or action taken from a range of choices. How can we make more ‘analogue’ software tools that ‘just are’? How can we make tools that can be used in different ways by virtue of what they are, with simplicity that we can use for expression in subtle, yet complex ways? Or further still, can we do this with something unique to the digital environment, and not a remediation or simulation of existing tools?
December 30th, 2006 .
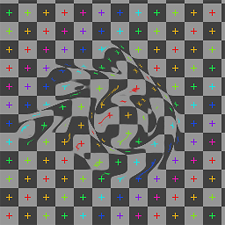
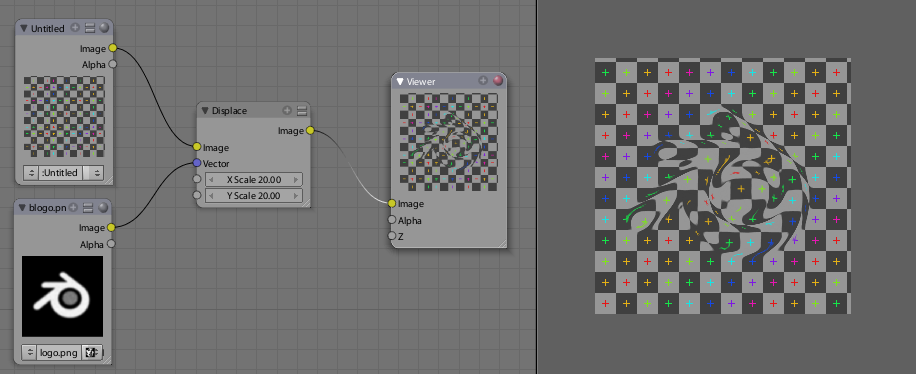
Yesterday I added a new node to Blender’s compositor: Displace. It works very similarly to Shake’s iDisplace node, pushing pixels around based on an input vector mask, and is useful for all sorts of things like doing hot air distortion, quick and dirty refraction effects in post, and so on. The full documentation is in the commit log, I guess I’ll have to tidy it up for the release notes.
One curiousity of this one is the technique used to code it. Most of the code logic was done using Blender’s Python Image API, as a means of quickly testing and prototyping. Python is a lot slower at the actual processing, but it’s a heck of a lot quicker to test than having to compile Blender each time. I recommend it!
You can download the prototype script/.blend file if you’re curious (just press Alt P). I then ported to C, which is relatively easy to do for simple image processing code like this, and changed a few things around. Previously in the Python version I had to try and come up with my own not-too-bad antialiasing code, though I’m sure what I came up with has been done before and has a nice technical name or something 😉 In the C version I was able to use some nicer image sampling code that Ton used for the awesome Map UV node. Incidentally, I also used the same Python prototyping technique for the UV test grid option when creating new images in Blender (.blend file).

Quick demo video: hot air distortion
 |
 |
|
Greyscale input, displacing in one direction (node setup)
|
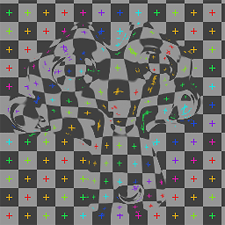
2D vector input (normal map), independent (more accurate) X and Y displacement (node setup)
|
December 5th, 2006 .
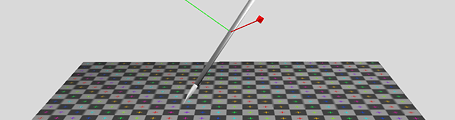
When I worked on adding tablet support to GHOST, Blender’s low-level input system (alongside Nicholas Bishop and Andrea Weikert who did the X11 and Windows versions), one thing I had in mind was the possibilities not only in the obvious painting and sculpting, but in other more experimental areas too. I’ve got a few ideas sketched down about potential uses in the interface, for example imagine sliders that changed in precision depending on tablet pressure, or a radial menu that uses the tablet tilt information to bias what option is selected.
A tablet, especially one that supports tilt sensitivity like the Wacom Intuos, is almost a poor man’s 3d input device. With X/Y location, pressure and tilt, you can derive a lot of information about the pen’s situation in 3D space. This is interesting to me, because unlike real 3D input devices like spaceballs (which I don’t own), many CG artists have tablets, so input methods involving a tablet can involve a much larger audience than the more obscure devices, and so investigating it doesn’t feel like such a waste of time :).
Anyway, the idea came to me that Blender’s built-in game engine could be very useful as a quick, interactive means of testing these different ways of interacting with a tablet. Over the weekend I had a hunt through it’s unfamiliar source code, and hacked together a patch that adds pressure and tilt support to the game engine’s mouse sensor (available here). It exposes these variables through Python and works very similarly to the way you currently get the mouse’s position, with three new functions: getPressure, getXtilt() and getYtilt().
So of course I had to do a first test! This one is very simple, just visualising the pen 3D space as a virtual pen over a virtual tablet surface. I mapped the pressure to the ‘height’ of the pen along it’s own local axis, and the tilt data is changing the orientation. Watch the video I recorded on a digital camera and see for yourself! The .blend file for it is here, but you’ll need to build Blender with my patch for it to work.
After doing this I’ve got a few more interesting ideas for things, such as FPS-style mouse navigation with the tablet but with tilt controlling other things like roll or turning around, or perhaps a marble madness style game where you use the pen to tilt the surface that the marbles roll around. I’m now also curious to combine this with my PowerMate for some really interesting interaction. Let me know if you have some other ideas that could work too! 🙂
October 17th, 2006 .
I’ve had several people contact me about my radial menus design and proof of concept for Blender that I showed here a couple of months ago. Progress on it had come to a standstill, while I was waiting for a limitation in Blender’s input system to be overcome. Previously, it wasn’t possible to detect in Blender if a key other than Ctrl Shift or Alt was held down, which meant that the fast menu selection method of holding down a key temporarily could only work when bound to combinations of those keys, and not most other hotkeys used in Blender.
Jean-Luc ‘lukep’ plans to work on improving this area of Blender when he works on refactoring the low-level input events system in Blender, and I’d put the menus on hold until this happened. However Jean-Luc’s project is large, progress is slow and it will take some time until it is completed.
So for my own sake and for those curious people who would like to give it a whirl, I wrote some temporary code to work around that problem, and now the radial menus are working on any hotkey, as they should. I also found a way to allow more than 8 items per menu, which was missing before. This is still a bit sketchy on enormous menus like the mesh specials menu, but that’s really a usability fault in Blender more than the radial menus – the specials menu is a badly organised dumping ground for tools that’s clunky to use and getting messier each release. This particular problem should be solved at its root.
Anyway, having said that, I’ve finally made a patch for you all to try, sitting in the patch tracker. Keep in mind it’s still a little rough around the edges, but hopefully you should find it interesting. If you make a testing build, I’d appreciate it if you could post a link to it in the comments here, so others can try too. Cheers!
March 12th, 2005 .
More experimentation and learning – variation on the clock theme.
March 7th, 2005 .
A couple of days ago I downloaded Processing, after discovering it a little while before. It’s “a programming language and environment built for the electronic arts and visual design communities”. Today, I made my first ‘sketch’, and I anticipate doing a lot more experimenting with this – it’s great.
March 6th, 2005 .
Yesterday, Rob ‘phase’ Haarsma committed some code that Mika Saari and he had been working on to Tuhopuu Blender – a first revision of enabling Unicode characters in 3D text objects. Although usability-wise, it’s still a little cumbersome, it’s an excellent improvement that I’ve been hoping for, for a while now, and I bet these guys will be overjoyed, too. Now who can I bug about adding proper kerning and leading? Baseline shift? Would ligatures be too much to ask for? 🙂
![a[euro]oeHelloa[euro]� in Japanese and Korean](/blender/etc/jk_hello_sm.png)
Hello!
March 2nd, 2005 .
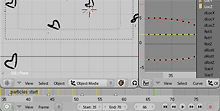
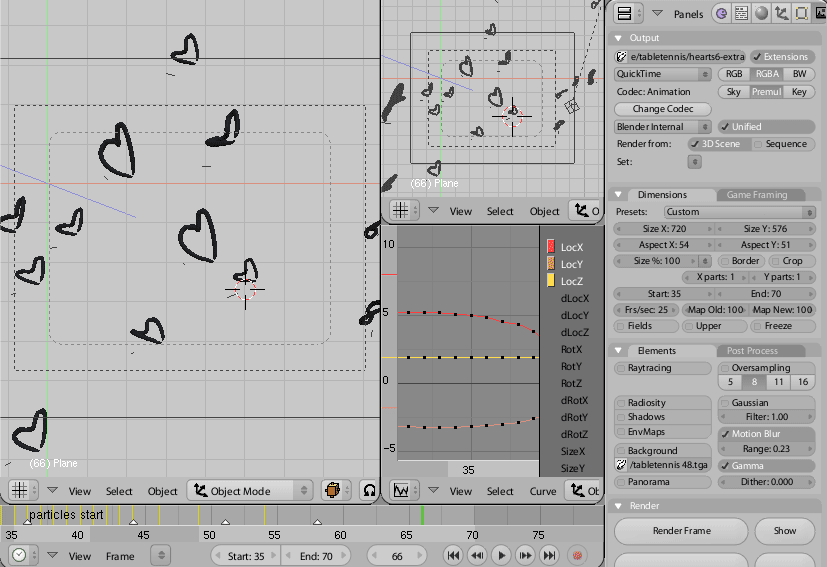
Over the last few days, I’ve committed some code for a time slider to the Tuhopuu Blender testing version, which will hopefully be a big usability boost for animation. I’ve been working on some animation lately myself, so it was a good motivation to polish up this work, which has been sitting around in a partially done state since last year. You can give it a try by picking up a tuhopuu testing build from over at the blender.org forums.
If I could turn back time
Notable features include: (excerpt from the CVS commit logs)
- Useful controls for start/end/current frame, and
buttons to rewind, play and fast forward in the active time area.
The area before the start frame and after the end is now tinted
out slightly.
- The auto key recording is now actually useful 😉
Rather than being a user preference, it’s now a toggle in the
timeline (red record symbol) which can be flicked on and off
quickly, which is really how this is meant to be used. The button
currently works for both object and action keyframes, hopefully it can be extended to other Ipos such as materials in the future.
- Keyframes of the active object are shown as little lines in the
timeline. Yellow lines represent object keys, blue lines represent
action keys
- Markers! Markers are the little triangles you can see in the
screenshot above. Video editors should be very familar with this,
they’re used very often in editing to help time cuts etc, but I don’t
know of any other 3D apps that have this, which is a little
surprising.
Basically, markers are used to mark spots on the timeline, that may
mean something to you, so you can easily find that point later.
They’re useful for timing animation, syncing animation to audio,
and plenty of other things, I’m sure. You can drop a marker on the
current frame by pressing M while the mouse is over the timeline,
or also by pressing M during animation playback (Alt A, play
button, whatever). You can remove a marker from the current frame
with Alt M. There is currently a limit of 99 markers
- Support for naming markers. Ctrl M or Frame->Name Marker opens
a text field where you can give a marker on the current frame a
name, which displays next to the triangle icon.
- Previous / Next Keyframe buttons. These should be pretty self
explanatory – clicking them brings the current frame to the previous
or next keyframe visible on the timeline.
- Hotkeys (S and E) for setting the current frame as the start or
end frame of the animation.
- Right mouse button now cancels animation playback, just like most
other ‘temporary modes’ (same functionality as Esc).
- Timeline now initialises showing frame numbers by default
December 22nd, 2004 .
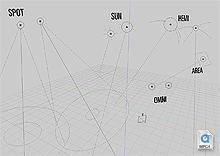
Related to this earlier experiment, I’ve ventured further into the scary world of 3D math and OpenGL, re-doing the 3D visualisation of lamp objects in Blender. There were a few problems with the previous versions which I hope to have addressed in this little project.
The problems I saw in the previous versions:
- They were too dependent on the little yellow center points – when I removed them in the previous experiment, the lamps became almost invisible.
- The ‘stems’ (the vertical dashed line connecting every lamp to the ground plane) created useless visual clutter (why on earth should it be a lamp’s job to tell me which is the Z axis?), and was a potential source of confusion, making normal omnidirectional lamps look the same as hemi or sun lamps pointed vertically downwards.
- There was inadequate visual distinction between lamp types in the 3D View – a hemi lamp looked identical to a sun lamp, and the visual design didn’t really say much about what each lamp did.
- There was inadequate visual communication of other subtle lamp information (only some, such as ‘Dist:’ or ‘Sphere’ settings).
So, I’ve tried to make some improvements:
- Each lamp now has a distinct visual appearance, that hopefully gives a better idea about how the lamp works, i.e. an omnidirectional lamp is represented as a point source, a sun lamp is shown with the typical sun rays, a hemi lamp is shown with arcs representing that the light is coming from a hemisphere direction, not just a single point. I think they all look nicer too 🙂
- More information is displayed – the size of the continuous line circle represents the energy value of the lamp, and a new circle inside the base of the spot lamp cone represents the SpotBlur falloff value (Note: this second circle is not entirely accurate to the rendered image, but it’s moderately close. Maybe someone with knowledge of how this works in the renderer could make it better, at least it’s a nice visual hint at a glance for now).
- The lamps now scale with the objects’ size, and with the view zoom. This means that when you zoom out, you don’t get a meaningless conglomerate of yellow dots at the same size, obscuring everything else. It’s also easy to tell where the lamps are in 3D space in perspective – lamps further away will look smaller. Of course if you do want them to look bigger though, you can just scale them up.
- I’m guessing because they’re drawn as lines, and not using glBitmap commands, these lamps are slightly faster to display on screen, too. On my Powerbook, according to Help->System->Benchmark, the scene shown in the video linked above displays at 284 fps on Blender 2.35 and 298 fps on my development version.
- I’d also like to rename the ‘lamp’ sub-type to ‘omni’ (short for omnidirectional). It’s rather dumb to have a ‘lamp’ sub-type of a ‘lamp’ object.
Now, if only we could modify lamp data (spotsize, spotblur, energy, etc.) directly with transformations in the 3D View, rather than having to use sliders for everything. *sigh*


![a[euro]oeHelloa[euro]� in Japanese and Korean](/blender/etc/jk_hello.png)