September 13th, 2017 .
It’s been a long time since the last update, but I have a few things to collate. First off after many happy years there, I’ve recently left Animal Logic and am now on the lookout for new challenges. I’m most interested in freelance work around Sydney for the time being, but open to anything, so please get in touch!
A few weeks ago I recently got back from SIGGRAPH 2017 in Los Angeles, where I had a fantastic time not just with the presentations, but also catching up with old and new friends afterwards was even better. In the Effects Omelette section, I presented one component of the work I developed on Guardians of the Galaxy Vol. 2 – a novel and efficient technique for using fractals for modelling architectural sets in the form of high density point clouds. The abstract is available online on the ACM SIGGRAPH website and there are also some interviews with our vfx supervisor about the process here and here.
Alongside the main conference I also gave a presentation for SideFX at their ‘Houdini Hive‘ sessions. Due to content permissions I wasn’t able to do the same presentation as at the main conference, but the benefit was that I could go into much more technical detail. I cover some of the techniques involved in not only the fractals work, but related tricks from previous projects too. Check it out here:
May 9th, 2015 .
Here’s a quick CVEX lens shader for Houdini, allowing you to render in Mantra with an equidistant fisheye lens. Also check out Matt Estela’s stereo spherical panorama camera that he got working for some VR tests we did.
–> http://mattebb.com/projects/houdini/fisheye_camera.otl
July 7th, 2014 .
Here’s a quick one, inspired by a tool I saw while at Double Negative earlier this year. The Point Wrangle and Attrib Wrangle nodes in Houdini 13 come in handy for a lot of things but are a but cumbersome when you want to add parameters to control them. This bit of python will look over your VEX code snippet and create parameters for any that have been referenced in your code but don’t already exist.
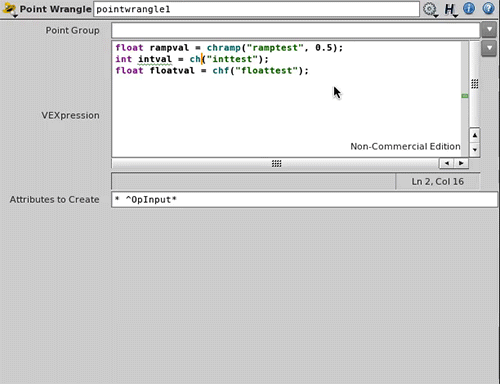
It’s in the form of a custom menu option, so you just need to drop this file in your houdini user folder (where all your .pref files are), and it will append the “Create Wrangler Parameters” option to the end of the parameter context menu.
http://mattebb.com/projects/houdini/wrangler_parms/PARMmenu.xml
July 3rd, 2014 .
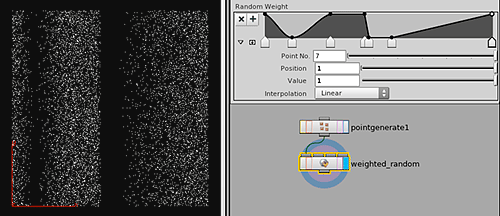
Today I finally got around to putting together a little tool for use in VEX/VOPs, to generate random numbers weighted according to a ramp. In the example below, I’m distributing 8000 points by ramp weight in the X axis, and randomly in Y – you can see how the density of random X values corresponds to the ramp.
This is using a simplistic method I remembered from a while ago when I saw it used for importance sampling brights parts of an environment map during rendering.
The idea is a bit similar to making a histogram. Divide your function (in this case the ramp) up into a number of bins, and scan over them, accumulating the sum of all bins up to that point in an array. The final value in the array will be equal to the sum of all bins.
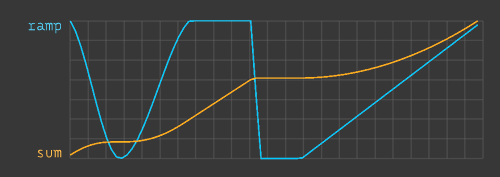
Above you can see the normalised sum curve overlaid on the ramp curve. Where the ramp has a high value, the slope of the sum is greatest (because the change in value of the sum is highest when its summing high ramp values).
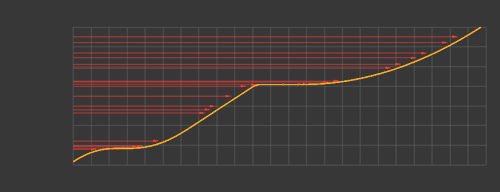
If we then choose a range of random numbers in y, most of the corresponding points on the sum curve will be in the areas of greatest slope. It’s easy to visualise as if you’re projecting points horizontally and intersecting the curve – areas of low slope will tend to get missed, and the majority of the random values will stick to the areas of greater slope, and therefore the greatest values in the underlying ramp function.
You can drop the VEX code below into a wrangle SOP or a snippet VOP. Right now it’s not hugely optimised, it’s pre-processing the ramp every time its run (eg. for each point), and it’s using a linear search to find the ‘random number intersections’ when a binary search might be faster. It’s still super quick though, so further work may not be so necessary.
Example .hip file is here: http://mattebb.com/projects/houdini/weightedrandom.hipnc
September 4th, 2013 .
If you use VOPs in Houdini a lot like I do, you might also find it a bit annoying when using Import/Add Attribute VOPs trying to keep a clean setup with nodes nicely named and local variables added – it can be a lot of typing.
I made a couple of scripts that you can add to your shelf and add keyboard shortcuts to, to automate this process a bit. They’ll pop up a text entry with the attribute name, add the VOP node, and then fill in the relevant parameters based on the attribute. For the import attribute node it also tries to be a bit clever and set the attribute type information by querying the incoming geometry. Enjoy!
August 12th, 2012 .
One of the things I’ve been wanting to investigate more since rendering clouds on Happy Feet 2 is using more physically based phase functions for volume lighting. The volume phase function describes the direction of scattered light relative to the incoming light’s direction – either isotropic (scattering light evenly in all directions), or anisotropic – scattering mostly forward, or mostly back, or some more complicated distribution altogether. Many volumes, such as smoke, are generally pretty isotropic, but clouds have quite a particular scattering behaviour, determined by the size, and distribution of microscopic water droplets that comprise their form. On HF2 we used a combination of two henyey-greenstein distributions, which was good enough for the task at hand, but after spending so long back then researching atmospheric optics, I’ve been curious to try something more realistic.
Antoine Bouthors’ excellent Phd thesis, Realistic rendering of clouds in realtime, spends a few pages on the Mie phase function – a good fit for many types of clouds. Clouds are highly anisotropic – at each scattering event, over 90% of the energy gets scattered in roughly the same direction that it enters (the strong forward peak), which is what gives the characteristic ‘silver lining’ when looking through a cloud towards the sun. Of the remaining energy scattered in other directions, diffraction and interference create some interesting optical effects such as the fogbow, or glory.

As part of Antoine’s work, he used Mieplot to generate scattering data for a general purpose droplet size distribution found in clouds, and published the data online – the relevant files are Mie0.txt and MiePF3.txt. The scattering distributions are divided into two to make it easier to sample – I imagine because the forward peak is so strong, attempting to importance sample it would barely leave any samples in the sideways or backward directions, so it helps to sample the rest of the function independently from the peak, and combine with weighted probabilities. In a traditional lighting pipeline where the phase function is just being used to weight lighting contribution and not sample new scattering vectors, we can ignore this and combine the data into a single set. To verify the results I wrote a little python script using pyglet to add the split data together and graph them on a log scale, as in the thesis – It’s pleasing to see it matches up perfectly. I also normalised the data to sum to 1.0 over the RGB channels.
For rendering in Houdini, the original plan was to copy the data in as a VEX array, and lookup/interpolate the data based on the input angle, but I think I may have hit a limit to the size of arrays VEX lets you define – arrays of a handful of float items worked fine, but using the full 1800 values introduced compilation errors. So as a more portable alternative, I brought the data into blender to generate an 1800 x 1 pixel OpenEXR image containing the scattering values. This is a lot more convenient to look up, and is easy to then reuse in a renderman shader for example. To sample the image using the U coordinate, the angle between light direction and eye direction needs to be fit to a 0-1 range. This is trivial to do in VOPs, replicating:
U = acos(normalize(I) . normalize(L)) / pi … and feeding that into a color map node.
You can download the EXR file here: mie_phase_function.exr
and hip file: cloudphase2.hipnc.zip
Because this phase function is so heavily forward scattering, by default the volume may seem dark from any other angle than directly in front of the light. For best results:
- Set up your scene to be more physically plausible, with a high dynamic range in lighting, viewed through a tone mapping transform (or at least a gamma curve). This way, with enough intensity in your main light, you’ll be able to see the backward and sideways scattered light, even though the light in the strong forward peak will be very intense. The tone mapping should bring the peak back into a more acceptable range while still leaving the other angles visible.
- Render some form of multiple scattering additional to the single scattering, to fill out the overall light in the volume. This can be faked in any number of ways – in Houdini one way could be to add in an additional weak isotropic phase function (higher orders of scattering tend towards isotropic scattering after light has bounced around randomly for a while), perhaps with a blurry deep shadow map, or however you like to fake multiple scattering effects. Even adding in a constant ambient term can help substantially.
April 11th, 2012 .
Spherical Harmonics is a method for efficiently representing values that vary based on angle – often, lighting. It’s been in use for a long time in computer graphics, and with a google search you can find plenty of interesting information explaining the subject, in particular this (now a bit old) paper by Robin Green of SCEA – Spherical Harmonic Lighting: The Gritty Details. The common use case for spherical harmonics is caching a slow-to-calculate value that varies by angle, storing it as SH coefficient data, then reproducing an approximated version of that original value later on. What makes spherical harmonics useful is that for certain types of things (like diffuse lighting) the amount of data you have to store is quite small, and the value can be reproduced later quite quickly.
I’d previously tinkered with SH a bit in blender, but this time decided to port the code in the above paper to VEX in Houdini, implemented as a couple of VOPs, used to generate and evaluate spherical harmonics as part of a VOP network. I started playing with this idea last year at Dr. D, and still haven’t implemented my original ideas yet after getting sidetracked with these fun examples of things you can do with SH. Maybe soon.
You can download this example file, and the OTL here: houdini_sh_otl_hipnc.v001.zip.
The OTL includes three VOPs:
- SH Generate
Stores a single float sample along with its corresponding angle in a set of spherical harmonics coefficients. It’s currently using a 4×4 Matrix type as storage for this because it’s convenient to work with in VOPs/attributes, and because 16 floats will allow you to store up to 4 bands of spherical harmonics, which is enough for many situations involving smooth/diffuse values.
- SH Evaluate
Evaluates the value of the input spherical harmonics coefficients at a given lookup angle, as a single float.
- Cartesian to Spherical
The SH Generate/SH Evaluate VOPs take input angles in spherical coordinates (Phi/Theta),. This VOP can be used to convert a cartesian vector direction, to spherical coordinates.
The OTL was made in Houdini Apprentice, but probably isn’t difficult to convert to a commercial version. If you find any use for this, or any mistakes, please let me know!
December 28th, 2011 .
I made another piece of jewelry for Kat‘s birthday last week – I thought I’d experiment with making a necklace rather than a ring like last time. It’s 3D printed and cast in sterling silver, and sits in three parts. Originally the idea was to have the arrangement customisable so they could be re-positioned along the chain, but in the end only a few combinations hang well in practice. Doing it this way, as opposed to a pendant, is much more complicated than I imagined and will require a bit more experimentation and prototyping if I attempt it again in the future.

The design is inspired by an islamic tile pattern that we saw recently while travelling in Turkey. I modelled it in Houdini by first procedurally re-creating the tiling pattern, then randomly breaking it up and distorting the pieces with some final detailing and bevelling. The final form was chosen by spending a while experimenting with different random seeds and noise offsets to find something that worked aesthetically. I then brought it into Blender for final tweaks, cleaned up the geometry to be watertight, added sprues for ease of casting, and exported the STL file for the print service.

April 15th, 2011 .
Added some different bsdfs to my fun little houdini vopsop pathtracer, trying to see how far I can push things. Now supports perfect specular mirror and fresnel dielectrics – more info on the vimeo page.
March 25th, 2011 .
So I ended up taking my previous silly Houdini VOPs experiment another step further, and upgraded it to a pathtracer supporting indirect diffuse illumination. More info and hip file are at the vimeo page.
March 6th, 2011 .
Fooling around in Houdini with the intersect VOP today, made a little raytracer inside SOPs. I’m sure its not the first time somebody’s done this, but it was a bit of fun while passing time.
It’s tracing rays from each grid point, doing (soft) shadowed diffuse lighting from a point light, with an optional specular reflection layer with fake fresnel blending.
December 23rd, 2010 .
It was K’s birthday recently, and this year I wanted to do something a bit different for a present. I’ve been getting more familiar with Houdini lately, and thought it would be a good exercise to use it to design a ring, to be rapid prototyped and cast in sterling silver. I was aiming for something geometric with a hint of art deco (which she likes), and I also involved random elements in the production, so the end product would be something quite unique.

Houdini was great for this, I tried to keep it as procedural as possible, giving lots of room for experimentation. The final model was brought into Blender for some more detailing, and export to STL. The printers (rapidprototype.com.au) did a great job, the cast ended up looking great with very well resolved detail in what is a very small piece. I made a little video below showing some of the sop network in Houdini.

