It’s been a long time since the last update, but I have a few things to collate. First off after many happy years there, I’ve recently left Animal Logic and am now on the lookout for new challenges. I’m most interested in freelance work around Sydney for the time being, but open to anything, so please get in touch!
A few weeks ago I recently got back from SIGGRAPH 2017 in Los Angeles, where I had a fantastic time not just with the presentations, but also catching up with old and new friends afterwards was even better. In the Effects Omelette section, I presented one component of the work I developed on Guardians of the Galaxy Vol. 2 – a novel and efficient technique for using fractals for modelling architectural sets in the form of high density point clouds. The abstract is available online on the ACM SIGGRAPH website and there are also some interviews with our vfx supervisor about the process here and here.
Alongside the main conference I also gave a presentation for SideFX at their ‘Houdini Hive‘ sessions. Due to content permissions I wasn’t able to do the same presentation as at the main conference, but the benefit was that I could go into much more technical detail. I cover some of the techniques involved in not only the fractals work, but related tricks from previous projects too. Check it out here:
I’ve been doing some work lately on ocean simulation tools for Blender. It’s based on Drew Whitehouse’s open source Houdini Ocean Toolkit, and on a previous patch that was made for blender. A few years ago at ProMotion when we were working on a short film ‘Lighthouse’, we hired Hamed Zaghaghi to make a patch for blender 2.4x, converting the HOT code from C++ to C, and using it to drive a texture in blender, which could provide displacement and foam outputs. In the state we left it in, it was a big improvement over previously available methods such as animated noise, though it was a bit rough around the edges, and since then the code was mostly neglected due to lack of time and interest.
I was asked by Todd McIntosh of Resonance Media if I was interested in restoring what could be salvaged of the old code and re-integrating it as a new patch for Blender 2.5, as a freelance coding project. Todd was able to get a good deal of additional crowd-funding, which really enabled me to spend the required amount of time on this. I was able to reuse some of the old patch ( mostly the C conversion of the main engine) however there was a lot of extra work and re-work that needed to be done. A fair bit of time was spent on making the simulation/evaluation thread-safe, since Blender 2.5 is much more multithreaded than previously, and just dropping in the old code was very unstable. Now the simulator sits as a separate ‘library’ inside blender that can be accessed from other parts of the software, and from a user perspective, there is now a new Ocean modifier, that can either generate an ocean mesh from scratch, or displace an existing mesh. The modifier adds correct UVs and if required, vertex colours to represent foam, for visualisation in the 3d view. I’ve also brought in multithreading to the main simulation engine, using OpenMP after seeing some example code here. I’ve written up some documentation online in the blender wiki.
Among the new features there’s also functionality to bake the simulation results (displacement/normal/foam data) out to a sequence of OpenEXR files. One of the reasons for this is to allow integration with external renderers. The sequence above was rendered in 3Delight with my blender->3Delight render exporter, using such baked files, with custom shaders (more info on the vimeo page). I’m currently just finishing off some final tweaks and bug fixes, and hopefully the tools should be released freely quite soon.
Yesterday I was doing some work over at Red Cartel, as part of it I coded a new network render submission script for Blender 2.5 to Autodesk Backburner – the default queue manager that comes with Max and Maya. I’d previously already made a similar exporter for Blender 2.4 which has been in use there for a while, allowing managing and prioritising Blender jobs alongside Max/vray jobs on the same farm.
I’ve packaged it up as a Blender 2.5 addon, it might be useful to any of you wanting to render Blender jobs in an Autodesk-centric environment. Get it here: http://mke3.net/projects/bpy/render_backburner.py
Rewrote the node ‘make links’ tool. Now you don’t need to select individual sockets, it automatically makes a best guess about how to connect them up (following a left -> right flow).
Allows fun things like in the video above pressing F multiple times.
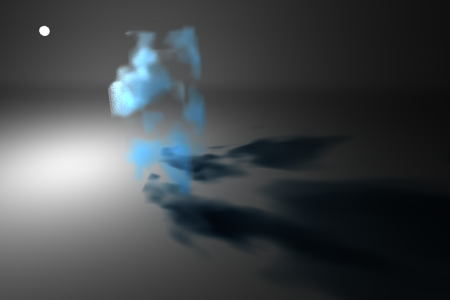
It’s been a little while since I merged the volume rendering work into Blender 2.5 but I’ve been steadily poking away at it since. Today I committed some lighting features, support for volumes receiving external shadows (raytraced, and quick but more limited shadow mapped) and a new shadow only mode that’s a bit faster than self-shading, good for less dense volumes like fog or wispy smoke:
I’ve also had some behind-the-scenes help in the form of code review and some new features from Alfredo de Greef, which has been great, and last week I bit the bullet and redid part of the shading code. It was previously using a custom method left over from initial experiments that wasn’t entirely physically correct – the shader didn’t conserve energy. In the real world, if more light is scattered out of the volume, towards your eye, there will be less left to keep penetrating through the remainder of the volume, but the previous method didn’t account for this.
In reality this also applies on a wavelength-dependent basis too, if the media is such that the red light is scattered out of the volume (from an initial white light shining on it), all that’s left to continue through the rest of the volume is the inverse of that (roughly cyan). I got to work changing this in the code, but after a long time testing realised it was getting very difficult to control. Most of the time, if you’re making a coloured volume (like the excellent coloured smoke in the Cloudy trailer), you want to be able to just set a colour and be done with it. Doing it by tweaking wavelength dependent absorption and scattering was getting to be a real pain, so I ended up chopping and changing things around.
Now there’s a single physically based ‘scattering’ parameter, controlling the amount of light that’s scattered out of the volume (leaving less to continue through), as well as a ‘transmission colour’ that defines the result colour in the rest of the volume, after out-scattering and absorption. With these settings, by default, the shader works physically correctly. For ease of control though, I also added a ‘reflection’ colour and strength which basically acts as an RGB gain, tinting the out-scattered light. It’s more of a non-physical tweak, but it does make life a fair bit easier. I’ve documented these settings with example renders on the blender wiki.
I’m pretty happy with how it’s working now: physically correct by default, but with the option of changing it for artistic control, and philosophically I think that’s how it should be. One of the many things I dislike about Blender’s current shading system is that it generally starts out incorrect, and you have to really understand what’s going on, and work quite hard in order to make it do the right thing (energy conservation, obeying physical laws, etc.). Not only is this a real pain since you have to go through the same chores every time just to get a decent looking material, but for many people who don’t have a good understanding of how rendering/shading works (or should work!) they’re left with sub-par results since they don’t know what magic buttons to press. You should have to work to break it, not to get just a base level of correctness. In further work I do on shading/rendering, that’s going to be a large motivation, to get things working physically plausible by default, but with the ability to break the rules if the situation requires it.
Earlier this week, I got a CT brain scan done, to get checked out for peace of mind after a sickness-induced seizure I had while away in Morocco. Fortunately, the result came back completely clean and normal, which is great, but as a nice bonus they also gave me the CT scan data on CD. So of course the first thing I did was load it up in OsiriX, have a look, and generate slices to load up in Blender!
It’s pretty amazing what sort of resolution they can capture, in just 512 x 512 x 400 voxels. Not only can it see deep inside, but it also resolves hair and skin pores as well – it’s fascinating. Once again, I’m reminded of how lucky and appreciative I am to live in a country where this sort of medical care is not only readily available, but free under the public health system too.
Last week I went to see a few sessions of the 2009 Sydney festival called films afloat, a free outdoor film screening on a massive screen floating out in the middle of Darling Harbour. Before the main feature (each night a different movie, with a soundtrack played by an improvising live band!) they showed the finalists of the animation competition, which our short ‘Lighthouse’ was included in. We ended up coming second in the competition, which was nice, but even better just to have it shown outdoors in front of a few thousand people in such a great atmosphere.
At work we also published a project we finished late last year, which was our first production use of the volume rendering tools I’ve been working on. It’s just a couple of shots, produced for an internal corporate video involving a hallucination sequence where a worker gets ripped out of his cubicle by a tornado. It’s a bit silly, and may not be the greatest vfx shot known to man, but it was fun to do, and good to give the rendering tools a good hammering in a practical context. There’s a bit more info about the process in this blenderartists thread.
It’s getting to the end of the year and things are getting busy. There’s been plenty on at work – quite a few projects have been running concurrent for a while, including a new Bridgestone gecko spot that’s out now, and the still in-progress project I’ve been working on the volume rendering for.
We’ve been getting around a bit too, four of us headed down to Melbourne in October to attend the first ‘Melbourne Blender Society‘ meeting. We gave an informal presentation about some of our work, much of it involving character setups, and then headed out for some ‘beer r&d’, meeting some fun and interesting people (Hi Glenn, this only took a month ;).
Jez, James and I also gave a presentation at the Digital Media Festival in Sydney , on the topic of ‘an open source pipeline’, talking about our use of Blender in production. Some of the parts that interested the audience of mostly 3d/vfx/design people most were existing features like the library linking system, but also the ability for us to do custom development, such as contracting the ocean sim tools for the Lighthouse project. I also showed off some work on the volume rendering too 😉
The volume rendering tools are at the point now where it’s going to give acceptable results given the timeframe. Although it’s still lacking a bit in some areas right now that aren’t a priority for this job, for my purpose it’s going pretty well. Raul has now picked up this code to work with too, and I’m looking forward to seeing his implementation of voxel data sets. A couple of the improvements I’ve made since last time posting include:
Particle rendering
There’s now a new 3d texture called ‘point density’ that retrieves density and colour information from point clouds (either particle systems or object vertices). It uses a BVH tree to store the points, and looks up what points are within a given radius of the shaded point, with various falloffs. It also has a few methods for simple turbulence, adding directed noise to give the impression of more detail. It’s also possible to use this texture on solid surfaces too.
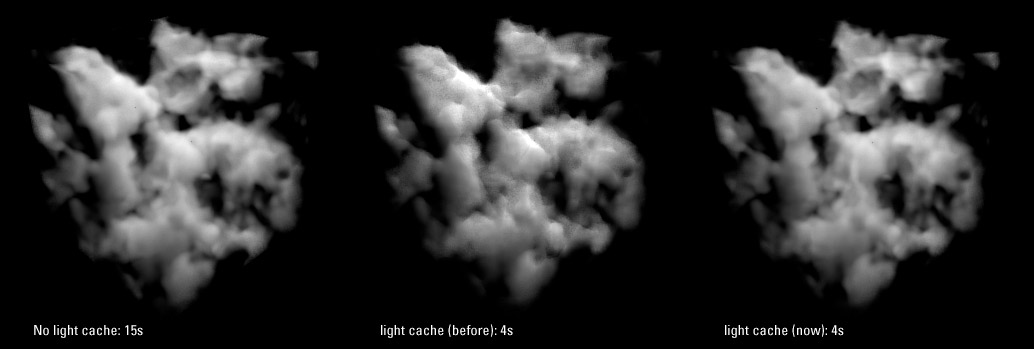
Light Cache
In order to speed up rendering of self-shaded volumes, there’s a new option to precalculate the shading at the start of the render into a voxel grid, which gets interpolated later to generate lighting information, rather than shading the lamps directly. You could make the analogy to raytraced occlusion vs approximate occlusion in Blender – it often gives around a 3x speed up with similar quality.
Kajimba‘s also rolling along nicely. We’ve released several more animation tests with audio (and plenty more sill in the pipe), the voices for the first episode have been recorded, and the animator dudes have started working on lipsync tests to begin some animation on ep 1 soon.
As much as I’d love to be at the 2008 Blender Conference in Amsterdam, as I have in some years past, it’s quite prohibitive and difficult, especially with work. Luckily, there is a live feed to watch the presentations online. One presentation that I’ve watched in its entirety so far is by William Reynish: The evolution of Blenders User Interface. I’ve met William a few times, and we’ve chatted about these issues a long time ago, and his presentation brilliantly elucidates so many things that I’ve been thinking about, ranting about and very patiently waiting to start working on, for several years. Do yourself a favour and watch it now!
These issues are not theoretical niceties, they’re serious problems that I (and the other people I work with) run up against day by day in our production work. They’re hurdles in Blender’s workflow that not only make Blender slower and clumsier to work in than it could potentially be, but also harder for professional users of other software to come up to speed in Blender quickly, which is important for us too. I’m sure William has come to the same conclusions after his experience working on Big Buck Bunny. Anyway, I want to offer my full support behind William’s presentation, and during the work on Blender 2.5 I’d like to do whatever I can to help make that happen. I hope you all can give these ideas the same support too.
I recently posted on blenderartists.org in response to some questions and misunderstanding about gamma correction and ‘linear workflow’ in 3D rendering.
I thought I’d re-post it here, since there are a lot of misconceptions about this topic around.
Much of the value of a linear workflow comes with rendering colour textures. But as the name suggests, it’s a workflow, that has to be kept in mind throughout the entire process.
The issue is that when you make a texture, either painting it in Photoshop to look good on your screen, or as a JPEG from a camera, that image is made to look good under gamma corrected conditions, usually gamma 2.2. So as you paint that texture, you’re looking at it on a monitor that’s already gamma 2.2, which is not linear. This is all well and good, displays are already gamma corrected to better fit the range of human vision.
The problem starts though, when you use those colour maps as textures in a renderer. When you’re doing lighting calculations in a renderer, those take place in a linear colour space. i.e – add 2x as much light, and it gets 2x brighter. The problem is that your colour textures aren’t like that if they’re at gamma 2.2. What’s double in numerical pixel values in gamma 2.2 is not necessarily twice brighter perceptually. So this breaks the idea of taking brightness information from a colour texture and using it in lighting/shading calculations, especially if you’re doing multiple light bounces off textured surfaces.
So what a linear workflow means, is that you take those colour textures, and convert them back to linear space before rendering, then you gamma correct/tonemap the final result back to gamma space (for viewing on a monitor). Now the lighting calculations work accurately, however it does change things – because the textures get darkened in the midtones the image can look darker, so you need to change the lighting setup, etc. etc. Hence, workflow – it’s something you need to have on all throughout the process, not just applying gamma at the end.
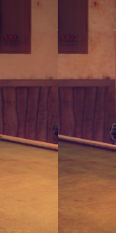
I wrote some code a little while ago that did it all automatically in the shading process, applying inverse gamma correction for colour textures before rendering, then corrected back to gamma 2.2 afterwards. After adjusting lights from old scenes to have the same appearance, it gave some nice results. It seemed to bring out a lot more detail in the textures, which got washed out before (left is normal, right is with linear workflow). It’s not finished though, it also needs to adjust the lights in the preview render, and inverse gamma correct colour swatches too so the flat colours you pick in the UI are also linear.
Three months since the last post here, I think that deserves either an award or a slap on the wrist. Things have been busy, and I’m sorry to say I’ve been much more inclined to spend my free time in other ways than writing here.
Work has been through alternating bursts of slow r&d time and busy projects, the latter being where I find myself at the moment. We’re using Blender more and more, currently we’re doing an immensely complex animation of around 12,000 frames, without much time to do it in. It’s the first project of this scale that we’ve done in Blender as a team, and although it’s a lot to manage and keep track of, it’s been pretty good.
Blender’s linked library / group / scene / action system has been great, and much easier than they were doing previously for similar projects in Max. I’m keeping a master scene file that contains everything, however most of the models/rigs in there are coming in from linked groups in external files, that any of the others can add to and update. Not only does this keep things easy to modify and ripple through, but it allows us to distribute the workload well between all of us by segmenting the files finely. I’m afraid I can’t give much more detailed info at this moment, perhaps some time in the future.
The work I was doing on glossy reflections/refractions was finished a while ago, the end product being much more robust and advanced than in that last post, and also including all sorts of extra nice things like using QMC sampling for ray shadows and ambient occlusion. These changes are now officially in Blender’s SVN repository and will be in the next major release, however I’ve already been making use of it extensively. This not overly interesting illustration I did for a magazine cover made it into the Australian Creative magazine gallery and uses a lot of anisotropic blurry reflection.
I’m back in Sydney again, after arriving yesterday with surprisingly little jetlag. Previous times I’d been to Europe, I’d been a total zombie for the week after, but I suppose thanks to a fortuitous combination of travel times and aeroplane seating arrangements, I’m feeling pretty good. My time away was rushed and brief, but still very interesting.
After only arriving in Europe the night before, Blender conference came and went very quickly, it was great to catch up again, with the general Blender crew and of course the others from the Orange team (except for poor Basse, who was stranded in Finland after an airline strike :/ ). Some very well produced videos of the proceedings, including our Making Elephants Dream presentation, are available on Google Video and BitTorrent, with hopefully more to come soon.
The day after the conference, Bassam and I shot over to Antwerp in Belgium to teach a 4 day Blender Workshop at the HISK, a high-end fine arts college located in a gorgeously run-down old military hospital. I was a little uncertain at first, not knowing much about the expectations and abilities of the students, including an audio installation artist, painter, sculptor, and others, none of whom had done any 3D before. By the end of the workshop though, things were going very well. We wanted to give the students more breadth of tuition than depth, so even if they weren’t instant experts, they would know what possibilities exist in Blender for them to integrate with their work, and they managed to keep up very well with the huge amount of information that was given to them day after day. By the end, most of the students were quite comfortable in getting around and starting to use it for practical work in their projects, one of them already connecting up the game engine with his audio applications based on a Python script we found on the web. So all in all, very successful and seemingly fun for everyone.
Immediately after the last session on the last day, we went out for a quick dinner, then Bassam and I jumped back on the train to Amsterdam. In the remaining day before we left, we hung out with Ton and researched and brainstormed improving Blender’s walkcycle animation tools. The results are impressive already! Bassam headed back to the US, and I set off for home, but rather than doing the whole 20+ hour flight in one go, had arranged to stop over in Tokyo overnight. With only about 4 hours to spare, I went strolling around Harajuku, Aoyama and Shibuya, dropping in at a few interesting places around the area.
Anyway, on the flight home, I did some experiments in the Blender Outliner, partially inspired by the expectations and real-world usability testing of the HISK students. Click below to see a little work in progress teaser video of the sort of thing that I’m getting at. The drag and drop stuff might take some time before it gets in a state ready to be committed to CVS, though. There are some structural issues in other areas of the code (that I’m not too confident with) that should probably be dealt with first.
Just a brief update, I’m sitting in the side room of De Waag in Amsterdam on the third and final day of the 2006 Blender Conference, waiting to give my next artist tutorial session. Having a great time as usual amidst the late nights and jetlag. Most of the presentations I’ve seen have been interesting, and they should be appearing as video downloads soon, for those who couldn’t be here.
Bart and the others from Blendernation are here, doing a great job covering the event with video reports and interviews already online, and there’s also an excellent live video stream coming straight from the main theatre floor. I wonder what sort of nonsense has been recorded coming out of my mouth, for the world to see…
I spent a long time deliberating over whether I would go to the 2006 Blender Conference or not. My bank balance has been pretty unhealthy recently, and as great as it would be to see everyone and be a part of the excitement again, I wasn’t sure if I could afford to travel halfway around the world or not. I came to the last-minute conclusion that it’s going to be pretty tight and not really affordable, and that even so, I would go anyway! 🙂
Apart from the real reason for the conference, being around all the others, eating, drinking, discussing, brainstorming, I’m going to be giving a couple of pretty informal talks on the Friday – ‘Making Elephants Dream’ with the others from Orange who can make it, and also a lighting and compositing workshop with Andy Goralczyk. I’d like the keep both of them pretty informal and fun, the latter more about nifty tips and tricks, like in my previous curves session.
Straight after the conference, Bassam Kurdali and I will shoot over to Belgium for a week, to teach a four day 3D course using Blender at the Flanders Higher Institute for Fine Arts in Antwerp. This should be very interesting and challenging, though not new – we held a series of one day courses during our time at Montevideo in Amsterdam. The students are a group of fine artists who are looking for ways to integrate 3D technology into their work. I’m very happy to be able to help them with this, and curious to see what they come up with.
Right now, some of the Orange and Blender contingent are living it up in Boston at SIGGRAPH 2006, the premier Conference/Festival/Tradeshow for the digital graphics industry and community. This year, we’re lucky enough to have a booth on the main tradeshow floor, the ‘Open Source Pavilion’, shared with people from other open source graphics projects like Inkscape, GIMP and Verse. The booth was sponsored by a few sources, but largely by an extremely generous private donation. We’re right there in the trenches just next door to Houdini and ZBrush.
Unfortunately I’m not there myself, I really wish I was. But the next best thing is the fantastic video blog coverage that Bart from BlenderNation is producing each day. It’s giving the event a great feeling of community involvement, so do go and check it out and see some of the faces behind the internet aliases!
A few days ago, I did a small voice interview which is now available on the Linux Australia Update podcast/internet radio show, talking briefly about Elephants Dream. Thanks, James, for the invitation and for having me on there. Bassam also had a chat with the Linux Link Tech Show, though for a lot longer than I! Jono Bacon and co also did a very positive segment on us on his LugRadio show which was quite fun to hear. Jono is a very nice guy and has been hanging around the Blender community for a while, briefly dropping in to visit us in the studio in Amsterdam last year.
Finally, after more than a week of excitement, elephantsdream.org is back online. I’m still hanging out for some statistics, but at one stage, we were getting 150,000 page views per day. Last week it was estimated that we’d had 300,000 downloads, and I think we probably would have doubled that by now. The Bittorrent tracker alone reports around 80 Terabytes (80,000 GB) transferred through it so far. Very impressive stuff.


 I wrote some code a little while ago that did it all automatically in the shading process, applying inverse gamma correction for colour textures before rendering, then corrected back to gamma 2.2 afterwards. After adjusting lights from old scenes to have the same appearance, it gave some nice results. It seemed to bring out a lot more detail in the textures, which got washed out before (left is normal, right is with linear workflow). It’s not finished though, it also needs to adjust the lights in the preview render, and inverse gamma correct colour swatches too so the flat colours you pick in the UI are also linear.