September 10th, 2008 .
Some of you may be aware of the great work done so far by Raul Fernandez Hernandez (“farsthary“) concerning volume rendering in Blender. For those not in the know, rendering volumes of participating media as opposed to solid surfaces, has many uses such as realistically rendering smoke, fire, clouds or fog, or even with more complicated techniques, rendering volume density data such as MRI scans for medical visfualisation.
Raul completed a fair bit already, implementing this in Blender. Living in Cuba, where he doesn’t enjoy the same kind of connectivity as in many other parts of the world, it’s been difficult for him to participate in development and share his work. A few weeks ago, he emailed me asking for help with his code, and with maintaining it publicly. I promised I’d at least have a look at the first patch he was able to release and see what I thought.
In some spare time, I had a go at taking apart his patch. Unfortunately, it became clear that it wasn’t suitable for immediate inclusion. It was Raul’s first time coding in Blender (or perhaps in 3D) and due to this, wasn’t aware of some of the techniques available to make his life easier, or of how to integrate the code as cleanly as it could or should be. On top of this, working alone without being able to easily communicate with other developers, he’d been working hard on adding more and more features and options on top of a structure which I think could be done differently and a lot cleaner at a fundamental level. This led to some quite complicated code, and a tricky UI for artists to interact with.
I proposed to Raul that I start again from scratch, simpler and more cleanly integrated and then merge in what I could later down the track, step by step, to which he was very enthusiastic. He excitedly agreed with my invitation to work closely on integrating things like the simulation work he’s been doing, once a new structure is well defined. Recently in a few days off from work I sat down and started fresh, based on the approach in Physically Based Rendering.

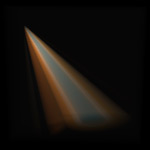
Spot light in constant density volume |
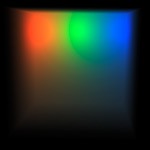
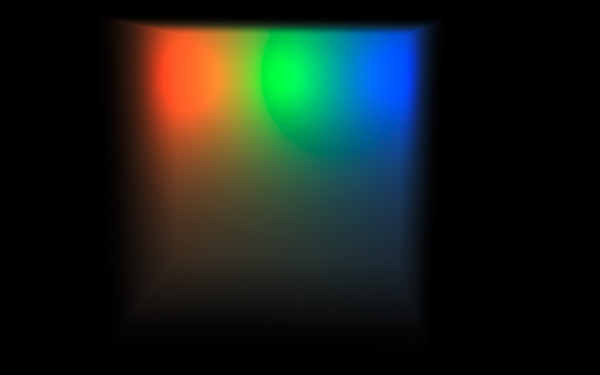
3 point lights in constant density volume |
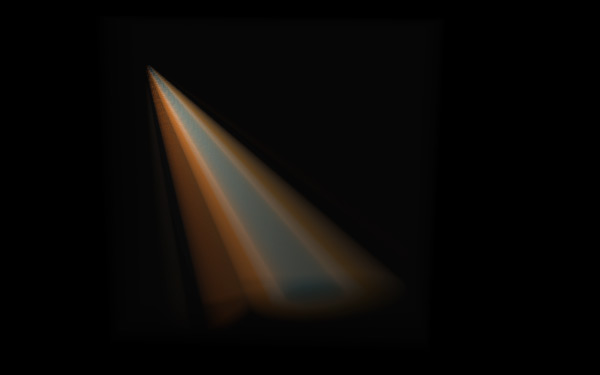
Textured spot light in constant density volume |
So far I’ve got it working reasonably well with about 90% new code. Unlike before, it’s following a physically based approach, with a region of constant or variable density, calculating light emission, absorption, and single scattering from lamps. My aim is to get a simple, easier to use version ready, optimised for practical rendering tasks like smoke, fire or clouds. Once this is working perfectly, integrated cleanly and completely, and working in Blender SVN, further down the track we can think about adding some of the less common capabilities like isosurfaces or volume data sets.

Cloud texture controlling density, lighting from volume emission only |
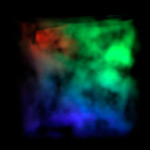
Cloud texture controlling density, 3 lights with single scattering |
Spherical blend textures controlling density, directional light with single scattering |
There’s still a lot to do – there’s one remaining bug with single scattering I must try and track down, and then there’s a lot of integration work to do, calculating alpha, rendering volumes in front of solid surfaces etc. Before too long I’ll commit this to the newly created ‘sim/physics’ SVN branch and work on it in there. I don’t know how long it will be before Raul is able to start working on this again too, since he’s under some horrible circumstances after hurricane Gustav ravaged Cuba. At least in the near term, I’ll be able to continue poking away at this in SVN.
Some things on my want-to-do list include:
- Plenty of optimisations
- Adaptive sampling – step size and/or early termination
- Alternative anisotropic phase (scattering) functions such as Mie or Henyey-Greenstein
- Wavelength (R/G/B) dependent absorption, so light gets tinted as it travels through a medium
- An optimised bounding box or sphere ‘volume region’ primitive, which could be much faster than raytracing meshes as is done now
- Multiple layers deep ray intersections, to enable concave meshes or volume meshes in front of volume meshes
- Rendering Blender’s particle systems, either by creating spherical ‘puffs’ at each particle as Afterburner or PyroCluster do, or perhaps by estimating particle density with a kd-tree or such
I hope to be able to provide some more updates on this before too long!
September 5th, 2008 .
I recently posted on blenderartists.org in response to some questions and misunderstanding about gamma correction and ‘linear workflow’ in 3D rendering.
I thought I’d re-post it here, since there are a lot of misconceptions about this topic around.
Much of the value of a linear workflow comes with rendering colour textures. But as the name suggests, it’s a workflow, that has to be kept in mind throughout the entire process.
The issue is that when you make a texture, either painting it in Photoshop to look good on your screen, or as a JPEG from a camera, that image is made to look good under gamma corrected conditions, usually gamma 2.2. So as you paint that texture, you’re looking at it on a monitor that’s already gamma 2.2, which is not linear. This is all well and good, displays are already gamma corrected to better fit the range of human vision.
The problem starts though, when you use those colour maps as textures in a renderer. When you’re doing lighting calculations in a renderer, those take place in a linear colour space. i.e – add 2x as much light, and it gets 2x brighter. The problem is that your colour textures aren’t like that if they’re at gamma 2.2. What’s double in numerical pixel values in gamma 2.2 is not necessarily twice brighter perceptually. So this breaks the idea of taking brightness information from a colour texture and using it in lighting/shading calculations, especially if you’re doing multiple light bounces off textured surfaces.
So what a linear workflow means, is that you take those colour textures, and convert them back to linear space before rendering, then you gamma correct/tonemap the final result back to gamma space (for viewing on a monitor). Now the lighting calculations work accurately, however it does change things – because the textures get darkened in the midtones the image can look darker, so you need to change the lighting setup, etc. etc. Hence, workflow – it’s something you need to have on all throughout the process, not just applying gamma at the end.
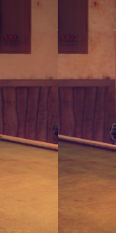 I wrote some code a little while ago that did it all automatically in the shading process, applying inverse gamma correction for colour textures before rendering, then corrected back to gamma 2.2 afterwards. After adjusting lights from old scenes to have the same appearance, it gave some nice results. It seemed to bring out a lot more detail in the textures, which got washed out before (left is normal, right is with linear workflow). It’s not finished though, it also needs to adjust the lights in the preview render, and inverse gamma correct colour swatches too so the flat colours you pick in the UI are also linear.
Further references:
September 4th, 2008 .
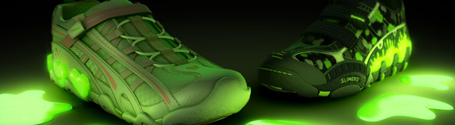
We recently finished a 15 second commercial for Striderite Slimers a new childrens’ shoe made in conjunction with Nickelodeon in the US. It involved heavy use of fluid sim, with all the sim, animation and rendering done in Blender.
August 17th, 2008 .
While watching the Beijing olympic opening ceremony last week, I got a bit of a surprise. A couple of months ago at work, we had a quick project come in to model, texture and render turnarounds of a few Chinese artifacts from a reference photo each. Mine wasn’t a big job and was pretty fast to do, using some texture projections with the UV Project modifier and cloning and cleanup in Photoshop.
We’d had a hunch it may be for something related to graphics in the olympics, but I was taken aback to see it blown up on the enormous LED screen during the opening ceremony. I wonder how many million people saw it – too bad this tiny part wasn’t something a bit more impressive! 🙂 Still, not bad for the novelty at least! Below is the original render, and a grab of how it appeared on screen.
July 22nd, 2008 .
A couple of nice things have come up lately that I’m quite proud to be able to mention. I was at the Museum of Contemporary Art on the weekend checking out part of the 2008 Biennale of Sydney. Browsing in the museum shop afterwards, I came across a book with a familiar sounding title – Design and the Elastic Mind, published by MoMA (that’s right, the Museum of Modern Art in New York). I knew Elephants Dream had been featured in the web component of this exhibition a little while back, but had no idea there was a book. So, I took a look inside and there it was, published art, with our names in the index too!
Another nice piece of news came in from Exopolis yesterday, mentioning that Lighthouse had appeared in Shoot magazine’s Summer 2008 top 10 visual effects and animation chart, coming in at 2nd place! Because of this, there’s also an article on the project too. Not only is this very flattering to see in itself, but especially looking at some of the other names below us, such as The Mill, Framestore, Digital Domain and Psyop, all huge studios with great reputations, it’s very satisfying to see that our little team is in such esteemed company.
July 1st, 2008 .
Last week, Lighthouse was released online, a short film project that our studio had been working on for the last couple of months. The full details about the project, with the movie itself viewable online, high res stills, and production breakdown video are available in the post we made at CGTalk, so please do go and check it out there. The response so far has been great, we got featured on the front page of said website, and have had several thousand views with very encouraging comments.
Although it was a bit tricky for me, being the bottleneck responsible for the texturing, shading, lighting, comping, with a couple of weeks of late nights towards the end of the project, it was quite enjoyable overall. Exopolis, our clients in LA, were fun guys to work with and gave us a lot of room to work without being micromanaged. It’s interesting that Liberty Mutual (the insurance firm who commissioned the work, in the form of the ‘responsibility project‘) are now spending their marketing dollars on producing themed art, rather than usual commercials. It’s certainly the kind of work I’d love to be doing more of.

September 27th, 2007 .
Three months since the last post here, I think that deserves either an award or a slap on the wrist. Things have been busy, and I’m sorry to say I’ve been much more inclined to spend my free time in other ways than writing here.
Work has been through alternating bursts of slow r&d time and busy projects, the latter being where I find myself at the moment. We’re using Blender more and more, currently we’re doing an immensely complex animation of around 12,000 frames, without much time to do it in. It’s the first project of this scale that we’ve done in Blender as a team, and although it’s a lot to manage and keep track of, it’s been pretty good.
Blender’s linked library / group / scene / action system has been great, and much easier than they were doing previously for similar projects in Max. I’m keeping a master scene file that contains everything, however most of the models/rigs in there are coming in from linked groups in external files, that any of the others can add to and update. Not only does this keep things easy to modify and ripple through, but it allows us to distribute the workload well between all of us by segmenting the files finely. I’m afraid I can’t give much more detailed info at this moment, perhaps some time in the future.
The work I was doing on glossy reflections/refractions was finished a while ago, the end product being much more robust and advanced than in that last post, and also including all sorts of extra nice things like using QMC sampling for ray shadows and ambient occlusion. These changes are now officially in Blender’s SVN repository and will be in the next major release, however I’ve already been making use of it extensively. This not overly interesting illustration I did for a magazine cover made it into the Australian Creative magazine gallery and uses a lot of anisotropic blurry reflection.
I made some nice docs online here: Glossy Reflection/Refraction / Raytraced Soft Shadows / QMC Sampling. Thanks again to Brecht van Lommel and Alfredo de Greef who both gave me some great guidance and help along the way, and I look forward to doing more work in this area in the future. A few other changes I’ve made recently have been extra lamp falloff options, including custom curve, enabling different curve tilt interpolation types, and I’ve also committed a bunch of ex-tuhopuu UI related work to the ‘imagebrowser’ branch, to work on separately in there until I can find the time to finish it up and bring to the main Blender SVN trunk.
But life goes on…
June 12th, 2007 .
Previously, I’ve grumpily complained that there aren’t enough people interested in working on Blender’s internal renderer, and so it was only fair that I put my money where my mouth is. I mentioned I’d been doing some coding recently, and this is one of the products of that time: blurry/glossy reflections and refractions in Blender’s internal raytracer. It works similarly in concept to yafray’s ‘conetrace’, sampling a cone of rays around the current pixel to get an averaged, blurry result. The sampling is using a quasi-monte carlo Halton sequence, which Brecht van Lommel previously converted into C code in an old experiment of his, and which he gave me a lot of valuable help with – thanks a bunch, Brecht!
This has been quite an interesting (though sometimes frustrating) learning experience for me, diving into a new area of Blender’s source code for me, and learning about many concepts I was previously unfamiliar with. What I’ve got so far probably isn’t perfect, but I’m very happy with the progress made so far. I’ll post again soon about some of the process and things I’ve learned so far, hopefully in a way that people not used to reading technical SIGGRAPH papers will get some value from. But for now, here are some pretty pictures, and a patch! There’s also a bit of discussion in this thread on blenderartists.org, too.
March 18th, 2007 .
I came across an article yesterday which referenced a presentation at SIGGRAPH 2004 by ATI, talking about a quick method for faking subsurface scattering in skin and had to give it a try in Blender. It’s by no means accurate, but it’s very fast and easy to set up now in Blender. The technique is apparently what they used on the Matrix: Revolutions ‘superpunch’ shot, it’s basically using UV information for finding pixel locations on the surface, by rendering a baked image of the lighting and blurring it.
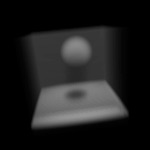
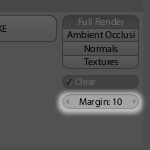
Luckily, with the baking tools now in Blender, this is simple. Just set up your unwrapped model so it’s rendering as usual [1], give it a new image texture and do a Bake Render Meshes → Full Render, to get a baked image of that lighting information [2]. When you do this, it’s important to set the baking bleed margin high [3], so when you blur this image later, you don’t get the black background spilling back into the visible area.
|

|

|
|
|
[1] Basic render
|
[2] Baked UV map
|
[3] Margin settings
|
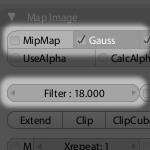
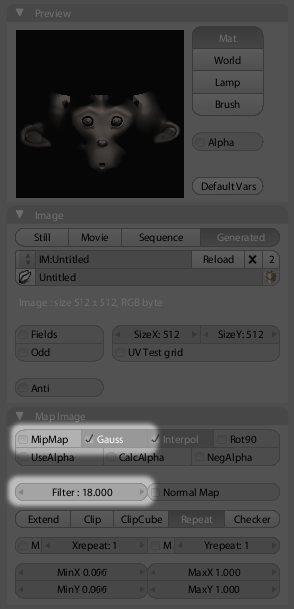
Now just load that image up as an image texture on your model’s material. You can do this without saving or packing the image since it’s still in memory, but if you don’t, it’ll be lost when you next load up that blend file, so you might as well save it. The next step is to blur this image, to fake the light scattering around under the surface. You can do this in Photoshop or something, but the easiest way is to just raise the ‘Filter’ value in the image texture [4]. This sets the width of the sampling area for when the pixels are looked up during texture mapping, and is pretty much the same as blurring the image. Switch on ‘Gauss’ to use Gaussian filtering instead of the box filter. Gaussian is much softer and doesn’t leave stepping artifaces with large filter sizes like Box does. It can also help to switch off MipMaps, though this will slow down the render as a tradeoff.
Finally, you’re going to be using this image texture to provide the lighting on your object, so first turn down your diffuse shader’s reflection value (usually ‘Ref’), give this texture a UV mapping, and turn up ‘Emit’ so the material is self illuminated by the texture. There are a few ways you could go about this such as mapping the texture to affect the ‘Ref’ channel, but what I’ve done in these examples is to turn down Ref to about 0.15, Emit up to about 0.85 and map the texture to the Color channel.
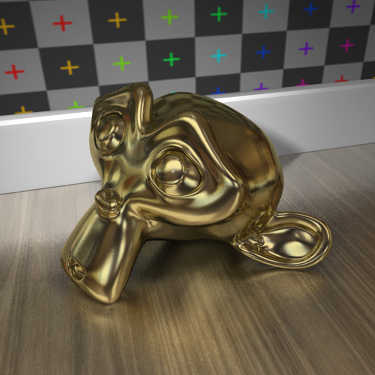
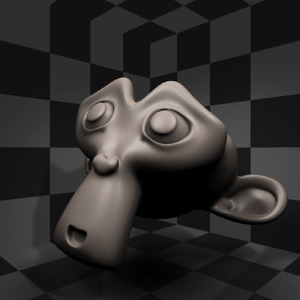
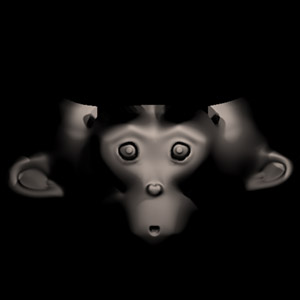
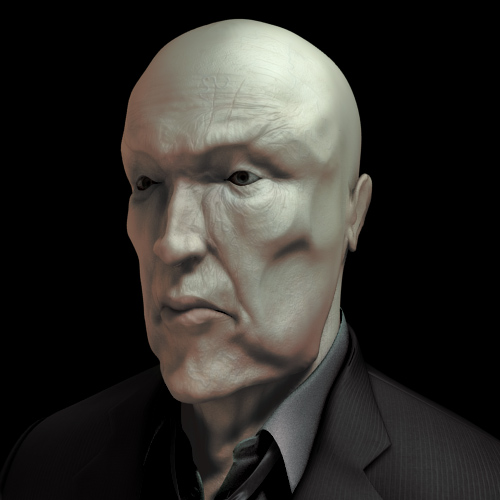
Render, and there you have it [5]! I gave it a try on my recent sculpt model, and it looks interesting there too [6]. For some situations, this works just fine, but it’s only really practical for things like skin, since it’s just blurring. It won’t handle real translucency, like light coming through a leaf.
|
|

|

|
|
[4] Filter settings
|
[5] Suzanne rendered with the effect
|
[6] Applied to a sculpt model
|
The good thing about this technique, unlike the toon shader/shadow buffer method, is that it lets you use a standard lighting and material setup. This technique isn’t view dependent, so it will be fine in animations like flyarounds, as long as the model or light sources aren’t moving. Perhaps it would be possible to get it working in animation by means of a script – i.e. for reach frame, do the bake render, and since you’re already using that image as a texture, it should go fine. Of course this is still a cheesy hack, so bring on the real thing!
February 26th, 2007 .
I’m only about a week late, but I might as well do the customary ‘New version released!’ post, so here we go: Blender 2.43 is released! There, that’s better.
A challenge leading up to this release was getting the new website together. I’d pretty much finished the design last year, but it took a while for the admins to get the new server hardware ready, and for Bart to do the work integrating the templates with the CMS, Typo3.
The release provided as good an incentive as any to get the site ready, and thankfully this time with the new hardware, the website was pretty solid, despite it being thoroughly barraged by visitors via various news outlets around the web. There’s still a fair bit to do though, there are plenty of stale old pages in need of a refresh, and the forums and wiki design still needs to be integrated.

As far as the release itself goes, here’s another little list of my favourite contributions this time around.
There’s one bit of disappointing news though. The next release was planned for a while to be a UI-centred Blender 2.5 release, for which Ton would do the huge and time consuming necessary internal upgrades that would allow features that I’ve been working on such as drag and drop in the outliner, a customisable toolbar, and radial menus to be implemented.
It seems now that once again, it has been decided for this work to be postponed in favour of a version 2.44 with smaller projects, meaning that it’s going to be at least May or June before any of these UI projects can be integrated. It’s a lot of difficult work for Ton to do, and it’s up to him to decide what he wants to work on, but it’s also frustrating and demotivating for me, because I’ve been waiting so long, being prevented from working on these sorts of improvements release after release. I offer my apologies to any of you who are waiting too.
February 8th, 2007 .
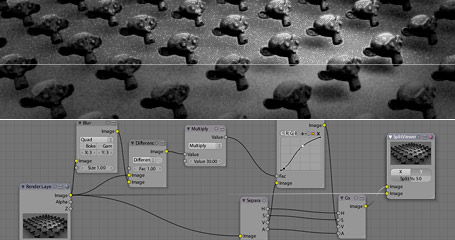
A couple of days ago, I was experimenting with unsharp masks in Blender’s compositor when I came across an interesting paper by Thomas Luft, Carsten Colditz, and Oliver Deussen, Image Enhancement by Unsharp Masking the Depth Buffer. The paper describes a number of image manipulations that can be done by finding areas where there are sharp discontinuities in depth, one of which is quite useful as a way to fake an ambient occlusion effect in post.
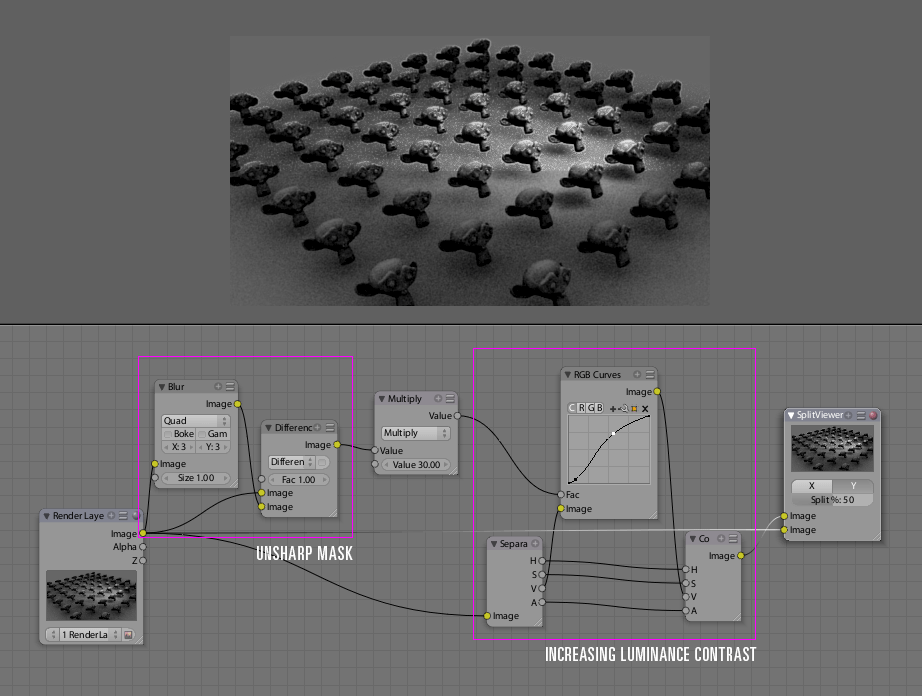
Unsharp mask is a popular way of sharpening images, which generally gives much better results and flexibility than simple convolution filters. It may not be widely known, but it’s actually a wet darkroom technique, and is very easy to recreate with some simple blurring and blending. Unsharp mask finds areas of high local contrast by comparing the original image to a blurred version of itself, checks where it differs the most, then uses this mask to enhance constrast in those areas, usually in the luminance channel. The blur radius determines the size, or frequency of features that will be found.
This is quite simple to rig up in the compositor, below is an example with a deliberately grainy and blurry render to clearly show the effect of the unsharp mask.
Now that I’ve got an unsharp mask, it’s easy enough to follow through and look at implementing some of the techniques mentioned in the paper. One that interests me the most is where they use the depth buffer to give a kind of ‘drop shadow’ behind foreground objects, using the unsharp mask to find discontinuities and and mask foreground/background. This can be used like a fake, post-process ambient occlusion. With a low radius, it can be used to act like a dirt shader, darkening cracks and wrinkles, and with a higher radius it can act more subtly on larger features.
Below is an example of using this fake AO technique. I didn’t actually use this on the Waiting in the Basement image, but the model is a nice test case. I start by finding the creases and corners from the depth channel using the unsharp mask, then I do some tweaks to the intensity since what comes out of the unsharp mask isn’t immediately useful by itself, and doesn’t cover all the areas I want to darken. Because it’s using a non-antialiased Z buffer, I do some small blurring to the mask at the end to make it a bit smoother, and then use that mask to darken the image slightly, giving the detail shadows.
Note that I’m using the Min and Max options on the Map Value nodes to clamp the channel to between 0.0 and 1.0 before blurring. Since the channels are all float values, giving a range greater than 0-1 can make the blur nodes work in strange ways. The effect is much clearer on the full size image, especially around the collar and folds in the face, so click to check it out. Here’s the .blend file (2.43 RC+ required)

January 6th, 2007 .
Here’s another experiment with my game engine tablet support patch, now trying to do something a bit more practical with the virtual pen. I’m using the new rigid body constraints in the game engine to construct a brush tip out of ball joints – I have very little experience with them so it’s a bit rough. I wish I knew how to make the motion more damped and swing less loosely, but it works to an extent, and the main thing, it’s all good fun!
I actually find it interesting, since the swinging back and forth of the tip adds another dimension to it, you have to get the angle and timing just right, to get the mark where you want it on the canvas. Although it’s not anything that’s of immediate practical value, it does at least provide an additional level of depth of ‘analogue’ input that could potentially be exploited in fun ways.
Of course this isn’t anything too amazing, being just a poor remediation of ink painting, but it’s a small step along the way to something that I’m interested in investigating, developing more simple, yet flexible tools.

As an example, a paintbrush is a tool that’s simple in construction, but can be used in a multitude of ways, to create a multitude of results. However these techniques and resultant effects are not necessarily designed from the outset. They are not necessarily results of conscious choices made during the creation of the tool, they are results of the brusha[euro](TM)s innate being, that are intuitively discovered or learnt by the artist by experience or experimentation, not by remembering formulas or keystrokes, or reading technical references.
I’d be confident in presuming brushes weren’t originally designed with the explicit thoughts a[euro]oewe will give it a feature to be able to be impressed, or used with too little ink, or to be thrown or flicked, or used with the opposite enda[euro]�. These are uses that come from outside the tool itself, from people using it and taking advantage of (abusing?) the form that it has.
How can this simplicity yet potential for complex creation be realised in software? Software is programmed, and often ita[euro](TM)s a case of if one wants a certain function, that functionality is programmed directly, and access to it given through some kind of direct command, button, gesture, or action taken from a range of choices. How can we make more ‘analogue’ software tools that ‘just are’? How can we make tools that can be used in different ways by virtue of what they are, with simplicity that we can use for expression in subtle, yet complex ways? Or further still, can we do this with something unique to the digital environment, and not a remediation or simulation of existing tools?
December 30th, 2006 .
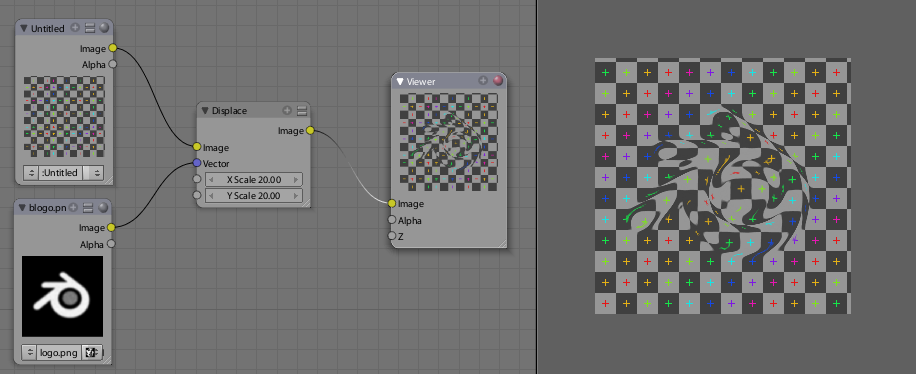
Yesterday I added a new node to Blender’s compositor: Displace. It works very similarly to Shake’s iDisplace node, pushing pixels around based on an input vector mask, and is useful for all sorts of things like doing hot air distortion, quick and dirty refraction effects in post, and so on. The full documentation is in the commit log, I guess I’ll have to tidy it up for the release notes.
One curiousity of this one is the technique used to code it. Most of the code logic was done using Blender’s Python Image API, as a means of quickly testing and prototyping. Python is a lot slower at the actual processing, but it’s a heck of a lot quicker to test than having to compile Blender each time. I recommend it!
You can download the prototype script/.blend file if you’re curious (just press Alt P). I then ported to C, which is relatively easy to do for simple image processing code like this, and changed a few things around. Previously in the Python version I had to try and come up with my own not-too-bad antialiasing code, though I’m sure what I came up with has been done before and has a nice technical name or something 😉 In the C version I was able to use some nicer image sampling code that Ton used for the awesome Map UV node. Incidentally, I also used the same Python prototyping technique for the UV test grid option when creating new images in Blender (.blend file).

Quick demo video: hot air distortion
 |
 |
|
Greyscale input, displacing in one direction (node setup)
|
2D vector input (normal map), independent (more accurate) X and Y displacement (node setup)
|
December 5th, 2006 .
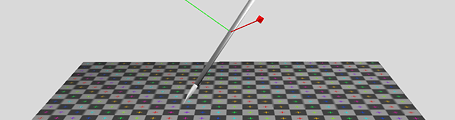
When I worked on adding tablet support to GHOST, Blender’s low-level input system (alongside Nicholas Bishop and Andrea Weikert who did the X11 and Windows versions), one thing I had in mind was the possibilities not only in the obvious painting and sculpting, but in other more experimental areas too. I’ve got a few ideas sketched down about potential uses in the interface, for example imagine sliders that changed in precision depending on tablet pressure, or a radial menu that uses the tablet tilt information to bias what option is selected.
A tablet, especially one that supports tilt sensitivity like the Wacom Intuos, is almost a poor man’s 3d input device. With X/Y location, pressure and tilt, you can derive a lot of information about the pen’s situation in 3D space. This is interesting to me, because unlike real 3D input devices like spaceballs (which I don’t own), many CG artists have tablets, so input methods involving a tablet can involve a much larger audience than the more obscure devices, and so investigating it doesn’t feel like such a waste of time :).
Anyway, the idea came to me that Blender’s built-in game engine could be very useful as a quick, interactive means of testing these different ways of interacting with a tablet. Over the weekend I had a hunt through it’s unfamiliar source code, and hacked together a patch that adds pressure and tilt support to the game engine’s mouse sensor (available here). It exposes these variables through Python and works very similarly to the way you currently get the mouse’s position, with three new functions: getPressure, getXtilt() and getYtilt().
So of course I had to do a first test! This one is very simple, just visualising the pen 3D space as a virtual pen over a virtual tablet surface. I mapped the pressure to the ‘height’ of the pen along it’s own local axis, and the tilt data is changing the orientation. Watch the video I recorded on a digital camera and see for yourself! The .blend file for it is here, but you’ll need to build Blender with my patch for it to work.
After doing this I’ve got a few more interesting ideas for things, such as FPS-style mouse navigation with the tablet but with tilt controlling other things like roll or turning around, or perhaps a marble madness style game where you use the pen to tilt the surface that the marbles roll around. I’m now also curious to combine this with my PowerMate for some really interesting interaction. Let me know if you have some other ideas that could work too! 🙂
November 22nd, 2006 .
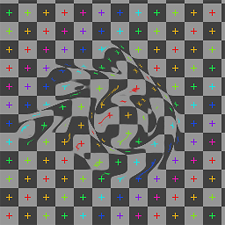
Yesterday I found out about a new website called CGSphere. The premise is simple, take a sphere on a grid background in a CG application and interpret it in some creative way. It reminds me of one of my uni projects called small square book, in which we had to make a square book with 50 pages, with each page having a different image based on the idea of a square, linked together in some consistent theme. I really enjoyed that project, and the fun of trying to be inventive within limitations, so I posted my first CGSphere today.
It’s an homage to El Lissitzky, one of the Russian Suprematists / Constructivists, and his famous image Beat the Whites with Red Wedge from 1919. I really love that kind of art, and luckily had the chance to see some of the originals by Malevich, Lissitzky and Rodchenko in the Russian museum a few years ago. Anyway, this is just my small tribute 🙂
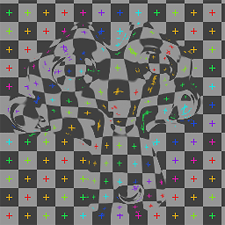
Update: I made another one.

September 12th, 2006 .
It’s interesting how productive one can be without the constant distractions of the internet. I’m alive and well in my new place and enjoying it a lot, but thanks to incompetent phone companies I’ve been disconnected from the net for the 2 1/2 weeks I’ve been here. Hopefully I’ll be back online within the next couple of days, so sorry if I’ve been a bit out of contact, I’ve got a huge backlog of emails to get through.
Apart from cleaning up a demo reel, some coding and of course unpacking, the other day I did a little test of the in-development multi-res sculpting tools, currently being constructed by Nicholas Bishop, who’s doing a sterling job as part of Google’s Summer of Code. I’m using a build that’s about 3 or 4 weeks out of date, but even so, it works very nicely already.
Although it doesn’t have many of the features and speed of an application like Zbrush, at least from my experience in both apps, it’s quite competitive for a lot of purposes. The tight integration of the sculpting tools with the rest of Blender is a huge plus – being able to step down from level 7 to level 4 subdivision, use Blender’s UV tools to unwrap the mesh and having the UV layout propagate up to the higher res surface is just fantastic. At the rate things were going previously, I wouldn’t be surprised if the current development version is a lot better, too. This little test below took an evening to sculpt and another day or so for the remaining stuff like lighting, skin shader, colour and bump map painting. My poor little Powerbook G4 can’t handle ungodly amounts of polys, this mesh being only 120k, but still the results are very nice, especially with a bump map on top, the old fashioned way.


