December 30th, 2006 .
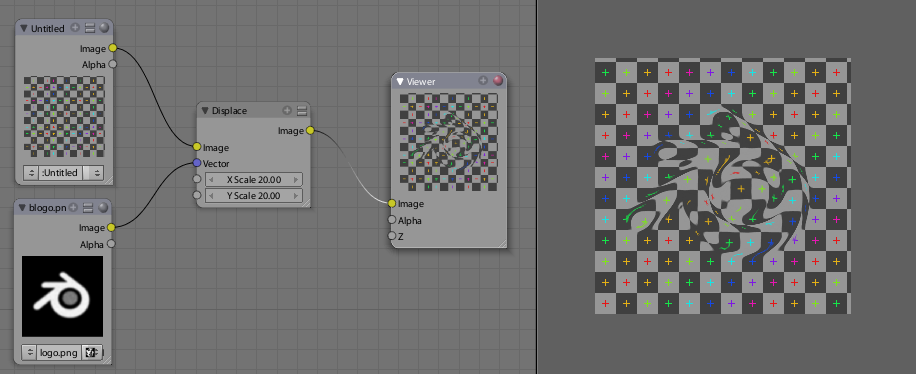
Yesterday I added a new node to Blender’s compositor: Displace. It works very similarly to Shake’s iDisplace node, pushing pixels around based on an input vector mask, and is useful for all sorts of things like doing hot air distortion, quick and dirty refraction effects in post, and so on. The full documentation is in the commit log, I guess I’ll have to tidy it up for the release notes.
One curiousity of this one is the technique used to code it. Most of the code logic was done using Blender’s Python Image API, as a means of quickly testing and prototyping. Python is a lot slower at the actual processing, but it’s a heck of a lot quicker to test than having to compile Blender each time. I recommend it!
You can download the prototype script/.blend file if you’re curious (just press Alt P). I then ported to C, which is relatively easy to do for simple image processing code like this, and changed a few things around. Previously in the Python version I had to try and come up with my own not-too-bad antialiasing code, though I’m sure what I came up with has been done before and has a nice technical name or something 😉 In the C version I was able to use some nicer image sampling code that Ton used for the awesome Map UV node. Incidentally, I also used the same Python prototyping technique for the UV test grid option when creating new images in Blender (.blend file).

Quick demo video: hot air distortion
 |
 |
|
Greyscale input, displacing in one direction (node setup)
|
2D vector input (normal map), independent (more accurate) X and Y displacement (node setup)
|
December 5th, 2006 .
When I worked on adding tablet support to GHOST, Blender’s low-level input system (alongside Nicholas Bishop and Andrea Weikert who did the X11 and Windows versions), one thing I had in mind was the possibilities not only in the obvious painting and sculpting, but in other more experimental areas too. I’ve got a few ideas sketched down about potential uses in the interface, for example imagine sliders that changed in precision depending on tablet pressure, or a radial menu that uses the tablet tilt information to bias what option is selected.
A tablet, especially one that supports tilt sensitivity like the Wacom Intuos, is almost a poor man’s 3d input device. With X/Y location, pressure and tilt, you can derive a lot of information about the pen’s situation in 3D space. This is interesting to me, because unlike real 3D input devices like spaceballs (which I don’t own), many CG artists have tablets, so input methods involving a tablet can involve a much larger audience than the more obscure devices, and so investigating it doesn’t feel like such a waste of time :).
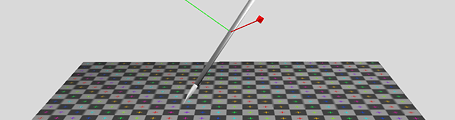
Anyway, the idea came to me that Blender’s built-in game engine could be very useful as a quick, interactive means of testing these different ways of interacting with a tablet. Over the weekend I had a hunt through it’s unfamiliar source code, and hacked together a patch that adds pressure and tilt support to the game engine’s mouse sensor (available here). It exposes these variables through Python and works very similarly to the way you currently get the mouse’s position, with three new functions: getPressure, getXtilt() and getYtilt().
So of course I had to do a first test! This one is very simple, just visualising the pen 3D space as a virtual pen over a virtual tablet surface. I mapped the pressure to the ‘height’ of the pen along it’s own local axis, and the tilt data is changing the orientation. Watch the video I recorded on a digital camera and see for yourself! The .blend file for it is here, but you’ll need to build Blender with my patch for it to work.
After doing this I’ve got a few more interesting ideas for things, such as FPS-style mouse navigation with the tablet but with tilt controlling other things like roll or turning around, or perhaps a marble madness style game where you use the pen to tilt the surface that the marbles roll around. I’m now also curious to combine this with my PowerMate for some really interesting interaction. Let me know if you have some other ideas that could work too! 🙂
November 22nd, 2006 .
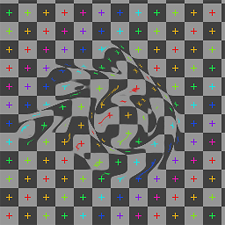
Yesterday I found out about a new website called CGSphere. The premise is simple, take a sphere on a grid background in a CG application and interpret it in some creative way. It reminds me of one of my uni projects called small square book, in which we had to make a square book with 50 pages, with each page having a different image based on the idea of a square, linked together in some consistent theme. I really enjoyed that project, and the fun of trying to be inventive within limitations, so I posted my first CGSphere today.
It’s an homage to El Lissitzky, one of the Russian Suprematists / Constructivists, and his famous image Beat the Whites with Red Wedge from 1919. I really love that kind of art, and luckily had the chance to see some of the originals by Malevich, Lissitzky and Rodchenko in the Russian museum a few years ago. Anyway, this is just my small tribute 🙂
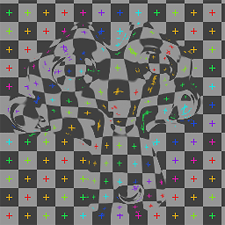
Update: I made another one.

November 3rd, 2006 .
I’m back in Sydney again, after arriving yesterday with surprisingly little jetlag. Previous times I’d been to Europe, I’d been a total zombie for the week after, but I suppose thanks to a fortuitous combination of travel times and aeroplane seating arrangements, I’m feeling pretty good. My time away was rushed and brief, but still very interesting.
After only arriving in Europe the night before, Blender conference came and went very quickly, it was great to catch up again, with the general Blender crew and of course the others from the Orange team (except for poor Basse, who was stranded in Finland after an airline strike :/ ). Some very well produced videos of the proceedings, including our Making Elephants Dream presentation, are available on Google Video and BitTorrent, with hopefully more to come soon.
The day after the conference, Bassam and I shot over to Antwerp in Belgium to teach a 4 day Blender Workshop at the HISK, a high-end fine arts college located in a gorgeously run-down old military hospital. I was a little uncertain at first, not knowing much about the expectations and abilities of the students, including an audio installation artist, painter, sculptor, and others, none of whom had done any 3D before. By the end of the workshop though, things were going very well. We wanted to give the students more breadth of tuition than depth, so even if they weren’t instant experts, they would know what possibilities exist in Blender for them to integrate with their work, and they managed to keep up very well with the huge amount of information that was given to them day after day. By the end, most of the students were quite comfortable in getting around and starting to use it for practical work in their projects, one of them already connecting up the game engine with his audio applications based on a Python script we found on the web. So all in all, very successful and seemingly fun for everyone.
Immediately after the last session on the last day, we went out for a quick dinner, then Bassam and I jumped back on the train to Amsterdam. In the remaining day before we left, we hung out with Ton and researched and brainstormed improving Blender’s walkcycle animation tools. The results are impressive already! Bassam headed back to the US, and I set off for home, but rather than doing the whole 20+ hour flight in one go, had arranged to stop over in Tokyo overnight. With only about 4 hours to spare, I went strolling around Harajuku, Aoyama and Shibuya, dropping in at a few interesting places around the area.
Anyway, on the flight home, I did some experiments in the Blender Outliner, partially inspired by the expectations and real-world usability testing of the HISK students. Click below to see a little work in progress teaser video of the sort of thing that I’m getting at. The drag and drop stuff might take some time before it gets in a state ready to be committed to CVS, though. There are some structural issues in other areas of the code (that I’m not too confident with) that should probably be dealt with first.

October 22nd, 2006 .
Just a brief update, I’m sitting in the side room of De Waag in Amsterdam on the third and final day of the 2006 Blender Conference, waiting to give my next artist tutorial session. Having a great time as usual amidst the late nights and jetlag. Most of the presentations I’ve seen have been interesting, and they should be appearing as video downloads soon, for those who couldn’t be here.
Bart and the others from Blendernation are here, doing a great job covering the event with video reports and interviews already online, and there’s also an excellent live video stream coming straight from the main theatre floor. I wonder what sort of nonsense has been recorded coming out of my mouth, for the world to see…
October 17th, 2006 .
I’ve had several people contact me about my radial menus design and proof of concept for Blender that I showed here a couple of months ago. Progress on it had come to a standstill, while I was waiting for a limitation in Blender’s input system to be overcome. Previously, it wasn’t possible to detect in Blender if a key other than Ctrl Shift or Alt was held down, which meant that the fast menu selection method of holding down a key temporarily could only work when bound to combinations of those keys, and not most other hotkeys used in Blender.
Jean-Luc ‘lukep’ plans to work on improving this area of Blender when he works on refactoring the low-level input events system in Blender, and I’d put the menus on hold until this happened. However Jean-Luc’s project is large, progress is slow and it will take some time until it is completed.
So for my own sake and for those curious people who would like to give it a whirl, I wrote some temporary code to work around that problem, and now the radial menus are working on any hotkey, as they should. I also found a way to allow more than 8 items per menu, which was missing before. This is still a bit sketchy on enormous menus like the mesh specials menu, but that’s really a usability fault in Blender more than the radial menus – the specials menu is a badly organised dumping ground for tools that’s clunky to use and getting messier each release. This particular problem should be solved at its root.
Anyway, having said that, I’ve finally made a patch for you all to try, sitting in the patch tracker. Keep in mind it’s still a little rough around the edges, but hopefully you should find it interesting. If you make a testing build, I’d appreciate it if you could post a link to it in the comments here, so others can try too. Cheers!
October 12th, 2006 .
I spent a long time deliberating over whether I would go to the 2006 Blender Conference or not. My bank balance has been pretty unhealthy recently, and as great as it would be to see everyone and be a part of the excitement again, I wasn’t sure if I could afford to travel halfway around the world or not. I came to the last-minute conclusion that it’s going to be pretty tight and not really affordable, and that even so, I would go anyway! 🙂
Apart from the real reason for the conference, being around all the others, eating, drinking, discussing, brainstorming, I’m going to be giving a couple of pretty informal talks on the Friday – ‘Making Elephants Dream’ with the others from Orange who can make it, and also a lighting and compositing workshop with Andy Goralczyk. I’d like the keep both of them pretty informal and fun, the latter more about nifty tips and tricks, like in my previous curves session.
Straight after the conference, Bassam Kurdali and I will shoot over to Belgium for a week, to teach a four day 3D course using Blender at the Flanders Higher Institute for Fine Arts in Antwerp. This should be very interesting and challenging, though not new – we held a series of one day courses during our time at Montevideo in Amsterdam. The students are a group of fine artists who are looking for ways to integrate 3D technology into their work. I’m very happy to be able to help them with this, and curious to see what they come up with.
September 12th, 2006 .
It’s interesting how productive one can be without the constant distractions of the internet. I’m alive and well in my new place and enjoying it a lot, but thanks to incompetent phone companies I’ve been disconnected from the net for the 2 1/2 weeks I’ve been here. Hopefully I’ll be back online within the next couple of days, so sorry if I’ve been a bit out of contact, I’ve got a huge backlog of emails to get through.
Apart from cleaning up a demo reel, some coding and of course unpacking, the other day I did a little test of the in-development multi-res sculpting tools, currently being constructed by Nicholas Bishop, who’s doing a sterling job as part of Google’s Summer of Code. I’m using a build that’s about 3 or 4 weeks out of date, but even so, it works very nicely already.
Although it doesn’t have many of the features and speed of an application like Zbrush, at least from my experience in both apps, it’s quite competitive for a lot of purposes. The tight integration of the sculpting tools with the rest of Blender is a huge plus – being able to step down from level 7 to level 4 subdivision, use Blender’s UV tools to unwrap the mesh and having the UV layout propagate up to the higher res surface is just fantastic. At the rate things were going previously, I wouldn’t be surprised if the current development version is a lot better, too. This little test below took an evening to sculpt and another day or so for the remaining stuff like lighting, skin shader, colour and bump map painting. My poor little Powerbook G4 can’t handle ungodly amounts of polys, this mesh being only 120k, but still the results are very nice, especially with a bump map on top, the old fashioned way.

August 3rd, 2006 .
Right now, some of the Orange and Blender contingent are living it up in Boston at SIGGRAPH 2006, the premier Conference/Festival/Tradeshow for the digital graphics industry and community. This year, we’re lucky enough to have a booth on the main tradeshow floor, the ‘Open Source Pavilion’, shared with people from other open source graphics projects like Inkscape, GIMP and Verse. The booth was sponsored by a few sources, but largely by an extremely generous private donation. We’re right there in the trenches just next door to Houdini and ZBrush.
Unfortunately I’m not there myself, I really wish I was. But the next best thing is the fantastic video blog coverage that Bart from BlenderNation is producing each day. It’s giving the event a great feeling of community involvement, so do go and check it out and see some of the faces behind the internet aliases!
July 20th, 2006 .
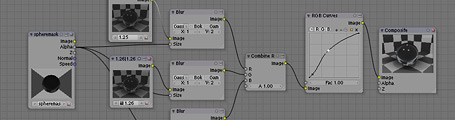
Here’s another comp test in some of my experiments with cekuhnen in the blenderartists forums. It makes use of a simple Combine RGBA node, which I wrote the other day. It doesn’t exist in Blender but a patch is available in the tracker. Without that patch though, you can replicate the functionality using a slightly convoluted node network. This technique basically takes three different versions of the refracting material, with slightly different indexes of refraction, then adds them back together in the different R/G/B channels. I’ve blurred them slightly with a mask taken from the sphere on another render layer.
It doesn’t hold up too well in close up since you can see the three different layers quite sharply, rather than a smooth blend – for that you’d need more IOR layers. I also tried doing this in material nodes too, which would be a much better approach, however the way raytraced refractions is handled there seems to be a little bit weird, and it didn’t work out. Hopefully in the future this can be cleaned up, perhaps with specific raytracing nodes that output RGB or alpha or whatever.
 A .blend file

July 18th, 2006 .
I’m sure most of the people reading this will know already, but Blender 2.42 has finally been released! Hooray! Do go and check out the extensive Release Notes, not just to see the beautiful demo images and movies but to read about the enormous amount of improvements that are in this version, many of which have come directly thanks to the work during the Orange project.
From my own perspective here, once again I’m proud and very happy to have played a tiny part in it’s creation, at Orange and away. My favourite contributions this time round were:
- Floating panel window edge snapping; not an obvious headliner, but makes working with floating panels much nicer
- Video sequence editor visual redesign, following on from this old blog post with mockup. And it only took 2 years to get around to it! 🙂
- Nice lighting setup/checkerboard/hair in the buttons preview render
- Empty display types and size; right now there are only two styles, need ideas for more!
- Cut/Copy/Paste selected text in a button. Should have done it before, but was obviously too lazy
- Three simple composite nodes: Separate RGBA, Separate HSVA, Set Alpha. Lots of fun and I hope to do more. An early patch for Combine RGBA is in the tracker!
- Colour sampler (eyedropper) now in the colour picker popup. It lets you sample a colour from anywhere on the Blender window
There’s also been some fun with the news reports. Blender.org got hit hard by the news article on Digg that some sadistic person submitted there. Also, presumably after reading through the Elephants Dream blog after hearing about the Blender release, one of the many Slashdot Wikipedia ‘enthusiasts’ posted an article mentioning me and linking to my unfortunate experience putting the Elephants Dream DVD menus together. I feel so honoured to have my name up in lights while providing an opportunity for the self-important misanthropes in the Slashdot peanut gallery to delight in some more of their irrelevant ranting. Bravo.
All in all though, a good release. Here’s to the next one, of which I’ll try to keep you all informed of my work towards.
July 15th, 2006 .
While helping prepare the Release Notes for the impending release of Blender 2.42, I’ve made a few more demo files, including for stress maps, and put together some comp breakdowns from Elephants Dream. The most fun (and slow) though, was using Blender’s fluid simulator for the first time, to make a nice demo of the new motion blurred fluid rendering capabilities.
It took an evening to set up, light and texture and overnight to render on my poor little G4, but it looks kinda cool! Guess I need a faster computer though, to use higher fluid resolutions and get rid of the residue stuck on the bowl at the end.
 A QuickTime H.264
 A MPEG4
A .blend file

July 11th, 2006 .
I did a bit of an experiment the other night as a proof of concept for a new node type that would be very nice. Although it’s unfinished and disabled for version 2.42, it’s planned that we’ll be able to extract an Ambient Occlusion pass into the compositor with Blender’s pass rendering system, which will make it much easier to manipulate, doing colour corrections, changing blend modes (screen/multiply/overlay are better blender modes than the built-in add/subtract/add+sub).
One very useful manipulation that could be done is to blur the AO pass along the surface of the geometry, to smooth out noisy sampling.
A test .blend file

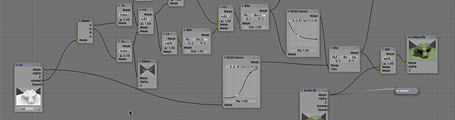
I’d like to be able to blur the AO pass in post, in order to get away with having less samples (faster render time) and to prevent flickering during animation. However just evenly blurring across the entire AO pass image won’t work, as the shading will blur outside the edges of objects and look ugly. Photoshop has a filter called ‘smart blur’ which does some kind of edge detection and masking in order to only blur the smooth areas, and leave sharp areas intact. Something like that would be a help, but that’s just doing an edge detect on the image itself, which probably isn’t all that accurate. Since we have plenty of information about the objects’ 3D geometry in the compositor via the Normal and Z passes, we should be able to make better use of it, and make the blur mask based on that information, to blur the smooth areas of the surfaces, but not across edges or corners.
If I knew more about filter programming, I might have a go at this myself, otherwise consider this a feature request 🙂 I mocked up a test using a whole bunch of nodes – A screenshot of the node setup is below. Basically, it takes each of the normal channels, does an edge detect on them, then tweaks and combines them back together as a mask for a blur. I’m sure a properly coded approach would be much better, perhaps doing things like comparing normal vector angles, masking and sorting based on Z depth, etc. but the results I have already with nodes are decent. The example image above shows the render without AO, with 4 sample AO, and the same thing with the AO pass ‘surface blurred’. 4 samples is usually ridiculously low and noisy, but it’s not too bad with the blur. If anyone wants to have a go at coding this, I (and I’m sure many others) will be most delighted!
July 7th, 2006 .
I’ve been working on a project using Blender over the last weeks and during the last few nights menu access has been increasingly frustrating me. Last year I had an idea for how to nicely integrate radial (pie) menus in Blender, and so during some time in the last couple of days I blew the cobwebs off my high school trigonometry and gave it a shot. It’s now mostly implemented and working well so far.
As Blender expands in its capabilities, less and less functionality is accessible directly with a single key press or button click. Keyboard space for new shortcut keys has run out, and most of the recent key additions are poorly structured, since it’s been a matter of finding a key that’s actually available, not one that’s ergonomic or meaningful.
There are ways to help this; customisable shortcut keys and customisable toolbars can help bring back direct access to tools, and an updated and re-thought keyboard layout can help prioritise what’s needed for working in the current age. Giving tools like texture space transformation (T) or split (Y) their own direct key presses worked fine in the 90s when there weren’t that many tools in competition, but these days we have much better tools (such as UV mapping) and more frequently used tools that should be brought to the fore. There is redundancy between popup menus (Ctrl E and K mesh editing menus) and they’re not optimised for ergonomics the same way that Blender’s other earlier hotkeys such as G, R and S are.
Ultimately, although a direct hotkey approach is great when possible and has worked well in the past, it has trouble scaling with an increase in complexity, which is happening in Blender more and more these days. Popup menus are evolving to be a new primary method of accessing tools – just about all of the excellent new mesh modelling tools in Blender 2.42 are found in the ‘Specials’ and ‘Edge Specials’ popup menus. It pays then, to take a look at making these menus as efficient as possible too.
Radial menus are a different method of presenting menu options to just a straight list. They’re more efficient to work with for a few reasons:
- The human ability for memorising an angle direction is much stronger than for remembering a linear distance
- Rather than needing an exact click on a button, one can select items in radial menus based on the angle of the mouse pointer from the start position. This makes the size of the selectable area segment much larger than that of a linear menu item, making it much faster to hit (see Fitt’s law)
- Radial menu items are an equal distance from the mouse pointer, so it doesn’t get successively harder to hit later items, as in a linear menu
Since radial menus rely so heavily on muscle memory, it’s not a good idea to change the position of menu items as new options are added. This can be a problem with auto-flowing radial menus that just divide the available 360A* by the number of available items. In an application like Blender, where new tools are often being developed and added, this would change the menu’s layout each time.
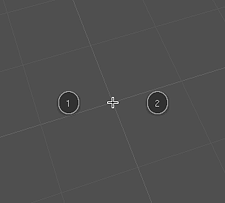
I have designed a layout and order of appearance to use for the first 8 radial menu items. It goes in a seemingly weird pattern, but it’s actually quite logical. It’s designed to be ‘upwards compatible’ for muscle memory so that the menu item locations are fixed and don’t move as new items are added to the menu later on. It also optimises efficiency – a radial menu is best kept symmetrical, with as large an angle between items as possible, so that the hittable areas are as large as possible, and gestural mouse movements can be fast and inexact.
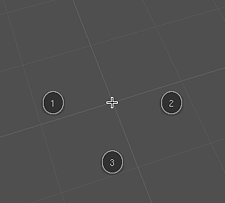
It starts off with two opposite sides for the first two items then joined by the one below for the third (this way, even with three items, the menu seems to still be ‘in order’ reading left to right).
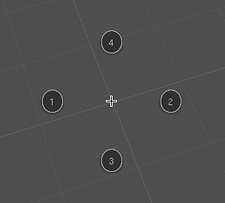
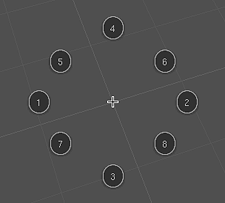
Then the fourth is added to complete the compass directions. From here, it’s just a matter of subdividing the rest of the angles for the last 4 items.
Although the radial menus are best with a maximum of eight items, they should be able to gracefully cope with more, if needed. I haven’t yet figured out the best way to do this, but I’ll probably try an approach of subdividing the 5/6/7/8 positions, or experiment with making a second ‘ring’ on the outside.
References:
July 4th, 2006 .
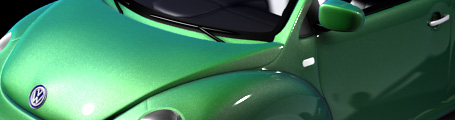
Some of you may have seen the video tutorial I made a while ago demonstrating how to fake a layered car paint material using ramps. Now in the upcoming Blender 2.42, we have the new material node system, so there’s no need for fakery, and a lot more flexibility and control. As a proof of concept and a nice demo for the 2.42 release, I made up a node-based car paint material using a great VW beetle model by ‘pa-furijaz’ that I found on the Blender Model Repository.

June 16th, 2006 .
Today, Campbell ‘Ideasman’ Barton showed me a very cool .blend file he made to demonstrate Blender’s Array Modifier, new in the upcoming Blender version 2.42. I thought I’d light, comp and render it to make a nice demo movie to use in the 2.42 release documentation. The white 3D axes are the controller objects. Check it out:


