Blender sensor sizes

October 28th, 2010 . 22 comments

Today I finally got around to fixing Blender’s weird camera to more closely resemble real-world counterparts. Previously Blender’s camera was hardcoded to use a sensor aperture width of 32mm, which doesn’t reflect any commonly available real-world camera sensor/film size. In turn, this meant the focal length (mm) for the lens didn’t resemble any real-world lenses whatsoever. It was pretty misleading when trying to intuitively choose lenses based on photographic experience, and also makes it a lot harder to match live-action footage.

I’ve made a patch to allow specifying a sensor size, along with a handful of common presets – easy to add some more. This first version isn’t 100% correct in that it doesn’t modify the FOV due to focus (in reality, the extension of the lens elements due to focusing slightly alters the FOV), but this can be added pretty easily as an option later. It’s also deriving the apparent FOV purely based on the horizontal aperture width, options for vertical/diagonal may be possible to add later, but would need to check how the renderer works with varying frame resolution aspect ratios.

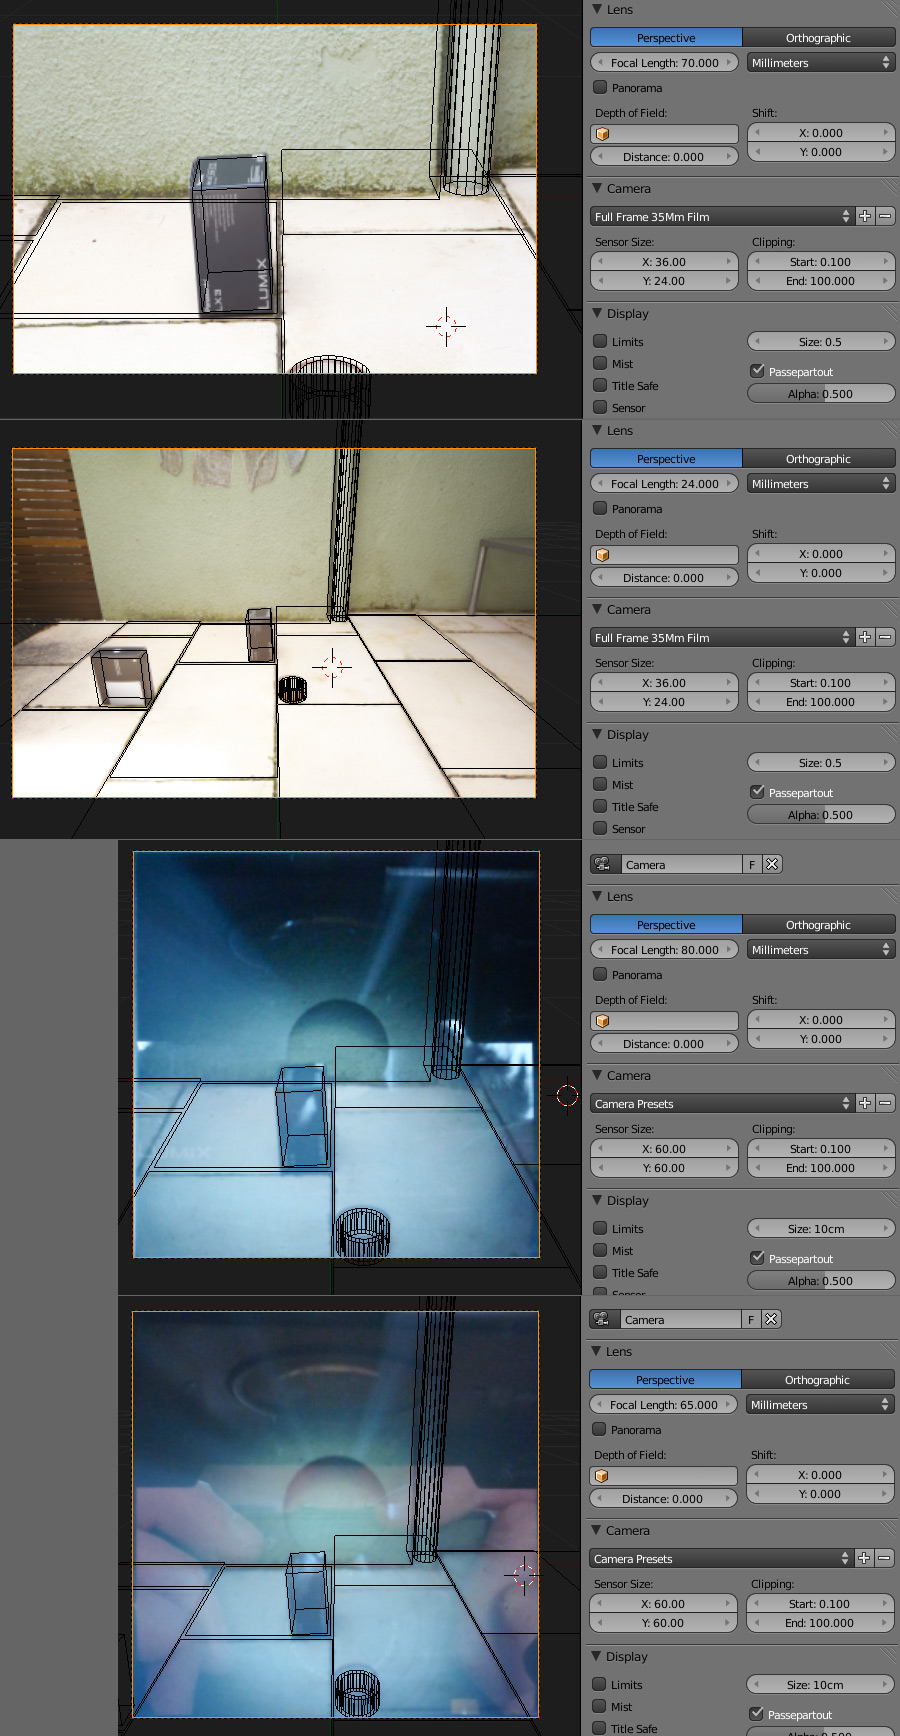
I thought it would be fun to do some real-world tests, so I quickly set up a very rough set in my backyard to see if a virtual set in Blender would match up. The setup and measurements were very very dodgy and I didn’t expect it to match perfectly. I shot with two cameras – first a 5D Mk II with a 12-24mm on 24mm and a 24-70mm on 70mm. To compound the un-scientific sketchiness of the test even further I tried again with my 6×6 Mamiya C330f TLR with 65mm and 80mm lenses, using a compact digital camera shooting the ground glass focusing screen (yes, too cheap to spend film on this). Given all this, I was pretty surprised to see that with a bit of tweaking it looks like it’s doing the right thing.

Anyway, the patch is up on the blender patch tracker, would be good to get some testing first before trying to commit, especially since I’m not sure how it should interact with the game engine either.

exhibition, kinokuniya sydney

October 19th, 2010 . 2 comments

For the last 6 years or so, a friend of mine from uni has organised ‘Art by Design’, an annual exhibition in Kinokuniya Sydney’s Wedge Gallery. This year I thought it would be fun to enter something in as a good motivation to take a break and produce something outside of commercial work.

I entered an illustration – a bit of fun, looking at the excitement of the early era of flight. It was produced with 3D renders mixed with a bit of digital painting over the top, and was actually more of a challenge than I thought, having to get back into doing the entire process (character modelling/posing) rather than just the lighting/shading as I’ve been doing mostly exclusively for the last few years.

The show is on until Nov 13 at Kinokuniya in The Galeries, 500 George St, Sydney.

Blender to Backburner

August 6th, 2010 . 7 comments

Yesterday I was doing some work over at Red Cartel, as part of it I coded a new network render submission script for Blender 2.5 to Autodesk Backburner – the default queue manager that comes with Max and Maya. I’d previously already made a similar exporter for Blender 2.4 which has been in use there for a while, allowing managing and prioritising Blender jobs alongside Max/vray jobs on the same farm.

I’ve packaged it up as a Blender 2.5 addon, it might be useful to any of you wanting to render Blender jobs in an Autodesk-centric environment. Get it here: http://mke3.net/projects/bpy/render_backburner.py

Moving on

July 5th, 2010 . 15 comments

As of last week, I’ve decided it’s time to finish up with my full time Blender development contract and move on to new things. It’s been 8 months now since I started with this, pretty close to the first 9 month target/budget, so it’s not too unexpected. I’m happy to have done my part in bringing Blender 2.5 closer up to production ready status over the last several months, and this decision doesn’t necessarily mean I’ll cease contributing, but it will be the end of it for now in this professional capacity. It’s been an interesting time, I’ve had some new experiences, but it’s not what I really want to be doing with myself in the long term – I’m itching to get back into more regular creative production work!

I think what I’ve learned from this is that while some people are happy programming for programming’s sake, It’s really most interesting for me when it’s directly in service of some artistic goal or creative problem to solve. While I’ve done the work to the best of my professional ability, the last several months of report management and bug fixing (I estimate about ~350 fixed since the start) has been a bit motivationally draining, so it’s a good time for change.

So, what next? I’m looking forward to getting stuck into more freelance work again

(hire me! 😉 as well as developing some new skills in other areas and working on some personal projects. Hopefully more interesting times ahead!

quick gecko tvcs

June 8th, 2010 . 5 comments

Recent jobs – quick lighting/setup on a couple more Bridgestone Gecko TVCs in blender 2.5:

3Delight (renderman) in Blender

June 1st, 2010 . 42 comments

For a little while now I’ve been working in my own time on a renderman connection for Blender 2.5. The new render API, while not fully complete and stable, makes it much easier to connect Blender’s scene data to external renderers, via python.

I’m aware that other people are interested in this topic too, but so far I’ve been doing this for my own use – to get more familiar and experienced with renderman in practice (by diving deeper in head first), and to develop something I’d like to use myself as a lighting/shading artist. I’m also concentrating on the 3Delight renderer at the moment, since it interests me most and provides a free single license.

It’s still quite a work-in-progress, and by no means provides exhaustive support at this point. I’m tackling this from a pragmatic angle, with the priority of implementing things I want to use myself first and making that easy to use rather than trying to supporting the entire rispec from the start. I’ll probably release the code very soon, but I would like to clean it up a little bit first.

Here’s a test I rendered out last night, with a model by my mate Tristan Lock:

Anyway, currently it supports: polygon mesh, subdivision surfaces, uv coordinates, depth of field blur, motion blur, surface/displacement/lightsource shaders with parameters available in blender material properties, simple conversion from blender’s lamps to renderman lightsources, shadow maps, raytraced shadows, built-in indirect lighting and environment lighting using 3Delight’s ‘indirectlight’ and ‘envlight2’ shaders, and shader editing and compilation from the blender text editor.

screenshot 01

Node Make Links tool

January 5th, 2010 . 1 comment

Rewrote the node ‘make links’ tool. Now you don’t need to select individual sockets, it automatically makes a best guess about how to connect them up (following a left -> right flow).

Allows fun things like in the video above pressing F multiple times.

gecko on fxguide

November 4th, 2009 . 0 comments

Just came across a ‘quick take’ article about our Bridgestone Gecko work on fxguide: Bridgestone by RedCartel.

blender development

October 24th, 2009 . 16 comments

As some of you may have seen, yesterday during the 2009 Blender conference keynote, Ton Roosendaal announced the addition of another full time blender developer: me! Thanks to the support of a very generous anonymous sponsor, I should be able to survive working from home on Blender development for the next few months.

This came about over the last week or two, so it’s still new for me as well. As far as I’m currently aware, the brief for this project is ‘Get Blender 2.5 ready’. So rather than some of the other things I’ve been working on in my own time such as volume rendering, at least in the near term, this project will involve a fair bit of ui work, fixes, tweaks, cleaning up, attacking the 2.5 todo list, documentation – attacking the main things needed to get the 2.5/2.6 work polished to a professional level.

I also hope to be able to provide support to other developers who are working on other tools, to help polish things for 2.5 where they may not have time to do so themselves. This also includes Brecht and Campbell at the Blender Institute who are busy with Durian – I suspect I’ll be taking on some of their grunt work, so they can concentrate on what’s needed for their production. Hopefully this can alleviate some of the ‘blender open project syndrome’, where features are added quickly to fill a specific need for the team, but aren’t entirely well integrated or fleshed out enough to be fully useful for blender users in general.

So that’s the plan as it stands for now. Depending on how soon these tasks can be done, perhaps there will be time for some other things such as working on python integration related work, render api, or also something I think is desperately needed – design and coding work for a re-written shading/material system. But time will tell!

Klaas Vaak

October 10th, 2009 . 6 comments

We recently finished a cg sequence for ‘Klaas Vaak’, a European children’s TV show. The show’s about the Sand Man (Klaas Vaak), who tells stories and illustrates them with sand drawings, and it looks really fun. We did a 30 second intro sequence and 10 second end credits sequence. The character’s owned by a large theme park, Efteling, and as I understand, some of this stuff will be constructed in real life at the theme park – very cool.

As usual, I did lighting/shading/comp, and some modelling and fur work too. Jeremy Davidson did most of everything else – animation, rigging, particles, etc. In general it went pretty smoothly, although some of the bigger shots full of trees and houses caused some headaches with the amount of geometry. Especially since at the start of the project we were using 32bit systems to render, though we ended up moving to 64bit midway. Only the first few visible ‘layers’ of trees are geometry (well even still, geometry with branch alpha mapped image textures), but after that, much of them are either image planes with baked colour/normal/alpha maps. All in all though, I’m pretty happy with how it turned out.

volume shading updates

October 5th, 2009 . 5 comments

It’s been a little while since I merged the volume rendering work into Blender 2.5 but I’ve been steadily poking away at it since. Today I committed some lighting features, support for volumes receiving external shadows (raytraced, and quick but more limited shadow mapped) and a new shadow only mode that’s a bit faster than self-shading, good for less dense volumes like fog or wispy smoke:

I’ve also had some behind-the-scenes help in the form of code review and some new features from Alfredo de Greef, which has been great, and last week I bit the bullet and redid part of the shading code. It was previously using a custom method left over from initial experiments that wasn’t entirely physically correct – the shader didn’t conserve energy. In the real world, if more light is scattered out of the volume, towards your eye, there will be less left to keep penetrating through the remainder of the volume, but the previous method didn’t account for this.

In reality this also applies on a wavelength-dependent basis too, if the media is such that the red light is scattered out of the volume (from an initial white light shining on it), all that’s left to continue through the rest of the volume is the inverse of that (roughly cyan). I got to work changing this in the code, but after a long time testing realised it was getting very difficult to control. Most of the time, if you’re making a coloured volume (like the excellent coloured smoke in the Cloudy trailer), you want to be able to just set a colour and be done with it. Doing it by tweaking wavelength dependent absorption and scattering was getting to be a real pain, so I ended up chopping and changing things around.

Now there’s a single physically based ‘scattering’ parameter, controlling the amount of light that’s scattered out of the volume (leaving less to continue through), as well as a ‘transmission colour’ that defines the result colour in the rest of the volume, after out-scattering and absorption. With these settings, by default, the shader works physically correctly. For ease of control though, I also added a ‘reflection’ colour and strength which basically acts as an RGB gain, tinting the out-scattered light. It’s more of a non-physical tweak, but it does make life a fair bit easier. I’ve documented these settings with example renders on the blender wiki.

I’m pretty happy with how it’s working now: physically correct by default, but with the option of changing it for artistic control, and philosophically I think that’s how it should be. One of the many things I dislike about Blender’s current shading system is that it generally starts out incorrect, and you have to really understand what’s going on, and work quite hard in order to make it do the right thing (energy conservation, obeying physical laws, etc.). Not only is this a real pain since you have to go through the same chores every time just to get a decent looking material, but for many people who don’t have a good understanding of how rendering/shading works (or should work!) they’re left with sub-par results since they don’t know what magic buttons to press. You should have to work to break it, not to get just a base level of correctness. In further work I do on shading/rendering, that’s going to be a large motivation, to get things working physically plausible by default, but with the ability to break the rules if the situation requires it.

brain

July 9th, 2009 . 4 comments

Earlier this week, I got a CT brain scan done, to get checked out for peace of mind after a sickness-induced seizure I had while away in Morocco. Fortunately, the result came back completely clean and normal, which is great, but as a nice bonus they also gave me the CT scan data on CD. So of course the first thing I did was load it up in OsiriX, have a look, and generate slices to load up in Blender!

It’s pretty amazing what sort of resolution they can capture, in just 512 x 512 x 400 voxels. Not only can it see deep inside, but it also resolves hair and skin pores as well – it’s fascinating. Once again, I’m reminded of how lucky and appreciative I am to live in a country where this sort of medical care is not only readily available, but free under the public health system too.

Images from OsiriX:

Image slice voxels in Blender:

using image slice voxels

June 24th, 2009 . 4 comments

Here’s a quick screencast showing how to use the voxel data texture to load and render image slices as 3D volumes. It may be a little unclear in this small window, but you can click through to Vimeo to see the HD/fullscreen version. This is using the sim_physics branch in blender SVN, you may be able to find builds for your system on graphicall.org.

medical voxel data

June 20th, 2009 . 8 comments

Today I committed some new additions to the blender sim_physics branch, making it easier to load up different types of voxel data sets for volume rendering within Blender. The most significant addition is a new ‘Image Sequence’ file format choice in the voxel data texture, which makes it easy to load up image slice sequences as the Z axis of a 3d voxel grid.

There are some other new features and optimisations mentioned in the commit log too. I really hope this helps people involved in medical visualisation/research, if only by providing them a free method for making animations with case data. If you are in the field, I’d love to hear from you.

Some test renders:

voxels -> vertices

June 11th, 2009 . 4 comments

Made a simple little script last night for testing voxel data loading – it creates vertices of a mesh based on voxel data, if the voxel’s value is above a threshold. The file’s here if you’re interested. The datasets this works with are available here.

I’m working on adding support for these, and also image sequences ( 3D voxel resolution = image X * image Y * number of frames), in Blender’s voxeldata texture, which should be interesting for people wanting to load up medical data. A preview animation is on vimeo.


gecko tvcs

May 27th, 2009 . 1 comment

Some recent Bridgestone Gecko TVCs @ ProMotion. I did shading/lighting/comp.